Showing posts with label Windows. Show all posts

Monday, 8 April 2024

Installing Python & related tools on Windows

Background

In this post, we will see how we can install Python & related tools on the Windows Operating System. 


Installing Python

Let's start with installing Python itself. For this, you can go to the Python official website and download the Windows installer (link). The version at the time I am writing this is Python 3.12.2. You can download the installer based on your Windows architecture. I have Windows 64-bit, so I downloaded the corresponding installer.


You can download and execute the installer. It will install Python and add it to your PATH which will let you execute the Python command on the cmd console or powershell terminal. You can check the Python version by following the command
  • "py --version"
You can also start the py console by just typing "py" in the console.


You can also create a python file with the extension ".py", add python code, and execute it with the command
  • py filename.py


Installing other tools

It is important we install a few other tools to work efficiently with Python.

Pycharm

Let's start with installing IDE. For any programming language, it's important we install an IDE to improve the convenience of use & productivity. I prefer using Pycharm but you could use other alternatives like Eclipse.

You can install the community version of Pycharm from their official site (link). You can scroll down to download and install the community version which is free to use. You can use inbuilt tools like create python project/file, run code, etc. to build and run your code.
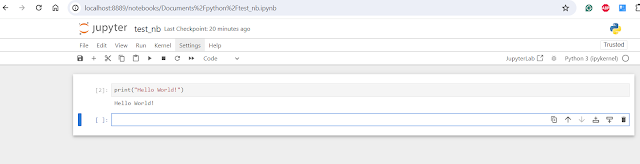

Jupyter Notebook

Next, I would recommend installing Jupiter Notebook. You can use Anaconda distribution to use it (Just install the Anaconda installer and you can use a notebook from it). You can download the installer from here. You can use it as mentioned here. It helps execute code snippets for quick testing.


Recommended links


Sunday, 2 October 2022

How to fix Apostrophes and double quotes not showing up in Windows

 Background

Recently I started using Windows 11 and realized Apostrophes (Single quotes) and double quotes not showing up until I type in the next letter. This behavior is really annoying, especially for me (I am from India/Asia) if you are wondering 😄 . This is most probably because you are using a US-international keyboard. In this post, I will show you how to fix this behavior.


Fixing "Apostrophes and double quotes not showing up in Windows"

As I mentioned before the issue is with you using the US-international keyboard. So you need to fix that.

I am using "Windows 11" so the below steps are keeping that in mind, but you would have similar steps in another version of Windows.


  1. Select Start > Settings > Time & language > Language & region.
  2. Under Preferred languages, select the options from 1st language you are using and click on "Language Options".


  3. Next, go under "Keyboards", here you will see the "US-International" keyboard installed. We need to remove this.
  4. Let's add the Keyboard we intend to use 1st. I am adding English (India) but you can choose the keyboard you want (Let's say English (United Kingdom)).
  5. Now select "US-International" keyboard from the list.


  6. Changes should immediately take effect.

Related Links

How to move TaskBar to the top or side in Windows 11

 Background

I recently started using Windows 11 and noticed there is no way to move windows TaskBar around. It is permanently fixed toward the bottom of the screen. I personally need the TaskBar towards the left or right of the screen and here's why - Our screen (Desktop or Laptop has more horizontal space than vertical space, hence it's only logical to keep TaskBar on the left or right of the screen so that it takes only horizontal space). Though there is no good way to move the TaskBar around there is a registry edit hack that does the trick. 

NOTE: If you are a normal windows user (Have not worked on programming and Windows internals before), I would recommend not to do the below but just live with TaskBar being on the bottom. Follow the below steps only if you know what you are doing and your own risk.

How to move TaskBar to the top or side in Windows 11

  1. Open "Windows Start" and search for "regedit" OR
  2. Go to "Run" (using ⊞ Win+R) and type "regedit" and press enter.


  3. You will get a prompt asking if you want to let the current user make changes to "Registry Editor". Press Ok.
  4. Next from the left hierarchy panel, you need to go to the following entry:
    HKEY_CURRENT_USER\Software\Microsoft\Windows\CurrentVersion\Explorer\StuckRects3
    
  5. Double-click the Settings binary key.

  6. Under "Value data" section click on the entry with the 2nd row and the 6th column (The default value would be 03). 


  7. Press the delete key and replace it with the 01 value to move the taskbar to the top. Press ok.


  8. You can replace them with the following values as you desire
    • 00: Move the Taskbar to the left
    • 01: Move the Taskbar to the top
    • 02: Move the Taskbar to the right
    • 03: Move the Taskbar to the bottom
  9. For changes to take effect you need to restart the "Windows Explorer" process.
    1. You can go to "Task Manager" and restart the "Windows explorer" process. OR
    2. Do it via "Command prompt" via the following commands.
      1. Open the command prompt from the start menu or from the run menu(⊞ Win+R) and "cmd" command.
      2. "taskkill /f /im explorer.exe"
      3. "start explorer.exe"

You will then see Taskbar move to the top of the screen.


NOTE: With the above steps, you can move the TaskBar to the right or left as well, but it's useless (It does not work as expected). Hopefully, Windows 11 team fixes this sooner but we have to live with it for now. I personally am not happy with the above as I really want my TaskBar on the right due to the reasons mentioned in the "Background section" at the top.


Thursday, 29 April 2021

How to fix issue of not able to click anything on Windows 10

 Background

Recently I came across an issue in Windows 10 where I was not able to click on icons. This was a relatively weird issue. What was happening is - I could click either on icons on the taskbar or icons on the desktop but not both. Also, cancel, minimize buttons won't work. This happened when I switched my mouse from USB to wireless. Anyways there are few ways we can fix this which I have listed below.

  1. Restart PC
  2. Restart File Explorer
  3. Use sfc (system file scanner)

Restart PC

Well, why not? This fixed the problem. There is not a lot of problems that restarting cant fix. But this is associated with system reboot time which I hate. I tried this for few times but quickly got tired of it. Restart every time I switch my mouse? Bad idea.


Restart File Explorer

If the issue was with explorer we could quickly try to kill File explorer and restart it. Go to Task Manager by
  • Ctrl + Alt + Delete
  • Ctrl + Shift + Escape
Find Windows Explorer and kill it


You can select the process and click delete. Or right-click and end process. To start it back in the same task manager go to File -> Run New Task (You can Also to Alt+F to open the file menu and then click and then click 'n' for new task)

Once you open a new task window - enter explorer in it and press enter.
Your windows explorer will start again.


Use Systems file checker (SFC)

This is what I use nowadays to fix this issue. My guess is some files get corrupted when I switch mouse or maybe the driver is buggy .. who knows! But running the following command fixes all.

Make sure you run the below command as administrator from the command prompt.
  • sfc /scanall


And the best part - No reboot required. This does take a couple of mins. But you can try browsing or something else at that time :)


Sunday, 29 April 2018

Objective C programming in Windows with GNUStep

Background

Objective C is the programming language that is used for iOS development. To learn iOS development you need a Mac since you need Xcode to develop it. However, there is no such limitation for learning Objective C. So in this post I am going to show you how to compile and run Objective C programs on windows.


Installing GNUstep on Windows

GNUstep is a free development environment that is based on MinGW and MSYS. It has set of tools and compilers (including GCC) that lets you compile objective c programs on windows. To completely install GNUstep you need to install 3 setup files -

  1. GNUstep MSYS System
  2. GNUstep Core
  3. GNUstep Devel
 You can download and install the same from http://www.gnustep.org/windows/installer.html.

Installation : For the full environment for compiling and running GNUstep. Install the following packages in order. First install the gnustep-msys-system package, which contains all the packages required to run GNUstep (shell, graphics libraries, etc). Then install gnustep-core, which contains the core GNUstep libraries. If you want to compile and develop your own GNUstep applications, also install the gnustep-devel package.

The default installation of GNUstep would go to
  • C:\GNUstep

You can also use ProjectCenter which is a GUI extension of GNUStep.

Hello World - Objective C

Now create a new file called helloworld.m and add following content to it -

#import <Foundation/Foundation.h>

int main (int argc, const char * argv[])
{
   NSAutoreleasePool * pool = [[NSAutoreleasePool alloc] init];
   NSLog (@"Hello World!");

   [pool drain];
   return 0;
}

I have saved it at location -
  • C:\GNUstep\home\<username>\Development\helloworld.m

Once you have saved it open the GNUstep shell. For me, it is at the following location -
  • C:\Users\<username>\AppData\Roaming\Microsoft\Windows\Start Menu\Programs\GNUstep
Once you have opened it navigate to the directory you have helloworld.m file. Then run following command -

 gcc -o helloworld helloworld.m -I /GNUstep/System/Library/Headers -L /GNUstep/System/Library/Libraries -lobjc -lgnustep-base -fconstant-string-class=NSConstantString


This should create a helloworld.exe file in the same directory. Now run ./helloworld.exe and it should print "Hello World!". This is captured in the screenshot below -


Related Links

Friday, 30 March 2018

Hello World Xamrin Android project tutorial

Background

Xamrin are set of tools built on .NET framework . It allows you to develop applications for Android, iOS and Windows using C# language and the .NET framework.In this post I am going to show you how to develop a native android application using xamrin.

Setup

For this tutorial you need to have Visual Studio with Xamrin components installed on your Windows operating system. You can get it from Visual Studio installer. Or from Visual Studio you can go to Tools -> Get Tools and Features.


 Hello World Xamrin Android project tutorial

Click on File -> New Project  and choose Blank App(Android)

 One you have created the project you should see following code structure -


 Let's go over some of the important files here -
  1. MainActivity.cs : This is your main launcher activity.
  2. Resources/layout/Main.axml : This is your launcher ctivity layout file
  3. Resources/values/String.xml : This is your string resource file.
Go to  Resources/layout/Main.axml and add a EditText and a Button to the Linear Layout that you have. You can do that from  Designer mode with just drag and drop.


Change the id of EditText and Button to "helloWorldeditText" and "ckickMeButton" respectively. So your source would look like -

<?xml version="1.0" encoding="utf-8"?>
<LinearLayout xmlns:android="http://schemas.android.com/apk/res/android"
    android:orientation="vertical"
    android:layout_width="match_parent"
    android:layout_height="match_parent">
    <EditText
        android:layout_width="match_parent"
        android:layout_height="wrap_content"
        android:id="@+id/helloWorldeditText"
        android:text="Hello World!" />
    <Button
        android:text="Click Me!"
        android:layout_width="match_parent"
        android:layout_height="wrap_content"
        android:id="@+id/ckickMeButton" />
</LinearLayout>
Now go to MainActivity.cs and make following changes. We are basically going to implement a button and  change the text of EditText on the click of the button.
using Android.App;
using Android.Widget;
using Android.OS;

namespace AndroidDemo
{
    [Activity(Label = "AndroidDemo", MainLauncher = true)]
    public class MainActivity : Activity
    {
        protected override void OnCreate(Bundle savedInstanceState)
        {
            base.OnCreate(savedInstanceState);

            // Set our view from the "main" layout resource
            SetContentView(Resource.Layout.Main);
            EditText helloWorldEditText = FindViewById<EditText>(Resource.Id.helloWorldeditText);
            Button clickButton = FindViewById<Button>(Resource.Id.ckickMeButton);
            helloWorldEditText.Text = "Hello World!";
            clickButton.Click += delegate { helloWorldEditText.Text = "Button Clicked!"; };
        }
    }
}


Notice the resource IDs we changed and use to reference it in the code. And that's it. Just deploy the code to an android device or an emulator and test our changes.


Related Links


Sunday, 18 March 2018

How To Set Up an HTTPS Service in IIS

Background

Windows provides Internet information service (IIS) to host your local applications on your windows machine. You need to enable IIS from "Turn Windows features on or off".


Once you have done that you can add an application to it and get started. I have created a youtube video to demo the same -


This video shows how to set up a simple website on IIS and also add https support. I am also going to show how to add https support part in this post.

How To Set Up an HTTPS Service in IIS

First, make sure you have self-signed certificate generated in your IIS manager. To do that go to "Server certificates" in your machine home node inside your IIS manager -


Next, double-click the "Server Certificates" section and make sure a self-signed certificate exists. 


If no certs exist for localhost go ahead and create one using "Create self-signed Certificate". 

Once you have the certificate go to Sites in the navigation panel on the left and click on Default website under sites.


Next, click on "Bindings" in the section on the right and add https binding. Make sure you select correct SSL certificate in the process that we create in previous steps.


Once you are done just click ok and you should have https binding set for your website.


Now you can open your website with https protocol.


Related Links

Sunday, 9 July 2017

How to install wine and run windows programs on your mac

Background

Sometimes it becomes necessary to install windows program on your Linux or mac machine. Like I mentioned in a post sometime back there may be some sites that require IE only -
In this post I will show you how to install wine on your mac. Wine is a very handy software that allows you to install and run windows programs in a windows like simulated environment.


Installing Wine on Mac

You need to have homebrew installed on your mac. If not please refer -
 Next Homebrew uses an extension called Homebrew Cask to install other programs. You can install the Cask extension by running following command -
  • brew tap caskroom/cask


Wine needs -
  • Java and 
  • XQuartz 
as dependencies to be already installed. I am assuming you already have Java installed on your machine and set it up in classpath. You can install  XQuartz with following command -
  • brew cask install xquartz


NOTE :  You can similarly install Java if you already done have it -
  • brew cask install java
 Once dependencies are done you can directly install wine with following command -
  • brew install wine


Also install winetricks -
  • brew install winetricks

 Use winetricks to set environment as windows 7 -
  • winetricks win7

Installing and running Windows program from wine

Go to the directory where you have downloaded your exec file and run -
  • wine installer.exe
where installer.exec is your exe file.

 You can find installed files in dir -
  • /Users/athakur/.wine/drive_c
You can then navigate to program files, find your installed program and run it -


 Once in the program directory you can simply run it as -
  • wine ioexplorer.exe


And you are done :)

Related Links

Wednesday, 28 June 2017

How to access websites on your Mac that requires Internet Explorer

Background

There are certain websites that can be accessed from Internet Explorer only. This happens because of the websites compatibility with IE. But this will not work on your Mac laptop or Linux machine since you cannot run IE on it. At least not in traditional way - You can always install a software like Wine and then run your windows application in that simulated environment. But there is a much simpler way.

How to access websites on your Mac that requires Internet Explorer

I will take Safari browser in our Mac as an example. 
  • Open Safari browser and open preferences from menu bar at the top.
  • Once opened go to "Advanced Tab"
  • In "Advanced Tab" select the "Show Develop menu in menu bar" check box.

  • Once done you should be able to see "Develop" menu in menubar on top. 
  • Under "Develop" menu you can select "User Agent" and then select the user agent you want. For eg - "Internet Explorer 7"

  • Once you select that your IE compatible page should load fine.

 On other operating systems and browser  - Linux/Chrome/Firefox

Above approach was specific to Safari but the solution remains same - You need to change the user agent. So you have plugins to do so -


Similar you can find a similar plugin in chrome store. 

Manual way

    FIREFOX 4.0 :  In Firefox type in the URL Address: about:config. A webpage will appear saying a warning about the use of the Config. Click on the button about you being careful. In the search bar in the Config type agent and look for the variable general.useragent.override. Double click on it and overwrite the value it has with one of the following (For the default leave the value EMPTY):

    IE6 - Mozilla/4.0 (compatible; MSIE 6.0; Windows NT 5.1)
    IE7 - Mozilla/4.0 (compatible; MSIE 7.0; Windows NT 6.0)
    IE8 - Mozilla/4.0 (compatible; MSIE 8.0; Windows NT 6.1)


    CHROME :  Chrome has an about page to CHECK if you have changed your User Agent about: and other options like about:labs, about:memory, about:hang, about:plugins and many others that depending on your version they could be available or not. But for the question at hand this option is not yet in any of the about pages i have found. To have it manually in chrome you need to start chrome with the option user-agent. For example google-chrome --user-agent="Mozilla/4.0 (compatible; MSIE 6.0; Windows NT 5.1)" which will open Chrome like it were IE6. The IE User Agents are from the Firefox option above.

    OPERA : In Opera type in the URL Address: about:config. A list will appear and a search address in the upper part of the list. Type in the search address user agent. The option for User Agen will appear below the search address. Click on it and depending on the Browser you want you have several options that change depending on version. For example:

    1 - Opera (this is the default user agent string used by Opera)
    2 - Mozilla (With the Opera String in it)
    3 - Internet Explorer (With the Opera String in it)
    4 - Mozilla (Without the Opera String in it. 100% Mozilla)
    5 - Internet Explorer (Without the Opera String in it. 100% IE)


    But this values could change so you would need to test each one to know what User Agent value it has.

Related Links

Friday, 17 October 2014

Install and use Git on Windows

Background

There are multiple code versioning tools. Some of them are SVN, Git, Mercurial, Perforce etc. In this post we will see how can we install git on windows and use it to create a local repository of a existing repository on github.

For installing git on Linux from source you can refer to one of my earlier posts - 


Installation

  1. Download the installer from the official git website.
  2. Run the installer. 
  3. If you are a beginner leave every setting in the installation workflow to default except probably the screen that says add git to the classath (This would alter your $PATH env variable).
  4. Finally click on finish to complete the intallation.

Screenshots for installation


Quick way to know if git is installed in your system is to open your command prompt and type git or git --version


If you see above output you have successfully installed git on your System.


Cloning a Git repository from Github

I have a repository on github that I had created fir creating a simple tic-tac-toe android application some time back. I am going to clone the same one. You can view the project at https://github.com/aniket91/TicTacToe

To clone a repository you have to use git clone repoUrl command. 
  •  C:\Users\athakur\GitSources>git clone https://github.com/aniket91/TicTacToe.git


Pushing changed to Github repository

Prior to pushing your changes you need to be aware of the changes that you have made. For that you can use git status command.

  • git status

Before pushing you need to  commit your changes. Use
  • git commit -a OR
  • git commit -m "git commit message"
to confirm your change. You will be asked to provide commit message. An empty commit message will abort the commit.


If you want to redo your commit then you need to execute - 

  • git reset --soft HEAD~1  
This will reset all your commit.

To push your changes you need to execute git push command. 

  • git push


You can see your commit changes on github. Below is the screenshot for my demo changes in this post.


Confused with master, remotes, origin?

You can run the following command to know more about repos your git knows -
  • git branch -a


Here, master is a branch in the local repository. remotes/origin/master is a branch named master on the remote named origin. remotes/origin/HEAD is the default branch for the remote named origin. This lets you simply say origin instead of origin/master.

So master is the branch name where as origin in the remote repo name.

Avoid Merge Commits

Whenever you have unpushed commits on your local and you try to do a git pull after those commits it will create a merge commit .
To avoid it follow one of the below mentioned methods,

  1. run git pull --rebase 
  2. To avoid running it with the rebase flag and to make the above the default behavior when pulling changes, git config --global branch.autosetuprebase always 
  3. In SourceTree under tools->options/preferences under the Git tab select "Use rebase instead of merge by default for tracked branches"

My Git Repositories


Related Links

t> UA-39527780-1 back to top