Showing posts with label Eclipse. Show all posts

Thursday, 11 October 2018

How to install Eclipse plugin manually from a local zip file

Background

Eclipse is an integrated development environment (IDE) used in computer programming and is the most widely used Java IDE. It contains a base workspace and an extensible plug-in system for customizing the environment. You can download Eclipse from their official site - 
It also supports installing the plugin to customize your IDE environment. If you have already used Eclipse you might know how you can install a new plugin. All you need is the sites link where the plugin is hosted and you are all set. You can do this from
  • Help -> Install new Software


In this post, I will show you how to install a plugin downloaded as a zip file from the local disk.

 How to install Eclipse plugin manually from a local zip file

First, make sure your zip file is a valid Eclipse plugin. To verify that you can simply view contents of that zip. You should see two folders-
  1. features,
  2. plugins
The new version of Eclipse might also have following files -
  1. content.jar, 
  2. artifacts.jar
Eg.


 If above files exist then it means this is an archived update site. Once you have verified that your plugin zip file is correct it's time to get it installed.

Now go back to
  • "Help" -> "Install New Software"
Now click on "Add"


 Now click on "Archive"


 Now select the zip file you downloaded earlier. You can leave the name blank. Now click on Ok.

You can now see the plugin details. Select it for installation. Make sure you unselect "Contact all update sites...." checkbox as it can sometimes create problems.

Click "Next", accept terms and conditions and click "Finish".


You should now see a warning that you are installing unsigned content.


You can view the details if you want. Finally, click Ok and restart eclipse for changes to take effect.

 Once installed you can go to -
  • "Help" -> "Installation details" 
to see the installed plugin details.


 You can also uninstall the plugin from here. Just click on the "Uninstall" button at the bottom.


Related Links


Saturday, 2 July 2016

How to add Eclipse Code Formatter file in Android Studio

Background

For those who have used Eclipse before know we can supply a formatter file that can be used to format the code you write. But Android studio does not seem to provide that functionality. In this post we will see how we can use the same formatter file in Android Studio.

How to add Eclipse Code Formatter file in Android Studio

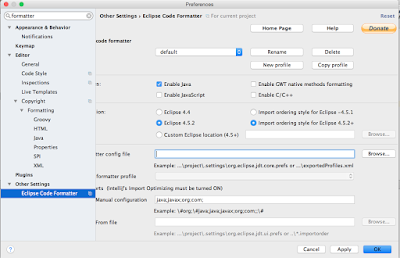
  • Go to Plugins section in Studio. Shortcut is Ctrl + Shift + A and then type plugin.

  • Next in the plugins window go to -> "Browse Repositories".

  • Now search for "Eclipse code formatter" and install it.

  • Post install you will need to restart Studio to activate the plugin. After restart go to preferences and search for formatter , you should see eclipse formatter in the search results. Select it and provide your formatter.

  • That's is! You can then format your code and this formatter will be used.

Sunday, 21 February 2016

Adding Java 8 support to Eclipse kepler

Background

In last post we saw how to use Lambda expressions (well at an introductory level). It is equally important to run it in an IDE like Eclipse to start with. Hence in this post we will see how to compile and run Java 8 compatible code in your Eclipse. Eclipse has a JRE which it uses to compile and run the code and there is compiler compliance level  which basically recognizes your syntax. For example something like below - 

List<String> myList = new ArrayList<>();

won't work with compliance level 6 as the diamond structure was introduced in Java 7. So compliance level 7 is required. We will come to all of this in a moment. This is just a background to get you started. My Eclipse version is Kepler (After upgrading from Juno)- 


NOTE : Eclipse Kepler SR2 & Eclipse Luna are the versions that will support Java 8. Older versions will not (And by not I mean you will see compiler warnings, you can still compile and run if you have Java8 JRE). So of you are using older versions please consider upgrading.

Getting Started

First lets take care of Java compiler compliance level. For that go to Help -> Install new Software


Next add following URL to it and press enter -
  • http://download.eclipse.org/eclipse/updates/4.3-P-builds/
Then select Eclipse java 8 support (for Kepler)


Click Next.Accept TnC and click Finish. Next select 1.8 as compiler compliance level.


You will also need to add JRE 8 as your java runtime (Windows -> Preference -> Installed JREs).


NOTE : Juna 4.4 SR2 already has that. So you can directly download it to save all this migration trouble.

Related Links

Saturday, 20 February 2016

Upgrading Eclipse from Juno to Kepler

Background

In this post I will show you how to upgrade your Eclipse from Juno to Kepler. My current installation details are as follows -


Upgrading Eclipse from Juno to Kepler

  • First you need to add update sites. So go to Windows -> preference. Then search for "Available software sites" and select Add... Then you need to add following 2 sites -
    1. Kepler release repo: http://download.eclipse.org/releases/kepler
    2. Kepler update repo: http://download.eclipse.org/eclipse/updates/4.3
  • Next go to Windows -> Check for Update

  • Previous step may take come time as it checks for new updates. Next select updates as follows -
  • Click Next, accept TnC and click finish to start installation of updates. After installation is complete simply restart Eclipse and you should get Eclipse Kepler.


Monday, 6 October 2014

Web scrapping using Jsoup Java library

Background

Websites are generally intended to humans to visit and go through it's content but we can very well automate this process. What happens when we hit a URL in the browser ? A GET or a POST request is sent to the server, server authenticates the request (if any) and replies with a response - typically a HTML response. Our browser understands the response and renders it in human readable form. If you know this it is no problem for a programmer to automate a REST API using CURL or HTTPClient , parse the response and fetch the interested data. 


Let me go a few steps ahead. Today we have many libraries in many languages that automate the process of sending requests, parsing the response and getting the data you are really interested in. They are know as Web Scrappers and the technique is know as Web scrapping.


Even see a text image validation or captcha before entering a  website ? Well it's there to ensure you are a human and not some bot (automated scripts like the one we will see in this post). Well then one would ask why do we need this web scrapping ? Heard of Google ? How do you think it shows you so accurate search result based on your search query or rather how does it know that a relevant page exists in first place? Yeah well......... web scrapping. Answering how does it get so accurate results is a bit tricky as it involves ranking algorithms and in depth knowledge of data mining. So lets skip that for now :)


Note

Web scrapping is not strictly ethical! and may be termed as hacking in some scenarios. So please check the legal policies of the website before trying anything like that. My intentions here are purely academic in nature :)

So do go ahead play with new libraries, new APIs, learn new things... but by staying withing the rules.

Web scrapping using Jsoup


So coming back to our title of the POST. we are going to use Jsoup library in Java to scrap web pages. As per their homepage info - 

  • jsoup is a Java library for working with real-world HTML. It provides a very convenient API for extracting and manipulating data, using the best of DOM, CSS, and jquery-like methods.
  • jsoup implements the WHATWG HTML5 specification, and parses HTML to the same DOM as modern browsers do.
    •  scrape and parse HTML from a URL, file, or string
    • find and extract data, using DOM traversal or CSS selectors
    • manipulate the HTML elements, attributes, and text
    • clean user-submitted content against a safe white-list, to prevent XSS attacks
    • output tidy HTML jsoup is designed to deal with all varieties of HTML found in the wild; from pristine and validating, to invalid tag-soup; jsoup will create a sensible parse tree.
  • jsoup is designed to deal with all varieties of HTML found in the wild; from pristine and validating, to invalid tag-soup; jsoup will create a sensible parse tree.

Setup & Goal

Goal :  I am going to scrap my own blog - http://opensourceforgeeks.blogspot.in and then print all the post titles that come up in the 1st page.


Setup :

I am going to use Ivy dependency manager and Eclipse as I do for most of my projects.
I am using jsoup version 1.7.3. You can see the version in the maven repository. So my Ivy file looks something like below  -

<ivy-module version="2.0" xmlns:xsi="http://www.w3.org/2001/XMLSchema-instance"
       xsi:noNamespaceSchemaLocation="http://ant.apache.org/ivy/schemas/ivy.xsd">
    <info
        organisation="OpenSourceForGeeks"
        module="WebScrapper"
        status="integration">
    </info>
    
    <dependencies>
    
        <dependency org="org.jsoup" name="jsoup" rev="1.7.3"/>
        
    </dependencies>
   

</ivy-module>


So go ahead build your project, resolve and add Ivy library. This would download the library and set it in your classpath. Create classes, packages to suit your requirement. My project structure looks like -


Code :

Add the following code in your WebScrapper class -

import java.io.BufferedReader;
import java.io.IOException;
import java.io.InputStreamReader;
import java.net.MalformedURLException;
import java.net.URL;
import java.net.URLConnection;
import java.util.Scanner;

import org.jsoup.Jsoup;
import org.jsoup.nodes.Document;
import org.jsoup.nodes.Element;
import org.jsoup.select.Elements;

/**
 * 
 * @author athakur
 *
 */
public class WebScrapper {
    
    public static void main(String args[]) {
        WebScrapper webScrapper = new WebScrapper();
        String page = webScrapper.getPageData("http://opensourceforgeeks.blogspot.in/" );
        Document doc = Jsoup.parse(page);
        Elements elements = doc.select(".post-title > a");
        for(Element element : elements) {
            System.out.println("POST TITLE : " + element.childNode(0).toString());
        }
    }


    public String getPageData(String targetUrl) {
        URL url = null;
        URLConnection urlConnection = null;
        BufferedReader reader = null;
        String output = "";
       
        try {
            url = new URL(targetUrl);
        }
        catch(MalformedURLException e){
        System.out.println("Target URL is not correct. URL : " + targetUrl);
        return null;
        }
       
        try {
            urlConnection = url.openConnection();
            reader = new BufferedReader(new InputStreamReader(urlConnection.getInputStream()));
            String input = null;
            while((input = reader.readLine()) != null){
                output += input;
            }
            reader.close();
        }
        catch( IOException ioException) {
            System.out.println("IO Exception occurred");
            ioException.printStackTrace();
            return null;
        }
       
        return output;
       
    }

    
}


Go ahead, run the program and check the output.

Output

POST TITLE : What is object-oriented programming? - By Steve Jobs
POST TITLE : Experimenting with Oracle 11g R2 database
POST TITLE : Difference between DML and DDL statements in SQL
POST TITLE : Difference between a stored procedure and user defined function in SQL
POST TITLE : IO in Java (Using Scanner and BufferedReader)

Explanation

If you are aware of HTML/CSS  code is quite self explanatory. All you have to understand is how the select query works. If your HTML element had id="myId" we can refer it as #myId. Same goes for class. if your element had class="myClass" we can refer it as .myClass. Select query work exactly the same way. For more on syntax refer - 

In the select query that I have used I am simply saying parse the page and get me all the elements that are a(anchor tag) and are children of Element with class = "post-title". Display text of the anchor tag is the data we are interested in.

How did I know what class or id to search ? Well we need to do some manual searching. In my case first I parsed the whole page, printed it and searched for the pattern I was interested in. You can do the same by going to a page and inspecting the page source code - via browser.

Related Links


Tuesday, 10 June 2014

Change Tomcat Server's timeout in Eclipse

I got the following error on Eclipse while starting Apache Tomcat


So in this post I will show how can we increase the server timeout for Tomcat.

  • Go to the server view

  • Double click the Server. Configuration window would open. On the right hand side you could see Timeouts dropdown tab. You can go in that tab. It will have time limit for start and stop. Change it as per your need.

Default start time limit is 45 second where as stop limit is 15 secs.

Tuesday, 20 May 2014

java.lang.ClassNotFoundException: org.springframework.web.servlet.DispatcherServlet

java.lang.ClassNotFoundException: org.springframework.web.servlet.DispatcherServlet 

I was stuck for last couple of days on this error. So made it the title of this post. A very simple exception - ClassNotFound. We know the jar is missing but what if we know that the exception persists even if the jar is present.

I used Ivy as my dependency manager. To know more on Apache Ivy you can refer to my detailed post I posted earlier.

My directory Structure was


There are two ways to resolve this error

  1. Either move your libraries to WEB-INF/lib . Because this is the folder from where Eclipse searches for corresponding jars. OR
  2. Let Eclipse know that it can search the jars from ivy library folder which is not same as WEB-INF/lib.  So now I will explain how to resolve above problem with 2nd approach in Eclipse.

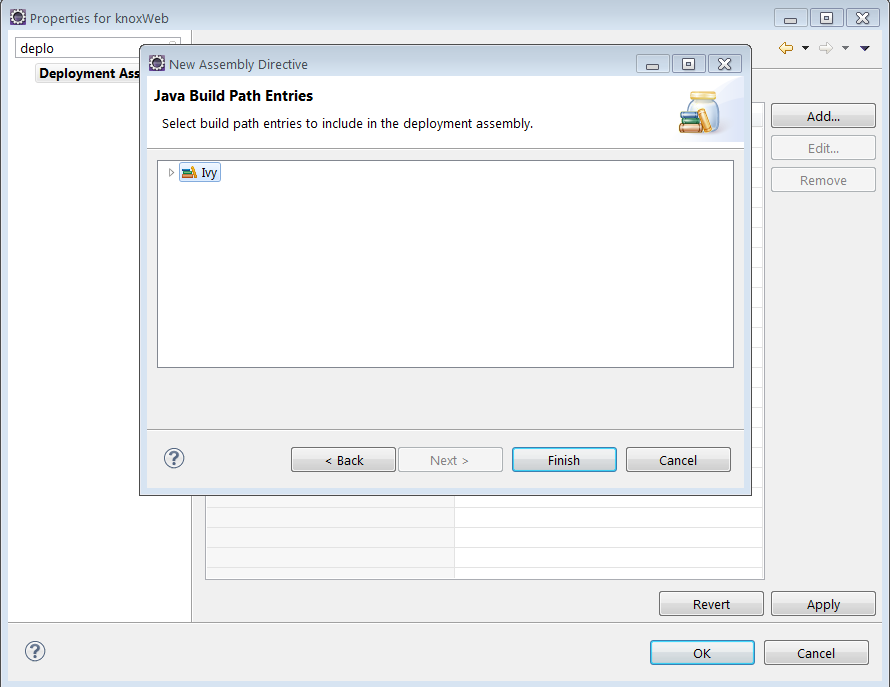
  • Right click the project and select properties. Now go to Deployment Assembly.


  • Now select Add and select Java build path entries.


  • Ivy option is automatically populated. Select that.


  • And you are done.Select Apply and Ok. ClassNotFound Exception vanishes.


That's it for resolving the issue. This issue may also occur if you genuinely don't have the corresponding jar in the lib folder :P . In that case you have to add the Jar. Dependencies I used for my Spring MVC project were

        <dependency org="org.springframework" name="spring-core" rev="4.0.3.RELEASE"/>
        <dependency org="org.springframework" name="spring-context" rev="4.0.3.RELEASE"/>
        <dependency org="org.springframework" name="spring-web" rev="4.0.3.RELEASE"/>
        <dependency org="org.springframework" name="spring-webmvc" rev="4.0.3.RELEASE"/>
        <dependency org="org.springframework" name="spring-beans" rev="4.0.3.RELEASE"/>

Important Links

Sunday, 20 April 2014

Installing and using Apache Ivy as dependency manager.

Apache Ant

Before we head on to Apache Ivy lets take some time to understand Apache ant.  Almost every programmer must be knowing what ant is and must have used it sometime or the other. For those who are not aware of it Ant is a Java library and a command line tool. It is mainly used for building java programs.

What is Apache Ant?

Apache Ant is a Java library and command-line tool whose mission is to drive processes described in build files as targets and extension points dependent upon each other. The main known usage of Ant is the build of Java applications. Ant supplies a number of built-in tasks allowing to compile, assemble, test and run Java applications. Ant can also be used effectively to build non Java applications, for instance C or C++ applications. More generally, Ant can be used to pilot any type of process which can be described in terms of targets and tasks. 

More information about Apache Ant can be found their HomePage. You can download Apache Ant from here.

Getting started with Apache Ant

Lets get started with installation of Apache Ant. This is needed for Apache ivy. Download the zip file from  this link. Go ahead and extract it. I have version 1.7.1 and the folder name is apache-ant-1.7.1.  And I have extracted it in the location C:\Users\athakur\Softwares. 

  •  Open command prompt and type ant. 


You will get ant is not a recognized command . That's right extracting ant is not enough you need to add it to the environment variables so that the command is recognized by the command line.

Now lets add the ant path to environment variables. 

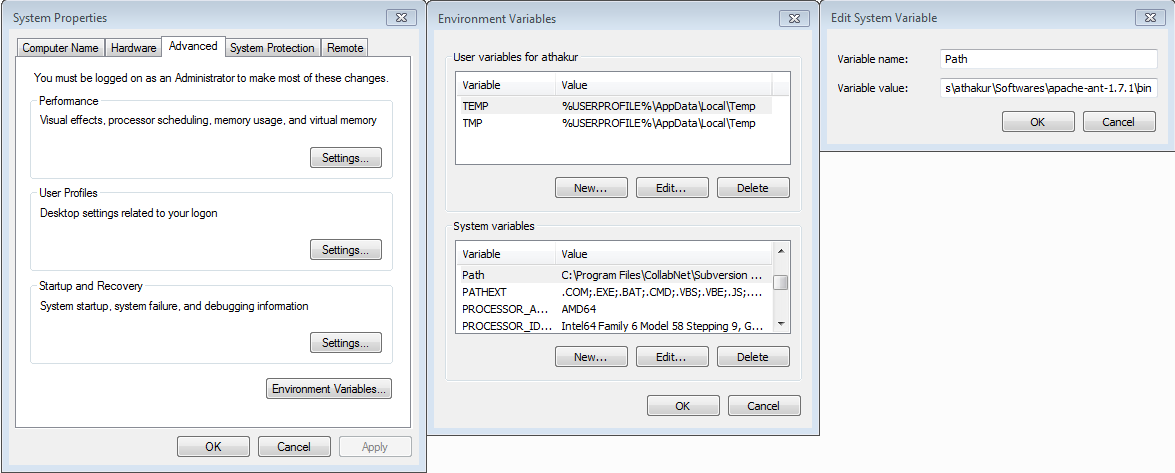
  • Right click on My Computer and select properties . Now on the left Panel under Control Panel Home select Advanced System Properties. Click on it.
You will see a window like below -


At the bottom you can see Environment Variables.. button. Click on it . This will open another window. Under System variables find a variable name PATH. Edit it and append the path to the lib folder under your extracted ant folder to it. For me it is C:\Users\athakur\Softwares\apache-ant-1.7.1\bin.


 And you are done. Again open the command prompt and type ant.  This time you should see some message like build.xml not found. That means ant is now installed. Whenever you execute ant by default it will search for build.xml file in the current folder for the targets to execute.


That's all for the ant.

Using Apache Ant

This post is not really to demonstrate ant usage. So I am skipping this part. But with above setup it should not be very difficult. You can refer to a very simple example below to get started - 


Note : Ant has some predefine ant tasks like javac(for compiling), java(for running) mkdir(creating directory) etc.

What is Apache Ivy?

Apache Ivy™ is a powerful dependencies manager with transitive dependencies support and much more features.

With Apache Ivy you define the dependencies of your module in an xml file, called an ivy-file. Then you usually ask Apache Ivy to retrieve your dependencies to a local lib dir, and it does it for you by locating the artifacts of your dependencies in repositories, such as a maven2 repository for instance.

Dependency Manager ????


Heard of Dependency Manager before? Yes / No ? Lets understand it now.

When ever you are creating a Java Project you may require some additional dependencies. In layman's language you need functionalities that are already implemented and you just import it in your project and use it without wasting time implementing it yourself.  

Let me give an example. Lets say you are creating a Java program that needs to carry out database operation. You will need the driver jar for that. For example JDBC jar for MYSql. What you generally do is download it manually and add it to your projects class path. Looks straightforward isn't it? But now imaging you have hundreds of this dependencies..... does not sound so simple now... does it? Also imagine you have n projects each requiring hundred of same dependencies. You will have to manually download it (once) and add it to classpath of all the projects(n times). To avoid all these there are dependency managers. 

You will have a configuration file per project which defines what dependencies you need. Dependency manager will scan this file download all the dependencies and add it to your projects class path. Smarter way ... isn't it?Want the same for another project simply copy the configuration file to that project. Also since a common cache is maintained for downloaded dependency, dependencies are directly used from cache. So no need to download again.

That's all for why would one go for a dependency manager. 
As far as why would one use Apache Ivy (given that there are other dependency managers like Maven) I would recommend to read their features page and FAQ.  Again I am not saying it is the best dependency manager out there. But I find it simple and powerful enough to suit my basic project needs. 

Installing Apache Ivy

Apache Ivy is already integrated with Apache Ant.Now if you see the lib folder of your ant folder  you will see ivy.jar file there. 

Apache Ivy is integrated with Apache Ant, the most popular Java build management system, so Apache Ivy follows Apache Ant design principles. If you have Apache Ant skills, you already have Apache Ivy skills! The plugin mechanism in Apache Ivy follows the Apache Ant model. Also like Apache Ant, Apache Ivy supports macrodefs and file imports from configuration.

If it is not there no big deal.You may be using an older version. Download the version you want here, unpack the downloaded zip file wherever you want, and copy the ivy jar file into your ant lib directory (ANT_HOME/lib). Here ANT_HOME is your ant folder. 

For more information you can see their Installation page. 

Getting started with Apache Ivy

So lets get started. I use Eclipse so I am going to show how to use Ivy with Eclipse. Of course you can do the same without an IDE as well. You can simply execute command like ant ivy-resolve from command line. Don't worry about the command for now. Only understand it is same with or without and IDE. Only instead of manually executing the commands IDE does it on it's own. 

Note : Without any settings, Ivy retrieves files from the maven 2 repository.

I hope you have installed Eclipse. In Eclipse go to 

  • Help --> Install new Software 
  • In the URL field put http://www.apache.org/dist/ant/ivyde/updatesite
  • Let it fetch the required data. Select the plugin and install it.

You may need to restart Eclipse for changes to get reflected.
After you restart Apache Ivy is all set for use.

Once you install ivy and create a project ivy should be automatically be enabled for that project. But if the project was already created and then you installed ivy then in that case
  • Right click on the project and select add ivy dependency management.
Once that is Done.
  • Again right click the project select new and add ivy.xml file.


It will be in the root of the project. It is an xml file with following syntax

<ivy-module version="2.0" xmlns:xsi="http://www.w3.org/2001/XMLSchema-instance"
       xsi:noNamespaceSchemaLocation="http://ant.apache.org/ivy/schemas/ivy.xsd">
    <info
        organisation=""
        module="TestWebProject"
        status="integration">
    </info>
</ivy-module>

Now lets add some dependencies in it. Lets say you are making a Spring project. So you need Spring framework jars. As mentioned previously Ivy be default looks into maven repository to download dependent jars. So you can search your dependencies there.

So to add Spring jars you will search for spring in the site.


 You will see the dependencies. Each dependency will have

  1. Group 
  2. Artifact ID
  3. Version
Now entries that you make in an ivy file is something like

  • <dependency org="commons-lang" name="commons-lang" rev="2.0"/> 
 To convert this into an Ivy dependency declaration, all you have to do is use the groupId as organization, the artifactId as module name, and the version as revision.

You can find more information about this in their Quick Start page.

I will now add spring-context and spring-core dependencies.

Ivy file will now look like

<ivy-module version="2.0" xmlns:xsi="http://www.w3.org/2001/XMLSchema-instance"
       xsi:noNamespaceSchemaLocation="http://ant.apache.org/ivy/schemas/ivy.xsd">
    <info
        organisation=""
        module="TestWebProject"
        status="integration">
    </info>
    
    <dependencies>
        <dependency org="org.springframework" name="spring-core" rev="4.0.3.RELEASE"/>
        <dependency org="org.springframework" name="spring-context " rev="4.0.3.RELEASE"/>
    </dependencies>
    
</ivy-module>


  • Now simply right click the ivy file and select add Ivy library. This will download the dependencies and add it to your project.
You can see the corresponding jars in the ivy library once above process finishes.


And also you are done. You can search maven repo to find details of dependencies you need for your project and then add it to the ivy file. It's that simple.

Note : For Apache Ivy all dependencies are downloaded once in the folder .ivy which is in your users home folder. For me it is
  • C:\Users\athakur\.ivy
If a dependency is required first this local cache is searched. If found that is used. If not then it is downloaded from the repository.

How Apache Ivy works?


For more details you can refer to their official principle page.

Saturday, 4 May 2013

Most useful shortcuts in Eclipse.

As mentioned earlier for writing and debugging Java code there are two widely used IDE's
  • Eclipse
  • Netbeans
Though each of them have their own pros and cons, Eclipse is the most common choice of the programmers. Main reason being it's simplicity.


So lets take a look at various shortcuts that come handy while using Eclipse.


Manage Files and Projects

Ctrl + N Create new project using the Wizard
Shift + Alt + N Create new project, file, class, etc
Ctrl + Shift + R Open Ressource (file, folder or project)
Ctrl + S Save current file
Ctrl + Shift + S Save all files
Ctrl + W Close current file
Ctrl + Shift + W Close all files
F5 Refresh content of selected element with local file system

Navigate in Editor

Ctrl + L Jump to Line Number. To hide/show line numbers, press ctrl+F10 and select 'Show Line Numbers'
Ctrl + Q Jump to last location edited

Indentions and Comments

Tab / Shift + Tab Increase / decrease indent of selected text
Ctrl + I Correct indention of selected text or of current line
Ctrl + F Autoformat all code in Editor using code formatter
Ctrl + / Comment / uncomment line or selection ( adds '//' )
Ctrl + Shift + / Add Block Comment around selection ( adds '/*... */' )
Ctrl + Shift + J Add Element Comment ( adds '/** ... */')

Editing Source Code

Ctrl + Space Opens Content Assist (e.g. show available methods or field names)
Ctrl + 1 Open Quick Fix and Quick Assist

Code Information

Ctrl + O Show code outline / structure
F2 Open class, method, or variable information (tooltip text)
F3 Open Declaration: Jump to Declaration of selected class, method, or parameter
Ctrl + T Show / open Quick Type Hierarchy for selected item
Ctrl + move over method Open Declaration or Implementation

Refactoring

Alt + Shift + R Rename selected element and all references

Run and Debug

Ctrl + F11 Save and launch application (run)
F11 Debug
F5 Step Into function
F6 Next step (line by line)
F8 Skip to next Breakpoint
F7 Step out
t> UA-39527780-1 back to top