Tuesday 31 December 2013

A glance at Linux achievements - 2013

First of all it's almost time for new year. So wishing everyone a Very happy New Year! May all your wishes come true. And may Linux and FOSS have more amazing next year.


2013 was an amazing year for Linux and it is just not possible to list them all. However I am attempting to list a few ones here.
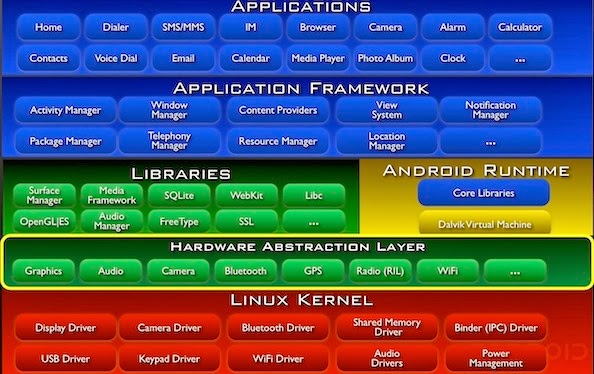
  • ANDROID


    Year 2013 marked a record of Android phone activation. The figure is 1.5 Million devices per day. Over 900 million Android devices have been activated since being introduced in 2008 and this figure is set to hit 1 billion soon. Not to mention behind Android as an OS there is Linux kernel running.
  • Raspberry pi

    One of the greatest development ever in the history of Low cost, single board computer was Raspberry pi. Raspberry pi was intended to promote Linux computing in schools and elsewhere and the board was highly welcomed by the FOSS Community and still continuing.
  • Linux in Space

    Manager of the Space Operations Computing (SpOC) for NASA Keith Chuvala said , "We migrated key functions from Windows to Linux because we needed an operating system that was stable and reliable -- one that would give us in-house control. So if we needed to patch, adjust, or adapt, we could." Distribution used was
    Debian,
  •  SteamOS

    2013 was indeed a great and marvelous year for Linux gaming.
    SteamOS, a debian based distribution was designed for Stream Machine Game Console and released in the mid of December 2013. With the trend of GNU/Linux into gaming environment is certainly a very welcome act.
  • The Firefox OS

    Firefox OS
    (project name: Boot to Gecko, also known as B2G) is a Linux-based open-source operating system for smartphones and tablet computers.It was released in late April 2013. The ARM based Linux distribution for mobile devices, shows promising future.
  • Ubuntu Touch


    Canonical released Ubuntu Touch 1.0, the first developer/partner version on 17 October 2013, along with Ubuntu 13.10 that "primarily supports the Galaxy Nexus and Nexus 4 phones. 
  • Chromebooks

    Chromebooks wins the market of notebook computers, with a lot of high-end manufacturer viz., Samsung, ASUS giving place to GNU/Linux OS over Proprietary OS’s.
  • Kali Linux


    From the developers of BackTrack Linux comes Kali Linux. Kali is a Linux distribution based on Debian, the mother OS which is Primarily developed for Penetration testing and shares a lot of repository of Debian, one of the most rich Distro. Kali Linux holds the record download, in a very less time of its release.
  • Android Kitkat


    One of the Most awaited release was named Kitkat. Google Announced Android 4.4 aka KitKat in September of 2013. Although the release had been expected to be number 5.0 aka Key Lime Pie. Kitkat has been optimised to run on a large variety of devices having a minimum of 512 MB RAM.
  • Miscellaneous

    Linux was not only constrained to desktops, tablets and smartphones but was also used in automobiles, space station, robots etc. 2013 was indeed a great year for Linux and the coming years we may see further boost.

Some memorable Linux milestones


Sunday 29 December 2013

How to reverse a LinkedList in Java?

A very basic interview question asked. In an earlier post we had see the LinkedList class in java and how to reverse it using Collections.revere(). You can refer to that post. Point to note that the LinkedList class defined in java is infact a doubly Linked list and that is not what the interviewer will be interested in.  Yes you can give that as your 1st answer as it will depict you have java knowledge but at some point you will have to fall back to basics.

Before we write the code to actually reverse the LinkedList lets write the code for the LLNode  data structure which will form our LinkedList.

LinkedList Node 

public class LLNode {

    int value;
    LLNode nextNode;

    public  LLNode(int value){
        this.value = value;
    }

    public int getValue() {
        return value;
    }

    public void setValue(int value) {
        this.value = value;
    }

    public LLNode getNextNode() {
        return nextNode;
    }

    public void setNextNode(LLNode nextNode) {
        this.nextNode = nextNode;
    }

    public static void printLL(LLNode head){
        if (head != null){
            System.out.println(head.getValue());
            printLL(head.getNextNode());
        }
    }
}

Note : In this data structure we have also provided a method printLL() to print the Linked List.

Now lets go ahead and write our code to reverse this Linked List

Linked List Reversal

public class LLReverser {

    public static LLNode reverse(LLNode root){

        if(root.getNextNode() == null){
            return root;
        }

        LLNode next = root.getNextNode();
        root.setNextNode(null);

        while(next != null){
            LLNode temp = null;
            if(next.getNextNode() != null)
                temp = next.getNextNode();
            next.setNextNode(root);
            root = next;
            next = temp;
        }

        return root;

    }
}

Now let us test it out

Testing the logic

    public static void main(String args[]){

        LLNode root = new LLNode(1);
        LLNode second = new LLNode(2);
        root.setNextNode(second);
        LLNode third = new LLNode(3);
        second.setNextNode(third);
        LLNode fourth = new LLNode(4);
        third.setNextNode(fourth);

        System.out.println("Before");
        LLNode.printLL(root);
        System.out.println("After");
        LLNode.printLL(LLReverser.reverse(root));

    }

Output :

Before
1
2
3
4
After
4
3
2
1

Saturday 28 December 2013

What is Android Debug Bridge (adb)?

This post is essentially dedicated to understand what Android Debug Bridge (adb) really is. How can we use it.


As we know Android has Linux kernel underneath. To execute a process via we need to provide corresponding command line command. Unless you root your android device you cannot really instal the terminal emulator application. The shell can be accessed via ADB (Android Debug Bridge) command tool.

What is Android Debug Bridge?

Android Debug Bridge (adb) is a versatile command line tool that lets you communicate with an emulator instance or connected Android-powered device. 

It is a client-server program that includes three components: 

  • A client, which runs on your development machine. You can invoke a client from a shell by issuing an adb command. Other Android tools such as the ADT plugin and DDMS also create adb clients.  
  • A server, which runs as a background process on your development machine. The server manages communication between the client and the adb daemon running on an emulator or device. 
  • A daemon, which runs as a background process on each emulator or device instance.  
A client can be you adb shell that you run or your IDE(Eclipse). As for the server you can check the status, kill it or start it through ADB command line tool utility. To check the daemon process you can simply type adb in your android terminal(if rooted).

 To get the overview of ADB refer to following picture

Where can I find ADB tool utility?

You can find the adb tool in <sdk>/platform-tools/. You can download the SDK from here.

More on ADB....

When you start an adb client, the client first checks whether there is an adb server process already running. If there isn't, it starts the server process. When the server starts, it binds to local TCP port 5037 and listens for commands sent from adb clients—all adb clients use port 5037 to communicate with the adb server

The server then sets up connections to all running emulator/device instances. It locates emulator/device instances by scanning odd-numbered ports in the range 5555 to 5585, the range used by emulators/devices. Where the server finds an adb daemon, it sets up a connection to that port. Note that each emulator/device instance acquires a pair of sequential ports — an even-numbered port for console connections and an odd-numbered port for adb connections. For example: 

Emulator 1, console: 5554
Emulator 1, adb: 5555
Emulator 2, console: 5556
Emulator 2, adb: 5557
and so on...


As shown, the emulator instance connected to adb on port 5555 is the same as the instance whose console listens on port 5554.

 Once the server has set up connections to all emulator instances, you can use adb commands to access those instances. Because the server manages connections to emulator/device instances and handles commands from multiple adb clients, you can control any emulator/device instance from any client (or from a script).[Source]


Usage Common Usage Examples

  1.  adb device(shows all the devices with device id the adb server is connected to)
  2. adb help( Shows adb version and all possible commands)
  3. adb start-server(To start adb server if not started already)
  4. adb kill-server(To kill adb server)
  5. adb push <local> <remote>(To push a file from local machine to remote device/emulator)
  6. adb pull <remote> <local>(To get a file from remote device/emulator to local machine)
  7. adb version(Shows version number of adb running)
  8. adb reboot(Reboots the device)
  9. adb root(Restarts the adbd daemon with root priveledges)
  10. adb backup(Used to backup your device. You can backup everything with -all argument)
  11. adb restore (Restore from a backup taken earlier).
  12. adb install (Push and Install a package)
  13. adb uninstall (Uninstall a package)
  14. adb shell(get shell access to your Android device)
Note : How to completely backup your android device has been already covered in a previous post. You can go through that post.


Related Links


Program to create Mirror image of a binary tree.

Question :

Write a Program in Java to print the mirror image of a given binary tree. Example is provided in following diagram


Solution :

Do a normal BFS traversal. In each call copy the left child's content to create right node of the mirror tree and the right child's content to create left child.

Code : 

public class TreeMirrorImageCreator {

    public static Node createMirrorImage(Node originalNode,Node mirroredNode){

        mirroredNode.setValue(originalNode.getValue());

        if(originalNode.getRight() != null){
            mirroredNode.setLeft(createMirrorImage(originalNode.getRight(),new Node(0)));
        }

        if(originalNode.getLeft() != null){
            mirroredNode.setRight(createMirrorImage(originalNode.getLeft(), new Node(0)));
        }

        return mirroredNode;

    }
}

Now lets write the code to test out this code.

    public static void main(String args[]){

        Node root = new Node(1);

        Node l = new Node(2);
        Node r = new Node(3);

        Node l1 = new Node(12);
        Node l2 = new Node(13);

        Node r1 = new Node(6);
        Node r2 = new Node(8);

        root.setLeft(l);
        root.setRight(r);

        l.setLeft(l1);
        l.setRight(l2);

        r.setLeft(r1);
        r.setRight(r2);

        System.out.println("Orig Tree : ");
        LevelTraversal.printLeveltraversal(root);
        Node mirroredRoot = new Node(0);
        TreeMirrorImageCreator.createMirrorImage(root,mirroredRoot);
        System.out.println("Mirrored Tree : ");
        LevelTraversal.printLeveltraversal(mirroredRoot);
}


Note :  Code for the Node data structure and level order traversal can be found here.

Related Links

Thursday 26 December 2013

Deepest left leaf node in a binary tree

Question : 

Given a Binary Tree, find the deepest leaf node that is left child of its parent. For example, consider the following tree. The deepest left leaf node is the node with value 9.

Code:


 public class DeepestLeftLeafNodeFinder {

    Node deepestNode;
    int deepestNodeDepth;

    public Node findDeepestLeftLeafNode(Node root,boolean isLeftNode,int depth){

        if(isLeftNode){
            if(depth > deepestNodeDepth){
                deepestNode = root;
                deepestNodeDepth = depth;
            }
        }

        if(root.getLeft() != null){
            findDeepestLeftLeafNode(root.getLeft(),true,depth + 1);
        }

        if(root.getRight() != null){
            findDeepestLeftLeafNode(root.getRight(),false,depth+1);
        }

        return deepestNode;
    }
}

Test :

    public static void main(String args[]){

        Node root = new Node(1);

        Node l = new Node(2);
        root.setLeft(l);
        Node r = new Node(3);
        root.setRight(r);

        Node l1 = new Node(4);
        l.setLeft(l1);

        Node r1 = new Node(5);
        r.setLeft(r1);
        Node r2 = new Node(6);
        r.setRight(r2);

        Node r12 = new Node(7);
        r1.setRight(r12);

        Node r121 = new Node(9);
        r12.setLeft(r121);

        Node r22 = new Node(8);
        r2.setRight(r22);

        Node r222 = new Node(10);
        r22.setRight(r222);

        System.out.println("Deepest left node of the tree is : " +
                new DeepestLeftLeafNodeFinder().findDeepestLeftLeafNode(root,false,0).getValue());
    }

Output :

Deepest left node of the tree is : 9 

Note : Complexity of above code is O(N) as we are visiting each node at most once. Do let me know if anyone has a better solution.

Wednesday 25 December 2013

Find next right node of a given key

Question : Find next right node of a given key

Given a Binary tree and a key in the binary tree, find the node right to the given key. If there is no node on right side, then return NULL. Expected time complexity is O(n) where n is the number of nodes in the given binary tree.
For example, consider the following Binary Tree. Output for 2 is 6, output for 4 is 5. Output for 10, 6 and 5 is NULL.


Code : 


package in.blogspot.osg.Demo;
import java.util.LinkedList;
import java.util.Queue;

public class RightNodeFinder {
    
    Queue<Node> nodeQueue = new LinkedList<Node>();
    Queue<Integer> levelQueue = new LinkedList<Integer>();
       
    public Node findRightNode(int value, Node root, int level){

        if(value == root.getValue()){
            if(nodeQueue.isEmpty()){
                return null;
            }
            else{
                if(levelQueue.peek() != level){
                    return null;
                }
                else{
                    return nodeQueue.poll();
                }
            }
        }
        else{           
            if(root.getLeft() != null){
                nodeQueue.offer(root.getLeft());
                levelQueue.offer(level + 1);
            }
            if(root.getRight() != null){
                nodeQueue.offer(root.getRight());
                levelQueue.offer(level + 1);
            }
            if(!nodeQueue.isEmpty()){
                return findRightNode(value, nodeQueue.poll(), levelQueue.poll());
            }   
        }
        return null;
    }
}

Now lets test the code. You can see the code for Node data structure in this post


    public static void main(String args[]){
        
        Node root = new Node(10);
        Node l = new Node(2);
        Node r = new Node(6);
        Node l1 = new Node(8);
        Node l2 = new Node(4);
        Node r2 = new Node(5);
        
        root.setLeft(l);
        root.setRight(r);
        l.setLeft(l1);
        l.setRight(l2);
        r.setRight(r2);
        
        System.out.println("Right Node of node with value 10 is : " + new RightNodeFinder().findRightNode(10, root, 0));
        System.out.println("Right Node of node with value 2 is : " + new RightNodeFinder().findRightNode(2, root, 0));
        System.out.println("Right Node of node with value 6 is : " + new RightNodeFinder().findRightNode(6, root, 0));
        System.out.println("Right Node of node with value 8 is : " + new RightNodeFinder().findRightNode(8, root, 0));
        System.out.println("Right Node of node with value 4 is : " + new RightNodeFinder().findRightNode(4, root, 0));
        System.out.println("Right Node of node with value 5 is : " + new RightNodeFinder().findRightNode(5, root, 0));
    }

Output : 


Right Node of node with value 10 is : null
Right Node of node with value 2 is : Data is : null and Value is : 6
Right Node of node with value 6 is : null
Right Node of node with value 8 is : Data is : null and Value is : 4
Right Node of node with value 4 is : Data is : null and Value is : 5
Right Node of node with value 5 is : null

Tuesday 24 December 2013

Finding Height of a binary tree

Question :  

To find height of any binary tree

Code :


public class TreeHeightFinder {

    public static int findHeight(Node root){

        int leftHeight = 0;
        int rightHeight = 0;

        if(root.getLeft() != null){
            leftHeight = findHeight(root.getLeft());
        }
        if(root.getRight() != null){
            rightHeight = findHeight(root.getRight());
        }

        int maxHeight =  max(leftHeight,rightHeight);

        return 1 + maxHeight;

    }

    public static int max(int a,int b){

        return a > b ? a : b;

    }
} 


Now lets build a tree and test it(tree is like below)


    public static void main(String args[]){

        Node root = new Node(1);

        Node l = new Node(2);
        Node r = new Node(3);

        Node l1 = new Node(12);
        Node l2 = new Node(13);

        Node r1 = new Node(6);
        Node r2 = new Node(8);

        root.setLeft(l);
        root.setRight(r);

        l.setLeft(l1);
        l.setRight(l2);

        r.setLeft(r1);
        r.setRight(r2);

        System.out.println("Height is : " + TreeHeightFinder.findHeight(root));
    }


Output :

Height is : 3

Monday 23 December 2013

Replace the data of each node by the sum of data of all its descendent nodes

Question :

Given a Binary Tree, replace the data of each node by the sum of data of all its descendent nodes.(Leaf nodes will have 0)

 Solution : 

The solution is simple recursive one.  For each node you need to set value of the node equal to the sum of value of it's left and right node. Each sub node will in turn calculate their value and based on sum of their children and return the sum with it's original value added.

Before providing the solution lets view the problem graphically

Before we process the tree lets say it is something like below


 The final result we are interested is 

Lets write the code for it. Note the code for Node data structure as well as various traversals is provided in this post which was poster earlier. There is a slight modification that we are adding and int value instance variable along with its getters ans setters. There is corresponding change in the constructor but the logic remains same.

Code : 

package in.blogspot.osg.Demo;

public class ReplaceWithDescendantSum {
    
    public static int replace(Node root){
        
        int rightValue = 0;
        int leftValue = 0 ;
        
        if(root.getRight() != null)
            rightValue = replace(root.getRight());
        if(root.getLeft() != null)
            leftValue = replace(root.getLeft());
        
        int sumOfDesendants = rightValue + leftValue;
        int retunValue = root.getValue() + sumOfDesendants;
        root.setValue(sumOfDesendants);
        return (retunValue);
        
    }
}

Above code will do the job.

 Lets write the main() method to test this out.


    public static void main(String args[]){
        
        Node root = new Node(1);
        Node l = new Node(2);
        Node r = new Node(3);
        
        Node l1 = new Node(12);
        Node l2 = new Node(13);
        
        Node r1 = new Node(6);
        Node r2 = new Node(8);
        
        root.setLeft(l);
        root.setRight(r);
        
        l.setLeft(l1);
        l.setRight(l2);
        
        r.setLeft(r1);
        r.setRight(r2);
        
        System.out.println("***Before***");
        PreOrder.printPreOrder(root);
        ReplaceWithDescendantSum.replace(root);
        System.out.println("**After**");
        PreOrder.printPreOrder(root);
        
    }

Output : 


***Before***
Value : 1
Value : 2
Value : 12
Value : 13
Value : 3
Value : 6
Value : 8
**After**
Value : 44
Value : 25
Value : 0
Value : 0
Value : 14
Value : 0
Value : 0


Sunday 22 December 2013

River Crossing Problem

Question 1

Four people need to cross a rickety bridge at night. Unfortunately, they have only one torch and the bridge is too dangerous to cross without one. The bridge is only strong enough to support two people at a time. Not all people take the same time to cross the bridge. Times for each person:  1 min, 2 mins, 7 mins and 10 mins. What is the shortest time needed for all four of them to cross the bridge?

Answer

The initial solution most people will think of is to use the fastest person as an usher to guide everyone across. How long would that take? 10 + 1 + 7 + 1 + 2 = 21 mins. Is that it? No. That would make this question too simple even as a warm up question.

To reduce the amount of time, we should find a way for 10 and 7 to go together.
So the solution is

1 and 2 go cross
2 comes back
7 and 10 go across
1 comes back
1 and 2 go across (done)

Total time = 2 + 2 + 10 + 1 + 2 = 17 mins


Question 2

A guard is positioned at the one side of bridge say 'A'.
* His task is to shoot all those who try to leave from 'A' to other side say 'B'.
* He also need to welcome the person who come from other side 'B' to his side 'A'.

The guard comes out of his post every 1 hour and looks down the bridge for any people trying to leave.
Monica a brilliant girl is at side 'A' and wish to go to other side 'B'. She also know's it would take her 1:45 hr to cross the river.

She comes with an super idea and able to cross the river.How did Monica cross the river ? 

Answer

Steps
1. Monica go from side A to B for approx 59 minutes
2. Lisa then move back to side A for 2 minutes to fool guard. Now guard will think she is coming to side A.
3. then she again move toward B

Piece of Cake

Question

How would you cut a rectangular cake into two equal pieces when a rectangular piece has already been cut out of it? The cut piece can be of any size and orientation. You are only allowed to make one straight cut.


Possible Solution

  1.  The simplest solution that one might think of is to cut the cake horizontally along the height of the cake. That would divide the cake in exact two equal pieces.This solution won't work if there is some frosting on the top which also needs to be divided.
  2. Other possible solution would be to make a cut such that it passes through center of both the rectangles. Since the cut halves both the rectangles, the resulting two pieces are guaranteed to have equal area.

Friday 20 December 2013

Android operating System Overview and Activity Life cycle


Before getting started with Android development there are some basic prerequisites that you should be aware of
  1. Object-oriented programming concepts. Android makes heavy use of this.
  2. Some experience with Java.
  3. Experience with Eclipse development Environment.
  4. Basic knowledge of Android.

Android Architecture

  1.  Android runs on top of Linux kernel.
  2. Android uses a virtual machine called Dalvik Virtual Machine . This is specially optimized for mobile devices.
  3. Android has an integrated browser based on open source WebKit engine.
  4. Android has OpenGL ES which is embedded version of OpenGL(2D/3D graphics).
  5.  SQLite database for structured data storage.


Android versions

  1. Cupcake (1.5)
  2. Donut (1.6)
  3. Éclair (2.0/2.1)
  4. Froyo (2.2)
  5. Gingerbread (2.3)
  6. Honeycomb (3.0/3.1/3.2)
  7. Ice Cream sandwich (4.0)
  8. Jelly Bean (4.1/4.2/4.3)
  9. Kitkat (4.4)
  10. Lollipop (5.0/5.0.2)

Application Fundamentals

  1. Applications are written in Java programming language.
  2. You compile applications into Android package file(.apk files) which you can then distribute.
  3. Each application run in its own sandbox protected and isolated from other. They also run in their own Linux process.
  4.  Application consists of Components, a Manifest file and resources.

Android Components

  1.  Activities
    1.  Represents a single screen with a user interface.
    2. An application consists of multiple Activities.
    3. When new Activity starts, the old one is pushed onto stack which user can navigate by pressing back key.
    4. Can be built with xml files or directly by Java.
  2. Services
    1. Used to perform long running operations in the background.
    2. No interface.
    3. For example playing music. No matter what you are doing music keeps playing once started.
    4. Can be bound to other application.
  3. Content Providers
    1. Used to store and retrieve data and make it accessible to all the devices.
    2. By default there is no way to share data across different applications.
    3. Exposes public URI to others application.
    4. Uses database model.
    5. Example Contacts, Media etc.
  4. Broadcast receivers
    1. Responds to system wide broadcast announcements
    2. Example when screen turns off Android sends broadcast which your application can listen to. Other example is when battery gets low.
    3. You can also broadcast your own messages which other applications can listen to.
    4. No user interface though they can be used to create status bar notifications.

    Android Manifest File

    1.  Name must be AndroidManifest.xml and must be in Applications root directory.
    2. Gives Android System information about the Application.
    3. Describes components(mentioned above like Activities) used in Application.
    4. Declares permission required to run the application. If you must have notices when you try to install any app from the market store you have to give some permissions. These are given here.
    5. Declares minimum API level. If this is set only people with Android running version more than the API level will be able to view the application on the app store.

    Android Lifecycle


Android Lifecycle Methods

 
  •  onCreate() :This methods is called when activity is created.
    • First call will be to super.onCreate() so that android will do some of it's own initializations.
    • You can set the activity's content view by calling method setContentView().
    • You can get references to various UI components like EditText, Button etc by calling findViewById() method and then attach various listeners to it. Eg you can set onClickListener for button.
  •  onRestart() : This  method will be called when activity is stopped and is about to start again. If there is any logic that you need to execute on activity restart you should add it here.
  • onStart() : [Visible only behavior] This method is  called when the activity is about to start. In this method you should typically add logic to load persistent application state like reading from database.
  • onResume() : [Foreground only behavior ] This method is called when activity is visible  and is about to start interacting with the user. In this method you should do tasks related to activity coming to foreground. For eg. Starting a playback music or starting some animation etc.
  • onPause() :  Opposite of onRsume(). This method is called when activity is about to loose focus. In this method you should do things like stopping animation or stopping playback music... handle things you started in onResume() method. You should also save any data that you need to persist like storing user entered data in database.
  • onStop() :  This is when activity is no longer visible to the user. In this method you should typically cache your activity state in case activity is killed and needs is restarted later.
    • Note : If activity is killed by Android OS then onStop() is not called. So saving any persistent data should be done in onPause() method.
  •  onDestroy() : This method is called when activity is about to be destroyed.  Typical things to do here is release resource hold by your application.
    • Note : Again if activity is killed by Android OS then onDestroy() is not called. So saving any persistent data should be done in onPause() method.


Related Links

Swapping two Strings without using temporary variable.

We saw swapping two numbers without using temporary or third variable(here). Now lets see how can we swap two Strings without using any extra variable.

/**
 * Created with IntelliJ IDEA.
 * User: aniket
 * Date: 20/12/13
 * Time: 8:49 PM
 */
public class StringSwapper {

    public static void main(String args[]){

        String a="one";
        String b="two";

        a= a+b;
        b = a.substring(0,(a.length()-b.length()));
        a = a.substring(b.length(),(a.length()));

        System.out.println("a = "+a);
        System.out.println("b = "+b);

    }


}


Output : 
a = two
b = one


Smarter Way

There is another swart way to do this - use a Special character to concatenate Strings and them split them to swap.

String a="one";
String b="two";
a = a.concat("#" + b);
b = a.split("#")[0];
a = a.split("#")[1];

But the problem with this approach is that you must take care that that the special character you use should not be part of the String

How to reverse Strings and Integers

Strings Reversal

First Lets looks at how can we reverse a String in Java. We can do it two ways

  1. Iterative way
  2. Recursive way 
Both ways are given in the following code

/**
 * Created with IntelliJ IDEA.
 * User: aniket
 * Date: 20/12/13
 * Time: 2:53 PM
 */
public class StringReverser {

    public static String iterativeReverse(String originalString){

        char[] originalStringCharacterArray = originalString.toCharArray();
        StringBuilder reversedString = new StringBuilder();
        for(int i=originalString.length()-1;i>=0;i--){
            reversedString.append(originalStringCharacterArray[i]);
        }
        return reversedString.toString();
    }

    public static String recursiveReverse(String originalString){

           if(originalString.length() == 1){
               return originalString;
           }
            else {
               return recursiveReverse(originalString.substring(1)) + originalString.charAt(0);
           }
    }

    public static void main(String args[]){

        String originalString = "abcdef";

        System.out.println("Revered String by iterative way is : " + StringReverser.iterativeReverse(originalString));
        System.out.println("Revered String by iterative way is : " + StringReverser.recursiveReverse(originalString));

        // For Palindrome simply reverse the String and use .equals()

    }

}
 
Output : 
Revered String by iterative way is : fedcba

For Palindrome you can simply use the above code to get the reversed String and check both using String's .equals() method.

Integer Reversal

Integers reversal is again very easy. You simply should know proper use of % and / operators.


/**
 * Created with IntelliJ IDEA.
 * User: aniket
 * Date: 20/12/13
 * Time: 4:45 PM
 */
public class NumberReverser {

    public static int reverseNumber(int number){

        int reverse = 0;
        while(number != 0){
            reverse = (reverse*10) + (number%10);
            number = number/10;
        }
        return reverse;
    }

    public static void main(String args[]){
        System.out.printf("Reverse of number 1234 is : " + NumberReverser.reverseNumber(1234));

    }

}
Output : 

Reverse of number 1234 is : 4321

Thursday 19 December 2013

Swapping two numbers without using temporary variable

Very basic interview question : Swap two variables without using third or temporary variables.  This serves the purpose of getting started with the interview. There are 3 ways to do this and we will discus all of them now

  1. Addition
  2. XOR operation(bitwise operator)
  3. Multiplication

By Addition


/**

 * Created with IntelliJ IDEA.
 * User: aniket
 * Date: 19/12/13
 * Time: 8:20 PM
 */
public class VariableSwapper {
    public static void main(String args[]){
        int a = 4;
        int b = 5;
        System.out.println("***** Swapping using Addition *****");
        System.out.println("Before Swapping a : " + a);
        System.out.println("Before Swapping b : " + b);
        a = a + b;
        b = a - b;
        a = a - b;
        System.out.println("After Swapping a : " + a);
        System.out.println("After Swapping b : " + b);
    }

}


By XOR operation

 /**
 * Created with IntelliJ IDEA.
 * User: aniket
 * Date: 19/12/13
 * Time: 8:20 PM
 */
public class VariableSwapper {

    public static void main(String args[]){

        int a = 4;
        int b = 5;
        System.out.println("***** Swapping using XOR *****");
        System.out.println("Before Swapping a : " + a);
        System.out.println("Before Swapping b : " + b);
        a = a ^ b;
        b = a ^ b;
        a = a ^ b;
        System.out.println("After Swapping a : " + a);
        System.out.println("After Swapping b : " + b);

    }

}

By Multiplication

/**
 * Created with IntelliJ IDEA.
 * User: aniket
 * Date: 19/12/13
 * Time: 8:20 PM
 */
public class VariableSwapper {

    public static void main(String args[]){

        int a = 4;
        int b = 5;

        System.out.println("***** Swapping using Multiplication *****");

        System.out.println("Before Swapping a : " + a);
        System.out.println("Before Swapping b : " + b);

        a = a * b;
        b = a / b;
        a = a / b;

        System.out.println("After Swapping a : " + a);
        System.out.println("After Swapping b : " + b);

    }

}


Output remains the same except printing the method part.

***** Swapping using Multiplication *****
Before Swapping a : 4
Before Swapping b : 5
After Swapping a : 5
After Swapping b : 4 


XOR logic can be better understood with following diagram


Monday 16 December 2013

Binary Tree Traversal

Background

You must have heard of binary trees. Nothing special about it. Each node has two nodes(right and left). One of the most common interview questions is traversing the tree. There are three common types of traversals -


  1. Pre Order (Root - Left - Right)
  2. In Order (Left - Root - Right)
  3. Post Order (Left - Right - Root)
 We are going to first write code for the data structure that forms the Node which is used further to build the tree. Node class code goes something like below


package in.blogspot.osg.Demo;

public class Node {

    private String data;
    private Node left;
    private Node right;

    public String getData() {
        return data;
    }
    public void setData(String data) {
        this.data = data;
    }
    public Node(String data){
        this.data = data;
    }

    public Node getLeft() {
        return left;
    }
    public void setLeft(Node left) {
        this.left = left;
    }
    public Node getRight() {
        return right;
    }
    public void setRight(Node right) {
        this.right = right;
    }

}


Very simple. In this node structure we have String data and two nodes right and left. We have corresponding getters and setters. Note that data,right and left are instance variables and are assigned default values(null is our case).

Not Lets us build one tree and print various traversals.


package in.blogspot.osg.Demo;

public class MainRun {

    public static void main(String args[]){

        Node root = new Node("Aniket");

        root.setLeft(new Node("Amit"));
        root.setRight(new Node("Anubhav"));

        root.getLeft().setLeft(new Node("Sam"));
        root.getLeft().setRight(new Node("Ram"));

        root.getRight().setLeft(new Node("John"));
        root.getRight().setRight(new Node("Mark"));

        System.out.println("Printing Pre Order Traversal");
        PreOrder.printPreOrder(root);
        System.out.println("**********");
        
        System.out.println("Printing Post Order Traversal");
        PostOrder.printPostOrder(root);
        System.out.println("**********");
        
        System.out.println("Printing In Order Traversal");
        InOrder.printInOrder(root);
        System.out.println("**********");

    }

}


Above tree could be visualize as follows -

Now lets see our actual traversal logic. They are divided into 3 separate classes and each have it's own static method with corresponding logic.

Pre Order


package in.blogspot.osg.Demo;

public class PreOrder {

    /**
     * PreOrder : root-left-right
     * @param root
     */
    public static void printPreOrder(Node root){
        System.out.println("Value : " + root.getData());
        if(root.getLeft() != null){
            printPreOrder(root.getLeft());
        }
        if(root.getRight() != null){
            printPreOrder(root.getRight());
        }
    }
}

Post Order


package in.blogspot.osg.Demo;

public class PostOrder {
    
    /**
     * PostOrder : left-right-root
     * @param node
     */
    public static void printPostOrder(Node root){
       
        if(root.getLeft() != null){
            printPostOrder(root.getLeft());
        }
        if(root.getRight() != null){
            printPostOrder(root.getRight());
        }
        System.out.println("Value : " + root.getData());
    }
}

In Order


package in.blogspot.osg.Demo;

public class InOrder {
    
    /**
     * InOrder : left-root-right
     * @param root
     */
    public static void printInOrder(Node root){
        if(root.getLeft() != null){
            printInOrder(root.getLeft());
        }
        System.out.println("Value : " + root.getData());
        if(root.getRight() != null){
            printInOrder(root.getRight());
        }   
    }
}
Output for the same is

Output : 


Printing Pre Order Traversal
Value : Aniket
Value : Amit
Value : Sam
Value : Ram
Value : Anubhav
Value : John
Value : Mark
**********
Printing Post Order Traversal
Value : Sam
Value : Ram
Value : Amit
Value : John
Value : Mark
Value : Anubhav
Value : Aniket
**********
Printing In Order Traversal
Value : Sam
Value : Amit
Value : Ram
Value : Aniket
Value : John
Value : Anubhav
Value : Mark
**********


Level Order


Leaving the above three types of traversal there is one more type of traversal called level traversal in which we visit all nodes on the same level from left to right before moving on to the next level.


Code for Level traversal goes something like below - 
We need to use queue data structure for this


public class LevelTraversal {

    static Queue<Node> levelQueue = new LinkedList<Node>();

    public static void printLeveltraversal(Node root){

        System.out.println("Value : " + root.getData());

        if(root.getLeft() != null){
            levelQueue.offer(root.getLeft());
        }
        if(root.getRight() != null){
            levelQueue.offer(root.getRight());
        }

        if(levelQueue.size() != 0){
            printLeveltraversal(levelQueue.poll());
        }
    }

}


You can call this function from the same main we defined above output would be as follows


Output : 

Level order Traversal
Value : Aniket
Value : Amit
Value : Anubhav
Value : Sam
Value : Ram
Value : John
Value : Mark


You can uniquely derive the original binary tree give it's
  1. Pre order and in order traversal
  2. Post order and in order traversal
But you cannot determine a unique binary tree with just it's Pre ordee and  Post order traversals. However if you have the constraint that each internal node has both two children then you can very well find the original tree with above data.

Wednesday 11 December 2013

FIFO based Queue implementation in Java

We know we have java.util.Stack as a data structure in Java. It has standard functions like pop(), push(), peek(). But  ever wondered what is analog for Queue in Java?


If you search for Queue class in java then you will wind such an interface java.util package.

public interface Queue<E> extends Collection<E>

And if you check classes implementing this interface you will find LinkedList in it. Yes LinkedList in java can be used for FIFO operations.  Actually LinkedList implements Deque which inturn implements Queue. If you see functions in Queue interface they are as follows -

  1. element(): This method retrieves the head of the queue.
  2. offer(E o): This inserts the specified element into the queue.
  3. peek(): This method retrieves the head of this queue, returning null if this queue is empty.
  4. poll(): This method retrieves and removes the head of this queue, or return null if this queue is empty.
  5. remove(): This method retrieves and removes the head of this queue.

 Lets understand this better with a code -

Code -

import java.util.LinkedList;
import java.util.Queue;

public class FIFOTest {
   
    public static void main(String args[]){
       
        Queue<String> myQueue = new LinkedList<String>();
        myQueue.add("US");
        myQueue.add("Russia");
        myQueue.add("India");
        myQueue.offer("Canada");
       
        for(String element : myQueue){
            System.out.println("Element : " + element);
        }
       
        System.out.println("Queue : " + myQueue);
        System.out.println(myQueue.peek());
        System.out.println("After peek : " + myQueue);
        System.out.println(myQueue.poll());
        System.out.println("After poll : " + myQueue);
        System.out.println(myQueue.remove());
        System.out.println("After remove : " + myQueue);
           
    }
}


Output - 


Element : US
Element : Russia
Element : India
Element : Canada
Queue : [US, Russia, India, Canada]
US
After peek : [US, Russia, India, Canada]
US
After poll : [Russia, India, Canada]
Russia
After remove : [India, Canada]


Note : From usability point of view add() and offer() do the same thing. Same goes for poll() and remove().

Tuesday 10 December 2013

Basic operations with Bitwise operators

Not a Java question as such but a more generic information that would be useful. Most of the interview questions consist of manipulations of bitwise operators. Some basic operations are listed below -

  • OR can be used to set a bit to one: 11101010 OR 00000100 = 11101110
  • AND can be used to set a bit to zero: 11101010 AND 11111101 = 11101000
  • AND together with zero-testing can be used to determine if a bit is set:
11101010 AND 00000001 = 00000000 = 0
11101010 AND 00000010 = 00000010 ≠ 0
  • XOR can be used to invert or toggle a bit:
11101010 XOR 00000100 = 11101110
11101110 XOR 00000100 = 11101010
  • NOT can be used to invert all bits.
NOT 10110010 = 01001101

Friday 6 December 2013

Find GCD of two numbers in Java?

Code :


/**
 * Created with IntelliJ IDEA.
 * User: aniket
 * Date: 6/12/13
 * Time: 4:46 PM
 * To change this template use File | Settings | File Templates.
 */
public class GCDFinder {

    public static int gcd(int a,int b){
        int temp = a % b;
        if(temp == 0)
            return b;
        else
            return gcd(b,temp);
        }

    public static void main(String args[]){
        System.out.println("GCD of 12 and 10 is : " + gcd(12,10));
    }
}

Output :

GCD of 12 and 10 is : 2


Note : You can calculate LCM as Number1*Number2/GCD

Find nth Fibonacci number in Java?

Fibonacci series is as follows

1 1 2 3 5 8 13 21 34...

You can read more about this sequence in Wiki.

Again for this we can have iterative approach as well as recursive. Recursive code is provided below

Recursive Code :


 /**
 * Created with IntelliJ IDEA.
 * User: aniket
 * Date: 6/12/13
 * Time: 3:25 PM
 * To change this template use File | Settings | File Templates.
 */
public class FibonacciFinder {

    public static int fibonacci(int number){

        if(number <= 2){
            return 1;
        }
        else{
            return  fibonacci(number - 1) + fibonacci(number - 2);
        }
    }

    public static void main(String args[]){

        System.out.println("8th fibonacci number is : " + fibonacci(8));


    }

}


Output :

8th fibonacci number is : 21

Iterative Code :


/**
 * Created with IntelliJ IDEA.
 * User: aniket
 * Date: 6/12/13
 * Time: 3:25 PM
 * To change this template use File | Settings | File Templates.
 */
public class FibonacciFinder {
    int prev = 1;
    int curr = 1;
    public int fibonacci(int number){

        if(number < 2){
            return curr;
        }
        else {
            int temp;
            for(int i = 0;i<number-2;i++){
                temp = curr;
                curr = curr + prev;
                prev = temp;
            }
            return curr;
        }
    }

    public static void main(String args[]){

        System.out.println("8th fibonacci number is : " + (new FibonacciFinder()).fibonacci(8));
    }

}

Output:

8th fibonacci number is : 21


Find Power of a number in Java?

There are two ways to find power of a number. One is iterative which is very simple(Just multiply the number power number of times) and other is recursive. Following is the code to get power of a number in recursive way.


Code : 


/**
 * Created with IntelliJ IDEA.
 * User: aniket
 * Date: 6/12/13
 * Time: 3:08 PM
 * To change this template use File | Settings | File Templates.
 */
public class PowerCalculator {

    public static int pow(int base, int power){

        if(power == 1){
            return base;
        }
        if(power % 2 == 0){
            return pow(base, power/2) * pow(base, power/2);
        }
        else {
            return pow(base, power/2) * pow(base, power/2) + base;
        }
    }

    public static void main(String args []){

        System.out.println("4 raise to 2 : " + PowerCalculator.pow(4,2));

    }

}

Output :

4 raise to 2 : 16
t> UA-39527780-1 back to top