
Background
In many business use cases, you need to notify your users over an email. AWS provides its own service to do so. You can use AWS SES (Simple email service) to send out emails to your users. In this post, we will see how we can configure AWS SES service and send out emails.
If you want to skip all the text post below you can refer to the video I have created to cover the same thing -
If you want to skip all the text post below you can refer to the video I have created to cover the same thing -
Setting up configurations in AWS SES service
First and foremost go to SES service in your AWS console. There are limited regions were AWS SES service is available. Please choose one of those regions -

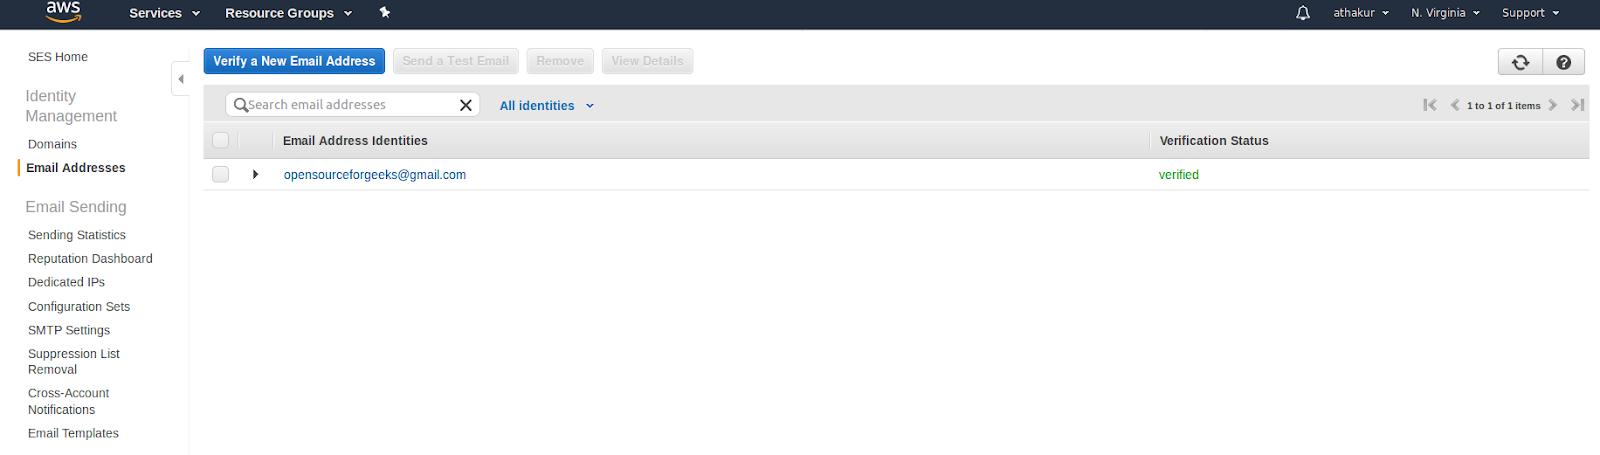
Next thing that you need to do is verify your email address - the address from which you want to send out emails. For this go to "Email addresses" section in the left panel. Now click on "Verify a New Email Address" button. Enter your email address and click "Verify this email address". Once done you should get an email to confirm and validate your email address.

Click on the confirmation link. Once done you should see your email address as verified in SES "Email addresses" section.
Next thing that we would need to setup is email template. The email template is the content that you went send in your email. This would include your unique template name, subject, body etc. Also, this can be parameterized which means you can have placeholders in the template that can be replaced at the runtime. A sample template would be -
HtmlPart is JSON escaped version of your actual HTML content. TemplateName is unique template name for your template that you would reference later from your code to send the mail. SubjectPart is the email subject. For more details refer -
If you have already created the template and want to update it you can execute -
NOTE: You need to have AWS CLI configured on your machine and setup with your AWS profile. I have multiple profiles on my machine which is why you see --profile argument. if you just have one then you do not have to mention it.
Once you have executed this API you can see your template under "Email Templates" section of SES service.

Now that you have your email verified and template setup you can send an email. Following is the node.js code to do it -
In the above code, you can see that we provide the ToAddresses which is an array field. So you can give multiple addresses here. I have used the same email address as the one we have used in the source (from email address - the one we whitelisted and verified in the first step of setup). Also, notice the template name that we have provided - it is the same name we had configures in the json template file. Finally, notice the placeholder value we have provided - for userName. This will be replaced by "athakur" in the template and the email will be sent.
You can find this code snippet in my GitHub gist-
And you should get an email. In my case, it looks as follows -

NOTE: If you are not able to see the mail check your spam folder. Since it is sent by AWS SES service it might land up there. Mark it as non-spam and you should be good going forward.
{
    "Template": {
        "TemplateName": "testtemplate",
        "SubjectPart": "Test email for username {{userName}}",
        "TextPart": "Test email body!",
        "HtmlPart": "<html>\r\n\r\n<head>\r\n    <title>Test Title<\/title>\r\n<\/head>\r\n\r\n<body>\r\n    <h1> Username : {{userName}}<\/h1>\r\n<\/body>\r\n\r\n<\/html>"


    }
}
HtmlPart is JSON escaped version of your actual HTML content. TemplateName is unique template name for your template that you would reference later from your code to send the mail. SubjectPart is the email subject. For more details refer -
Notice how we have added {{userName}} in the subject and text. This is a placeholder that will be replaced at runtime. We will see how in some time. Once your template is set up it is time to add it to AWS SES. To do this you need to call following API -
- aws ses create-template --cli-input-json fileb://test_template.json --region us-east-1 --profile osfg
If you have already created the template and want to update it you can execute -
- aws ses update-template --cli-input-json fileb://test_template.json --region us-east-1 --profile osfg
NOTE: You need to have AWS CLI configured on your machine and setup with your AWS profile. I have multiple profiles on my machine which is why you see --profile argument. if you just have one then you do not have to mention it.
Once you have executed this API you can see your template under "Email Templates" section of SES service.

Now that you have your email verified and template setup you can send an email. Following is the node.js code to do it -
const aws = require('aws-sdk');
aws.config.loadFromPath('./config.json');
const ses = new aws.SES();

/**
 * author: athakur
 * aws ses create-template --cli-input-json fileb://test_template.json --region us-east-1 --profile osfg
 * aws ses update-template --cli-input-json fileb://test_template.json --region us-east-1 --profile osfg
 * @param {*} callback
 */
var sendMail = function (callback) {
    var params = {};

    var destination = {
        "ToAddresses": ["opensourceforgeeks@gmail.com"]
    };
    var templateData = {};
    templateData.userName = "athakur";

    params.Source = "opensourceforgeeks@gmail.com";
    params.Destination = destination;
    params.Template = "testtemplate";
    params.TemplateData = JSON.stringify(templateData)


    ses.sendTemplatedEmail(params, function (email_err, email_data) {
        if (email_err) {
            console.error("Failed to send the email : " + email_err);
            callback(email_err, email_data)
        } else {
            console.info("Successfully sent the email : " + JSON.stringify(email_data));
            callback(null, email_data);
        }
    })
}


sendMail(function(err, data){
    if(err){
        console.log("send mail failed");
    }
    else {
        console.log("Send mail succedded");
    }
})
In the above code, you can see that we provide the ToAddresses which is an array field. So you can give multiple addresses here. I have used the same email address as the one we have used in the source (from email address - the one we whitelisted and verified in the first step of setup). Also, notice the template name that we have provided - it is the same name we had configures in the json template file. Finally, notice the placeholder value we have provided - for userName. This will be replaced by "athakur" in the template and the email will be sent.
You can find this code snippet in my GitHub gist-
And you should get an email. In my case, it looks as follows -

NOTE: If you are not able to see the mail check your spam folder. Since it is sent by AWS SES service it might land up there. Mark it as non-spam and you should be good going forward.
