Background
HtmlUnit is a "
GUI-Less browser for Java programs".
It models HTML documents and provides an API that allows
you to invoke pages, fill out forms, click links, etc...
just like you do in your "normal" browser.
It has fairly good JavaScript support (which is constantly improving)
and is able to work even with quite complex AJAX libraries,
simulating either Firefox or Internet Explorer depending
on the configuration you want to use.
So in this post I am going to host a simple HTML page on a server and use HtmlUnit to get that page and perform click action on the button on that fetched page.
Setting up the server
I am going to use NodeJS to setup the server that renders our simple page with a button. It's a simple fastest way to host a server. You need to have NodeJS installed on your machine for it. I had written a post earlier on it - installation and printing response on server request. You can go through that to setup and go through the basic workflow -
In a directory create two file
index.html and
server.js and put in the following contents in it.
index.html -
<html>
<head>
<title>Hello World!</title>
<script>
function displayHelloWorld()
{
    alert("Hello World");
}
</script>
</head>
<body>
<center>
<h3>Hello World Demo by Open Source for Geeks</h3>
<button type="button" id="buttonId" onclick="alert('Hello world!')">Click Me!</button>
</center>
</body>
</html>
server.js -
var http = require('http'),
fs = require('fs');

fs.readFile('./index.html', function (err, html) {
    if (err) {
        throw err;
    }
    http.createServer(function(request, response) {
        response.writeHeader(200, {"Content-Type": "text/html"});
        response.write(html);
        response.end();
    }).listen(8000);
    console.log('Server running at http://127.0.0.1:8000/');
});
and that's it you can start the server by executing
node server.js
you can then view the page from your browser - http://localhost:8000/
Go ahead click on the button. You should be able to see "Hello World" alert.
Our server is now ready. We are basically trying to automate this click by using HtmlUnit.
Getting Started with HtmlUnit
As usual I am going to use Ivy as my dependency manager and Eclipse as my IDE. You are free to choose yours. I am using 2.15 version (latest) of HtmlUnit [
Link To Maven Repo ].
My Ivy file structure looks something like -
<ivy-module version="2.0" xmlns:xsi="http://www.w3.org/2001/XMLSchema-instance"
       xsi:noNamespaceSchemaLocation="http://ant.apache.org/ivy/schemas/ivy.xsd">
    <info
        organisation="OpenSourceForGeeks"
        module="HtmlUnitDemo"
        status="integration">
    </info>

    <dependencies>
        <dependency org="net.sourceforge.htmlunit" name="htmlunit" rev="2.15"/>
    </dependencies>
</ivy-module>
Lets get to the code now -
Lets create a class called
WebpageButtonClicker.java and add our code in it.
import java.io.IOException;
import java.net.MalformedURLException;

import com.gargoylesoftware.htmlunit.AlertHandler;
import com.gargoylesoftware.htmlunit.FailingHttpStatusCodeException;
import com.gargoylesoftware.htmlunit.Page;
import com.gargoylesoftware.htmlunit.WebClient;
import com.gargoylesoftware.htmlunit.html.HtmlButton;
import com.gargoylesoftware.htmlunit.html.HtmlPage;


public class WebpageButtonClicker {

    public static void main(String args[]) throws FailingHttpStatusCodeException, MalformedURLException, IOException {
        WebClient webClient = new WebClient();
        webClient.setAlertHandler(new AlertHandler() {

            @Override
            public void handleAlert(Page page, String message) {
                System.out.println("Alert was : " + message);

            }
        });
        HtmlPage currentPage = webClient.getPage("http://localhost:8000/");
        HtmlButton button = (HtmlButton) currentPage.getElementById("buttonId");
        button.click();
    }


}
that's it. Now run the Java code. You should see the following output.
Alert was : Hello world!
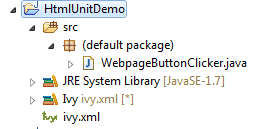
For the reference project structure looks like
Note : See how we have registered a Alert handler in above code. It is a callback that is received on any alert that is triggered. Similarly you can have handlers registered for multiple events like prompt and refresh.
Related Links


