
Apache Ant
Before we head on to Apache Ivy lets take some time to understand Apache ant. Almost every programmer must be knowing what ant is and must have used it sometime or the other. For those who are not aware of it Ant is a Java library and a command line tool. It is mainly used for building java programs.
What is Apache Ant?
Apache Ant is a Java library and command-line tool whose mission is to drive processes described in build files as targets and extension points dependent upon each other. The main known usage of Ant is the build of Java applications. Ant supplies a number of built-in tasks allowing to compile, assemble, test and run Java applications. Ant can also be used effectively to build non Java applications, for instance C or C++ applications. More generally, Ant can be used to pilot any type of process which can be described in terms of targets and tasks.
More information about Apache Ant can be found their HomePage. You can download Apache Ant from here.
Getting started with Apache Ant
Lets get started with installation of Apache Ant. This is needed for Apache ivy. Download the zip file from this link. Go ahead and extract it. I have version 1.7.1 and the folder name is apache-ant-1.7.1. And I have extracted it in the location C:\Users\athakur\Softwares.
- Open command prompt and type ant.

You will get ant is not a recognized command . That's right extracting ant is not enough you need to add it to the environment variables so that the command is recognized by the command line.
Now lets add the ant path to environment variables.
- Right click on My Computer and select properties . Now on the left Panel under Control Panel Home select Advanced System Properties. Click on it.

At the bottom you can see Environment Variables.. button. Click on it . This will open another window. Under System variables find a variable name PATH. Edit it and append the path to the lib folder under your extracted ant folder to it. For me it is C:\Users\athakur\Softwares\apache-ant-1.7.1\bin.
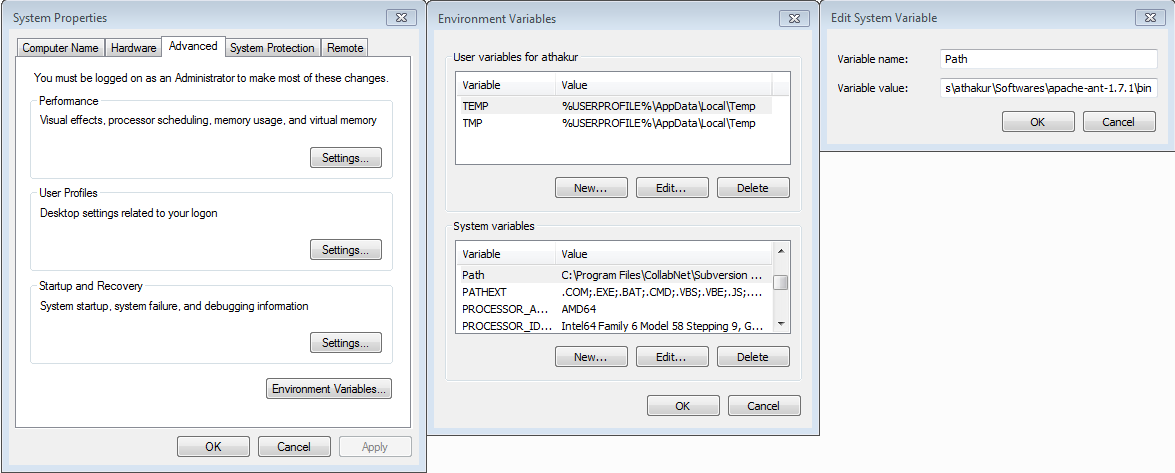
And you are done. Again open the command prompt and type ant. This time you should see some message like build.xml not found. That means ant is now installed. Whenever you execute ant by default it will search for build.xml file in the current folder for the targets to execute.

That's all for the ant.
Using Apache Ant
This post is not really to demonstrate ant usage. So I am skipping this part. But with above setup it should not be very difficult. You can refer to a very simple example below to get started -
Note : Ant has some predefine ant tasks like javac(for compiling), java(for running) mkdir(creating directory) etc.
What is Apache Ivy?
Apache Ivy™ is a powerful dependencies manager with transitive dependencies support and much more features.
With Apache Ivy you define the dependencies of your module in an xml file, called an ivy-file. Then you usually ask Apache Ivy to retrieve your dependencies to a local lib dir, and it does it for you by locating the artifacts of your dependencies in repositories, such as a maven2 repository for instance.
Dependency Manager ????
Heard of Dependency Manager before? Yes / No ? Lets understand it now.
When ever you are creating a Java Project you may require some additional dependencies. In layman's language you need functionalities that are already implemented and you just import it in your project and use it without wasting time implementing it yourself.
Let me give an example. Lets say you are creating a Java program that needs to carry out database operation. You will need the driver jar for that. For example JDBC jar for MYSql. What you generally do is download it manually and add it to your projects class path. Looks straightforward isn't it? But now imaging you have hundreds of this dependencies..... does not sound so simple now... does it? Also imagine you have n projects each requiring hundred of same dependencies. You will have to manually download it (once) and add it to classpath of all the projects(n times). To avoid all these there are dependency managers.
You will have a configuration file per project which defines what dependencies you need. Dependency manager will scan this file download all the dependencies and add it to your projects class path. Smarter way ... isn't it?Want the same for another project simply copy the configuration file to that project. Also since a common cache is maintained for downloaded dependency, dependencies are directly used from cache. So no need to download again.
That's all for why would one go for a dependency manager.
As far as why would one use Apache Ivy (given that there are other dependency managers like Maven) I would recommend to read their features page and FAQ. Again I am not saying it is the best dependency manager out there. But I find it simple and powerful enough to suit my basic project needs.
Installing Apache Ivy
Apache Ivy is already integrated with Apache Ant.Now if you see the lib folder of your ant folder you will see ivy.jar file there.
Apache Ivy is integrated with Apache Ant, the most popular Java build
management system, so Apache Ivy follows Apache Ant design principles.
If you have Apache Ant skills, you already have Apache Ivy skills! The
plugin mechanism in Apache Ivy follows the Apache Ant model. Also like
Apache Ant, Apache Ivy supports macrodefs and file imports from
configuration.
If it is not there no big deal.You may be using an older version. Download the version you want here, unpack the downloaded zip file
wherever you want, and copy the ivy jar file into your ant lib directory
(ANT_HOME/lib). Here ANT_HOME is your ant folder.
For more information you can see their Installation page.
Getting started with Apache Ivy
So lets get started. I use Eclipse so I am going to show how to use Ivy with Eclipse. Of course you can do the same without an IDE as well. You can simply execute command like ant ivy-resolve from command line. Don't worry about the command for now. Only understand it is same with or without and IDE. Only instead of manually executing the commands IDE does it on it's own.
Note : Without any settings, Ivy retrieves files from the maven 2 repository.
I hope you have installed Eclipse. In Eclipse go to
- Help --> Install new Software
- In the URL field put http://www.apache.org/dist/ant/ivyde/updatesite
- Let it fetch the required data. Select the plugin and install it.

You may need to restart Eclipse for changes to get reflected.
After you restart Apache Ivy is all set for use.
Once you install ivy and create a project ivy should be automatically be enabled for that project. But if the project was already created and then you installed ivy then in that case
- Right click on the project and select add ivy dependency management.
- Again right click the project select new and add ivy.xml file.

It will be in the root of the project. It is an xml file with following syntax
<ivy-module version="2.0" xmlns:xsi="http://www.w3.org/2001/XMLSchema-instance"
       xsi:noNamespaceSchemaLocation="http://ant.apache.org/ivy/schemas/ivy.xsd">
    <info
        organisation=""
        module="TestWebProject"
        status="integration">
    </info>
</ivy-module>
Now lets add some dependencies in it. Lets say you are making a Spring project. So you need Spring framework jars. As mentioned previously Ivy be default looks into maven repository to download dependent jars. So you can search your dependencies there.
So to add Spring jars you will search for spring in the site.

You will see the dependencies. Each dependency will have
- Group
- Artifact ID
- Version
<dependency org="commons-lang" name="commons-lang" rev="2.0"/>
You can find more information about this in their Quick Start page.
I will now add spring-context and spring-core dependencies.
Ivy file will now look like
<ivy-module version="2.0" xmlns:xsi="http://www.w3.org/2001/XMLSchema-instance"
       xsi:noNamespaceSchemaLocation="http://ant.apache.org/ivy/schemas/ivy.xsd">
    <info
        organisation=""
        module="TestWebProject"
        status="integration">
    </info>

    <dependencies>
        <dependency org="org.springframework" name="spring-core" rev="4.0.3.RELEASE"/>
        <dependency org="org.springframework" name="spring-context " rev="4.0.3.RELEASE"/>
    </dependencies>

</ivy-module>
- Now simply right click the ivy file and select add Ivy library. This will download the dependencies and add it to your project.

And also you are done. You can search maven repo to find details of dependencies you need for your project and then add it to the ivy file. It's that simple.
Note : For Apache Ivy all dependencies are downloaded once in the folder .ivy which is in your users home folder. For me it is
- C:\Users\athakur\.ivy
How Apache Ivy works?

For more details you can refer to their official principle page.

