
Background
In this post we will see how to add a new user using command line. Then we will add it to sudoers list which will essentially make this user administrator. Next we will also see how can we personalize this new users profile and then we will see how we can change permissions or copy files from other users directory to this new users. We will also see how to remove an existing user and how to list files that belong to a user/group. And all of it with command line :)


Adding a new User
If you want to see list of existing user then you can browse the file /etc/passwd
- less /etc/passwd
To add new user use following command -
- sudo adduser <username>
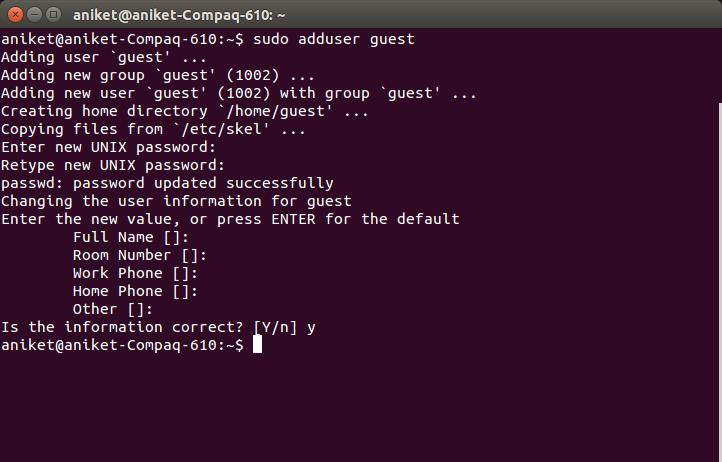
User should get created now. To verify
- You can see directory with same username getting created in /home folder.
- You can also inspect contents of /etc/passwd file. You should now start seeing row corresponding to this new user

Lastly to change user you can use following command
- su <username>
Adding user to sudoers list
Just creating a user will not grant it administrative privileges. This user can't use sudo command and thereby not execute tasks that requires administrative privileges.
To add a user to sudoers list you can execute following command -
- sudo adduser <username> sudo

Personalizing User profile
What I mean here by personalizing is setting environment variables and aliases that user will need in his or her daily usage. For example lets say a developer create his/her account and now want JAVA_HOME variable set. Sure it can be exported and be done for the day but lets see how we can permanently set it.
All of this magic happens in a file called .bashrc that is located in the home folder of user. You can export your variable or set aliases here. For eg
- export PATH=$PATH:$HOME/firefox/adt-bundle-linux-x86-20140702/sdk/tools:$HOME/firefox/adt-bundle-linux-x86-20140702/sdk/build-tools:$HOME/firefox/adt-bundle-linux-x86-20140702/sdk/platform-tools
For demo purpose lets create an alias to print hello world. Go to ~/.bashrc file and add following line
- alias hw='echo hello world!'

This was just an example you can set alias to command use frequently use.
Note : If you making any change in the .bashrc file you will have to open a new terminal window to see the effects. If you want to see the changes in same terminal you have to use source command as show in screenshot above.
- source ~/.bashrc
Changing file permissions
To change a permission of a file or a folder you can use chmod command. Yo give all read, write and execute permissions to all - user, group, others you can use -
- chmod ugo+rwx filename
- u = user
- g = group
- o = others
- r = read
- w = wite
- x = execute
- + = adds the specified modes to the specified classes
- - = removes the specified modes from the specified classes
- = = the modes specified are to be made the exact modes for the specified classes
- r = 4
- w = 2
- x = 1
Use this with caution. You don't want to give others unauthorized access to your profile.
Also if you want to do this action recursively you can use -R option.
If you want to change ownership of a file or a directory you can use chown command.
To change file owner user you can use
- sudo chown <username> <filename>
- sudo chown :<groupname> <filename>
Or to change both user and group simultaneously
- sudo chown <username>:<groupname> <filename>

Removing an User
To remove an existing user simply execute following command -
- sudo userdel <username>
Note : Though user gets deleted it's home directory will not get deleted. You have to manually delete it. To delete users home directory use following command
- sudo rm -rf /home/<user_directoryname>
Finding all files owned by a particular User/Group
For finding files owned by a group you can use
- find directory-location -group {group-name} -name {file-name}
- find directory-location -user {username} -name {file-name}

