Sunday 29 April 2018

Objective C programming in Windows with GNUStep

Background

Objective C is the programming language that is used for iOS development. To learn iOS development you need a Mac since you need Xcode to develop it. However, there is no such limitation for learning Objective C. So in this post I am going to show you how to compile and run Objective C programs on windows.


Installing GNUstep on Windows

GNUstep is a free development environment that is based on MinGW and MSYS. It has set of tools and compilers (including GCC) that lets you compile objective c programs on windows. To completely install GNUstep you need to install 3 setup files -

  1. GNUstep MSYS System
  2. GNUstep Core
  3. GNUstep Devel
 You can download and install the same from http://www.gnustep.org/windows/installer.html.

Installation : For the full environment for compiling and running GNUstep. Install the following packages in order. First install the gnustep-msys-system package, which contains all the packages required to run GNUstep (shell, graphics libraries, etc). Then install gnustep-core, which contains the core GNUstep libraries. If you want to compile and develop your own GNUstep applications, also install the gnustep-devel package.

The default installation of GNUstep would go to
  • C:\GNUstep

You can also use ProjectCenter which is a GUI extension of GNUStep.

Hello World - Objective C

Now create a new file called helloworld.m and add following content to it -

#import <Foundation/Foundation.h>

int main (int argc, const char * argv[])
{
   NSAutoreleasePool * pool = [[NSAutoreleasePool alloc] init];
   NSLog (@"Hello World!");

   [pool drain];
   return 0;
}

I have saved it at location -
  • C:\GNUstep\home\<username>\Development\helloworld.m

Once you have saved it open the GNUstep shell. For me, it is at the following location -
  • C:\Users\<username>\AppData\Roaming\Microsoft\Windows\Start Menu\Programs\GNUstep
Once you have opened it navigate to the directory you have helloworld.m file. Then run following command -

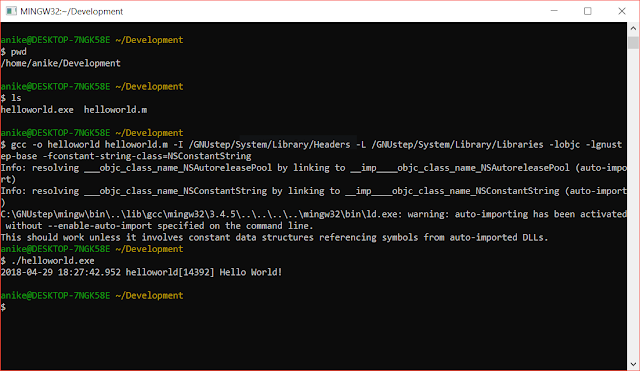
 gcc -o helloworld helloworld.m -I /GNUstep/System/Library/Headers -L /GNUstep/System/Library/Libraries -lobjc -lgnustep-base -fconstant-string-class=NSConstantString


This should create a helloworld.exe file in the same directory. Now run ./helloworld.exe and it should print "Hello World!". This is captured in the screenshot below -


Related Links

Friday 13 April 2018

Understanding Delegates in C#

Background

Delegates are a very important part of C# programming language. A delegate in C# holds a reference to a method. Think of it as a pointer to the method. This reference or pointer can change at runtime. A delegate can also reference multiple methods and can invoke them all together. Think about event listeners for a Button in UI. You can add as many event listeners as you want and when the button is clicked all methods get the callback - much like the Observer Design Pattern. In this post well see how delegates work with an example.

Understanding Delegates in C#

Syntac of a delegate declaration is -
  • delegate <return type> <delegate-name> <parameter list>
For eg. consider -
  • public delegate void PriceChangeDelegate(int oldPrice, int newPrice); 

Now this delegate can point to any method that has return type void and parameters list (int, int). We will see a demo in a while. But the declaration syntax should be clear now.

So for this demo idea is to define an Item Object and with an attribute call price and we want to provide our own callback to receive updates whenever price of the item changes. We will do this using a delegate.

So let's first define our Item class -

namespace HelloWorld
{
    class Item
    {
        private int price;
        public PriceChangeDelegate PriceChanged;
        public int Price {
            get { return price; }
            set {
                if(value != 0)
                {
                    if(value != price)
                    {
                        PriceChanged(price, value);
                    }
                    price = value;
                }
            }
        }
    }
}


Notice how have created a private variable price (lower case by convention) and then a public property called Price (uppercase by convention) to encapsulate the price. Set method of this property is where our logic is. We are calling the delegate  PriceChanged when the old value price is different than current value. Also, notice how we have declared a public delegate member in class -
  • public PriceChangeDelegate PriceChanged;
 However, we have not yet declared our delegate type PriceChangeDelegate anywhere. Let's do that now -

namespace HelloWorld
{
    public delegate void PriceChangeDelegate(int oldPrice, int newPrice);
}


And there we go. Now our delegate instance can point to any methods of return type void and parameters (int, int) like we saw before. Now let's see all of this in action.


namespace HelloWorld
{
    class Program
    {
        public static void Main(string[] args)
        {
            Item item = new Item();
            item.PriceChanged = new PriceChangeDelegate(ItemPriceChangeCallback);
            item.Price = 100;
            Console.ReadLine();
        }
        public static void ItemPriceChangeCallback(int oldPrice, int newPrice) {
            Console.WriteLine("Item price changed from " + oldPrice + " to " + newPrice);
        }
    }
}


Here we are creating an instance of Item and setting a value for price to 100. Note the default value of primitive int is 0. So now when we set it to 100 we are essentially changing the price of the item. Also before that, we are assigning the delegate to the method we have locally called ItemPriceChangeCallback. So when items price will be changed ItemPriceChangeCallback will be called and our statement should get printed. Let's give it a try.


So that worked! Now like I said before a delegate can reference multiple methods as long as return type and paramters are same. Let's see how we can do that. Let's change our previous code a bit.


namespace HelloWorld
{
    class Program
    {
        public static void Main(string[] args)
        {
            Item item = new Item();
            item.PriceChanged += new PriceChangeDelegate(ItemPriceChangeCallback1);
            item.PriceChanged += new PriceChangeDelegate(ItemPriceChangeCallback2);
            item.Price = 100;
            Console.ReadLine();
        }
        public static void ItemPriceChangeCallback1(int oldPrice, int newPrice) {
            Console.WriteLine("ItemPriceChangeCallback1 :: Item price changed from " + oldPrice + " to " + newPrice);
        }
        public static void ItemPriceChangeCallback2(int oldPrice, int newPrice)
        {
            Console.WriteLine("ItemPriceChangeCallback2 : Item price changed from " + oldPrice + " to " + newPrice);
        }
    }
}


and the output is -


Notice our syntax for assigning delegate has changed. Instead of assigning we are adding it now -

  • item.PriceChanged += new PriceChangeDelegate(ItemPriceChangeCallback1);
  • item.PriceChanged += new PriceChangeDelegate(ItemPriceChangeCallback2);
instead of

  • item.PriceChanged = new PriceChangeDelegate(ItemPriceChangeCallback);

 We have defined two methods ItemPriceChangeCallback1 and ItemPriceChangeCallback2 to show this behavior. You can have as many as you wish as long as delegate contract in honoured - same return type and parameters type and number.

Also note you need not use new keyword again and again. C# compiler is intellegent enough to do this itself. You can simply do.

  • item.PriceChanged += ItemPriceChangeCallback1;
  • item.PriceChanged += ItemPriceChangeCallback2;
 It would give the same result.

Lastly you can remove all references by setting delegate as null -
  • item.PriceChanged = null;
 You would get a Null reference exception since are using delegate without instantiating our delegate and it is null by default. But this is not a desired behavior. To avoid this we can define our delegate as event. For this go back to our Item class and change -
  • public PriceChangeDelegate PriceChanged;
to
  • public event PriceChangeDelegate PriceChanged;
 and you can see that assigning null to PriceChanged is no longer possible.


 And that's all for delegates. Post your questions in comments below. Thanks.


Thursday 5 April 2018

How to use a file to store all your logs in Xamrin Android App

Background

You can see the debug logs in the Device Log tab in Visual studio but you need to connect a USB to your android phone (not needed if you are using an emulator). However this is for realtime debugging and will not be useful to check logs that were present couple of hours back. In this post I will show you how you can log into a file in the android sd card so that you can refer it at any point in time to see what has happened.


How to use a file to store all your logs in Xamrin Android App

You can log to a file using following code snippet -

using System;
namespace Com.Osfg
{
    public class LogUtils
    {
        String logFilePath = null;

        public LogUtils()
        {
            String path = Android.OS.Environment.ExternalStorageDirectory.Path;
            logFilePath = System.IO.Path.Combine(path, "log.txt");
            if(!System.IO.File.Exists(logFilePath))
            {
                using (System.IO.StreamWriter writer = new System.IO.StreamWriter(logFilePath, true))
                {
                    writer.WriteLine("Starting logging at " + DateTime.Now.ToString());
                }
            }
        }

        public void Log(String message)
        {
            using (System.IO.StreamWriter writer = new System.IO.StreamWriter(logFilePath, true))
            {
                writer.WriteLine(DateTime.Now.ToString() + " : " + message);
            }
        }
    }
}

Let's uderstand whats happening here -

In the constructor we are getting the external storage directory and creating a file called "log.txt" there. We are checking if the file already exists and if it does not we create it. Now anyone who want to log to this file can simple create an instance of LogUtils and call Log method on it.

You can do this on OnCreate of your main activity. For me external storage file is - /storage/emulated/0 so my complete log file path is /storage/emulated/0/log.txt

Make sure you have provided appropriate permissions in the manifest file -

<uses-permission android:name="android.permission.WRITE_EXTERNAL_STORAGE" />
<uses-permission android:name="android.permission.READ_EXTERNAL_STORAGE" />


Related Links


t> UA-39527780-1 back to top