Showing posts with label Objective-C. Show all posts

Tuesday, 22 May 2018

How to upload files to S3 from iOS app written in Objective C using AWS Cognito identity pool

Background

This post assumes you have setup Cognito identity pool as explained in the previous post -
If not, then please refer the previous post and set that up. Before starting with using this you should have -
  1. Identity pool ID
  2. AWS region where pool and S3 bucket reside
  3. S3 bucket name
We will use above in configuration and implementation that follows.

How to upload files to S3 from iOS app written in Objective C using AWS Cognito identity pool

  • First, go to your pod file and update following dependencies -

# Uncomment the next line to define a global platform for your project
# platform :ios, '9.0'


target 'TestApp' do
  # Uncomment the next line if you're using Swift or would like to use dynamic frameworks
  # use_frameworks!
  # Pods for TestApp


pod 'AWSMobileClient', '~> 2.6.18'  # For AWSMobileClient
pod 'AWSS3', '~> 2.6.18'            # For file transfers
pod 'AWSCognito', '~> 2.6.18'       # For data sync

end

  • Next run "Run pod install --repo-update" from the command line
  • Once you have the dependencies installed we can now write Objective C code to upload a file to S3.


//
//  FileUploader.m
//  TestApp
//
//  Created by Aniket on 22/05/18.
//


#import <Foundation/Foundation.h>


#import "FileUploader.h"
#import <AWSS3/AWSS3.h>
#import <AWSCore/AWSCore.h>


@implementation FileUploader


static AWSS3TransferManager *transferManager;


+ (void) initialize {
    
    if (self == [FileUploader class]) {
        AWSCognitoCredentialsProvider *credentialsProvider = [[AWSCognitoCredentialsProvider alloc] initWithRegionType:AWSRegionUSEast1 identityPoolId:@"us-east-1:f847843f-0162-43c2-b73f-efdc7c69cce2"];
        AWSServiceConfiguration *configuration = [[AWSServiceConfiguration alloc] initWithRegion:AWSRegionUSEast1 credentialsProvider:credentialsProvider];
        [AWSS3TransferManager registerS3TransferManagerWithConfiguration:[[AWSServiceConfiguration alloc] initWithRegion:AWSRegionUSEast1 credentialsProvider:credentialsProvider] forKey:s3TransferManagerKey];


        AWSServiceManager.defaultServiceManager.defaultServiceConfiguration = configuration;
                                        
        transferManager = [AWSS3TransferManager S3TransferManagerForKey:s3TransferManagerKey];
    }
    
}


+ (void)uploadFile
{
    
    
    NSURL *uploadingFileURL = [NSURL fileURLWithPath: @"PATH_TO_FILE";
    AWSS3TransferManagerUploadRequest *uploadRequest = [AWSS3TransferManagerUploadRequest new];
    
    
    uploadRequest.bucket = s3Bucket;
    int timestamp = [[NSDate date] timeIntervalSince1970];
    uploadRequest.key = [NSString stringWithFormat:@"%@-%d%@",@"testfile",timestamp,@".txt"];
    uploadRequest.body = uploadingFileURL;
    
    [[transferManager upload:uploadRequest] continueWithExecutor:[AWSExecutor mainThreadExecutor]
                                                       withBlock:^id(AWSTask *task) {
                                                           if (task.error) {
                                                               if ([task.error.domain isEqualToString:AWSS3TransferManagerErrorDomain]) {
                                                                   switch (task.error.code) {
                                                                       case AWSS3TransferManagerErrorCancelled:
                                                                       case AWSS3TransferManagerErrorPaused:
                                                                           break;
                                                                           
                                                                       default:
                                                                           NSLog(@"Error uploading file to S3: %@", task.error);
                                                                           break;
                                                                   }
                                                               } else {
                                                                   // Unknown error.
                                                                   NSLog(@"Error uploading file to S3: %@", task.error);
                                                               }
                                                           }
                                                           
                                                           if (task.result) {
                                                               AWSS3TransferManagerUploadOutput *uploadOutput = task.result;
                                                               // The file uploaded successfully.
                                                               NSLog(@"uploading file to S3 was successful: %@", uploadOutput);
                                                           }
                                                           return nil;
                                                       }];
    
}
@end


In above code replace the identity pool id and region as per your configuration settings. This is Objective C code, if you want to see Swift or Android - Java please refer https://docs.aws.amazon.com/aws-mobile/latest/developerguide/how-to-integrate-an-existing-bucket.html

Related Links

Sunday, 29 April 2018

Objective C programming in Windows with GNUStep

Background

Objective C is the programming language that is used for iOS development. To learn iOS development you need a Mac since you need Xcode to develop it. However, there is no such limitation for learning Objective C. So in this post I am going to show you how to compile and run Objective C programs on windows.


Installing GNUstep on Windows

GNUstep is a free development environment that is based on MinGW and MSYS. It has set of tools and compilers (including GCC) that lets you compile objective c programs on windows. To completely install GNUstep you need to install 3 setup files -

  1. GNUstep MSYS System
  2. GNUstep Core
  3. GNUstep Devel
 You can download and install the same from http://www.gnustep.org/windows/installer.html.

Installation : For the full environment for compiling and running GNUstep. Install the following packages in order. First install the gnustep-msys-system package, which contains all the packages required to run GNUstep (shell, graphics libraries, etc). Then install gnustep-core, which contains the core GNUstep libraries. If you want to compile and develop your own GNUstep applications, also install the gnustep-devel package.

The default installation of GNUstep would go to
  • C:\GNUstep

You can also use ProjectCenter which is a GUI extension of GNUStep.

Hello World - Objective C

Now create a new file called helloworld.m and add following content to it -

#import <Foundation/Foundation.h>

int main (int argc, const char * argv[])
{
   NSAutoreleasePool * pool = [[NSAutoreleasePool alloc] init];
   NSLog (@"Hello World!");

   [pool drain];
   return 0;
}

I have saved it at location -
  • C:\GNUstep\home\<username>\Development\helloworld.m

Once you have saved it open the GNUstep shell. For me, it is at the following location -
  • C:\Users\<username>\AppData\Roaming\Microsoft\Windows\Start Menu\Programs\GNUstep
Once you have opened it navigate to the directory you have helloworld.m file. Then run following command -

 gcc -o helloworld helloworld.m -I /GNUstep/System/Library/Headers -L /GNUstep/System/Library/Libraries -lobjc -lgnustep-base -fconstant-string-class=NSConstantString


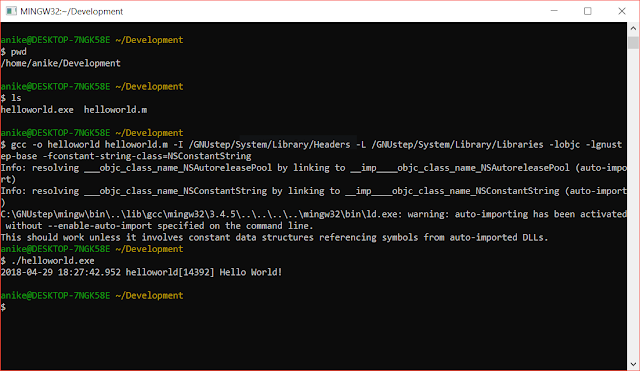
This should create a helloworld.exe file in the same directory. Now run ./helloworld.exe and it should print "Hello World!". This is captured in the screenshot below -


Related Links

t> UA-39527780-1 back to top