Showing posts with label Tomcat. Show all posts

Thursday, 6 October 2016

Setup Tomcat on an Amazon EC2 instance to deploy a wep app

Background

Amazon EC2 module is a virtual server in cloud. It's a IaaS (Infrastructure as a service) when you have your own machine (virtual) with an operating system and you can deploy your stuff there. We have already discussed setting up an EC2 instance and connecting to it. If you do not recollect please refer -
 In this post we will see how to setup your tomcat and access it remotely. This post assumes you have an EC2 instance up and running and you can SSH to it remotely.

Setup Tomcat on an Amazon EC2 instance to deploy a wep app

Apache Tomcat, often referred to as Tomcat, is an open-source web server developed by the Apache Software Foundation (ASF). Tomcat implements several Java EE specifications including Java Servlet, JavaServer Pages (JSP), Java EL, and WebSocket, and provides a "pure Java" HTTP web server environment in which Java code can run.

There are two ways you can setup tomcat on your machine (EC2 instance) in this case. Either
  1. install it through apt-get
  2. Download the binary distribution from their official site and use
We are going to take simpler route here and install it via apt-get. First get an update -
  • sudo apt-get update


 Next install tomcat7 -
  • sudo apt-get install tomcat7


 Post installation you can see the default configuration file located at -
  • less /etc/default/tomcat7 


 You can change the configuration parameters here if you wish.

To start,stop and see current tomcat status you can use following commands -
  • sudo service tomcat7 start
  • sudo service tomcat7 stop
  • sudo service tomcat7 status


 Next you can deploy your webapps at /var/lib/tomcat7/webapps
  • CATALINA_HOME : /usr/share/tomcat7
  • CATALINA_BASE : /var/lib/tomcat7

 Now your tomcat installation is done. Tomcat by default runs on port 8080 that you need to open externally (for inbound traffic). Go to Security Groups and add a custom TCP rule to open port 8080 externally -


 Add the rule and save it. You should not be able to access your tomcat. If it shows you Its up! page you are all set!

I have also deployed a web app. If you have a web app just export it as war and put it in webapps directory
  • /var/lib/tomcat7/webapps 
And restart tomcat. Tomcat will automatically extract folder out of it and deploy. If you do not have a webapp and want to test you can checkout -
Import it in eclipse and export a war out of it. If you want to skip all that you can directly download the war from -
and put it in webapps folder. Note this war is compiled with java 8. So make sure you are using Java 8 for your tomcat. You can set it in file -
  • /etc/default/tomcat7
Eg. JAVA_HOME=/usr/lib/jvm/java-8-oracle

Once deployed you can hit following URL and see if it works. If it does not you need to check catalina.out logs for any deployment issues.


You should see a page something like above.

Related Links

Monday, 25 January 2016

Replacing web.xml with Java based configuration for Servlet 3.x Webapplications using Spring

Background


As we know if you want to deploy a web app in a container like tomcat you have a context file called web.xml that creates context necessary for you app to run. For eg. you can provide libraries that will be available to your web app. 

Your typical web.xml will look like - 


<web-app id="WebApp_ID" version="2.4"
    xmlns="http://java.sun.com/xml/ns/j2ee"
    xmlns:xsi="http://www.w3.org/2001/XMLSchema-instance"
    xsi:schemaLocation="http://java.sun.com/xml/ns/j2ee
    http://java.sun.com/xml/ns/j2ee/web-app_2_4.xsd">

  <display-name>Spring Web MVC Demo Application</display-name>

  <servlet>
      <servlet-name>mvc-dispatcher</servlet-name>
        <servlet-class>org.springframework.web.servlet.DispatcherServlet</servlet-class>
        <init-param>
            <param-name>contextConfigLocation</param-name>
            <param-value>/WEB-INF/mvc-dispatcher-servlet.xml</param-value>
        </init-param>
        <load-on-startup>1</load-on-startup>
  </servlet>

  <servlet-mapping>
     <servlet-name>mvc-dispatcher</servlet-name>
        <url-pattern>/</url-pattern>
  </servlet-mapping>
   

    <context-param>
        <param-name>contextConfigLocation</param-name>
        <param-value>/WEB-INF/root-context.xml</param-value>
    </context-param>

    <listener>
        <listener-class>org.springframework.web.context.ContextLoaderListener</listener-class>
    </listener>
    
</web-app>


Lets see its Java equivalent

Java Configuration

  • For Java configuration you can write your own class that implements WebApplicationInitializer  interface and override it's
    onStartup() method.
  • WebApplicationInitializer is an interface provided by Spring MVC that ensures your implementation is detected and automatically used to initialize any Servlet 3 container.
  • An abstract base class implementation of WebApplicationInitializer named AbstractDispatcherServletInitializer makes it even easier to register the DispatcherServlet by simply overriding methods to specify the servlet mapping and the location of the DispatcherServlet configuration.  
  • This is from Spring 3.1+
Lets now see the Java config -


public class MyWebApplicationInitializer implements WebApplicationInitializer {

    @Override
    public void onStartup(ServletContext container) {
    
        AnnotationConfigWebApplicationContext rootContext = new AnnotationConfigWebApplicationContext();

        rootContext.register(RootApplicationConfig.class);
       
        container.addListener(new ContextLoaderListener(rootContext));
       
        AnnotationConfigWebApplicationContext displacherContext = new AnnotationConfigWebApplicationContext();
        displacherContext.register(MyWebConfig.class);
    
    
        ServletRegistration.Dynamic registration = container.addServlet("dispatcher", new DispatcherServlet(displacherContext));
        registration.setLoadOnStartup(1);
        registration.addMapping("/");
    }
} 


Code for MyWebConfig.java and RootApplicationConfig.java are given below -

Or as I mentioned before you can extend abstract class AbstractDispatcherServletInitializer.

public class MyWebAppInitializer extends AbstractDispatcherServletInitializer {

    @Override
    protected WebApplicationContext createRootApplicationContext() {
        return null;
    }

    @Override
    protected WebApplicationContext createServletApplicationContext() {
        XmlWebApplicationContext cxt = new XmlWebApplicationContext();
        cxt.setConfigLocation("/WEB-INF/spring/dispatcher-config.xml");
        return cxt;
    }

    @Override
    protected String[] getServletMappings() {
        return new String[] { "/" };
    }


Now you don't need web.xml as part of your web application. Your container will startup your app using Java config provided. This classes are detected automatically.

 RootApplicationConfig.java

 package com.osfg.config;

import org.springframework.context.annotation.ComponentScan;
import org.springframework.context.annotation.Configuration;
import org.springframework.context.annotation.PropertySource;

/**
 * 
 * @author athakur
 * Root applciation context
 * Services and data sources should go here - common to all web application contexts
 */
@Configuration
@ComponentScan({ "com.osfg" })
@PropertySource(value = { "classpath:com/osfg/resources/spring-props.properties" })
public class RootApplicationConfig {


}


Source :  https://github.com/aniket91/SpringFeaturesDemo/blob/master/src/com/osfg/config/RootApplicationConfig.java


MyWebConfig.java

package com.osfg.config;

import org.springframework.context.annotation.Bean;
import org.springframework.context.annotation.ComponentScan;
import org.springframework.context.annotation.Configuration;
import org.springframework.web.servlet.ViewResolver;
import org.springframework.web.servlet.config.annotation.EnableWebMvc;
import org.springframework.web.servlet.view.InternalResourceViewResolver;

/**
 * 
 * @author athakur
 * Dispacher servlet context - web app context
 * All Controllers. handler mappings, viewresolvers etc should go here
 */
@Configuration
@ComponentScan({ "com.osfg.controllers" })
@EnableWebMvc
public class MyWebConfig {
    
    @Bean
    public ViewResolver getViewResolver(){
        InternalResourceViewResolver resolver = new InternalResourceViewResolver();
        resolver.setPrefix("/pages/");
        resolver.setSuffix(".jsp");
        return resolver;
    }

}


Source : https://github.com/aniket91/SpringFeaturesDemo/blob/master/src/com/osfg/config/MyWebConfig.java


 You can see the complete sample code in my github repo -


If you are not using Spring you will need to do -

  1. Create a custom class that implements ServletContainerInitializer (i.e. com.osfg.MyServletContainer
  2. Create a file in your META-INF/services folder named javax.servlet.ServletContainerInitializer which will contain the name of your implementation above (com.osfg.MyServletContainer)
In Spring ofcourse you don't need to do this.

Related Links

Sunday, 22 June 2014

Supporting https URLs on your Tomcat server.

Goal

Couple of posts back we saw how we can write a normal server in Spring MVC ( Spring MVC Hello Wold Example  ). If you notice the URL was something like "http://localhost:8080/GreeterProject/welcome.htm". Notice the protocol used is http. But you must have seen some sites using a more secure protocol called https. Specially sites which have payment transactions. In this post we will see how can we support those. So by the end of this post we should be able to hit URL like "https://localhost/GreeterProject/welcome.htm".

Prerequisite

For this post I am assuming you have the setup equivalent to how the setup at the end of post Spring MVC Hello Wold Example  . Also you should have Java SDK with you. We will need it ti create a self signed certificate which is essential for SSL connections (https). Do not worry about it as of now. Just make sure you have Java SDK installed.

Basics

SSL (and its successor, TLS) is a protocol that operates directly on top of TCP (although there are also implementations for datagram based protocols such as UDP). This way, protocols on higher layers (such as HTTP) can be left unchanged while still providing a secure connection. Underneath the SSL layer, HTTP is identical to HTTPS.

When using SSL/TLS correctly, all an attacker can see on the cable is which IP and domain you are connected to, roughly how much data you are sending, and what encryption and compression is used. He can also terminate the connection, but both sides will know that the connection has been interrupted by a third party.

Getting Started

So lets get started. First lets edit the configuration for the Apache tomcat server so that it can now support SSL(https) connections.

Go to server.xml file . If you are using Eclipse IDE then there should be a separate folder created for servers in the projects directory. In that you will have multiple servers (you have configured) configurations. If you see the previous post on how to create a simple Hello World Spring MVC project we create a new server instance to run it on. That would be present in that servers folder. If not when you run your project by selecting run as -> Run on server Eclipse will ask you to configure one. 

If you are using plain Apache tomcat installation i.e no eclipse then you can find this file in path TomcatInstallation/conf/server.xml . Here TomcatInstallation is the folder where you have installed tomcat.

In this file you would see a commented line like

<Connector SSLEnabled="true" clientAuth="false"  maxThreads="150" port="8443" protocol="HTTP/1.1" scheme="https" secure="true" sslProtocol="TLS"/>

It would be commented. You can see <!-- --> tags. Remove them i.e un-comment it. You need to add some more properties like keystoreFile and keystorePass. The line should now look like

<Connector SSLEnabled="true" clientAuth="false" keystoreFile="${user.home}/.keystore" keystorePass="mypasswd" maxThreads="150" port="443" protocol="HTTP/1.1" scheme="https" secure="true" sslProtocol="TLS"/>

Do not worry about keystoreFile and keystorePass. I will come to it. Notice other than that I have changed the port from 8443 to 443. You can leave it at 8443 but 443 is the default port for SSL. So I used it. If you change this you don't have to explicitly add a port in your URL.

You can view your server config from Eclispe itself. Double click your server in servers tab.


Understanding and Creating a keystore

For secure connection between server and client (browser in this case) server needs to send a certificate signed by some trusted authority. Client must trust the authority who has signed this certificate. What are the contents of the certificate, how client knows that the certificate comes from the proper server etc questions are out of scope for this discussion. If interested you can go through the Important links section at the bottom of this post. 

Important point is we need a certificate on server. For demonstration purpose i am going to create a self signed certificate and use it. Yes when browser hits this URL it would not be something broweser automatically trusts so we would have to give permission to the browser to trust it. But we can see that later. Create a self signed certificate. You can go through my earlier post on it ( Creating a self signed certificate for SSL using java keytool ) .  This will be created in your root folder with name .keystore. Now if you looks back at the configuration changes we made in tomcat server.xml file keystoreFile is the path to this certificate and keystorePass is the password you used while creating the certificate.


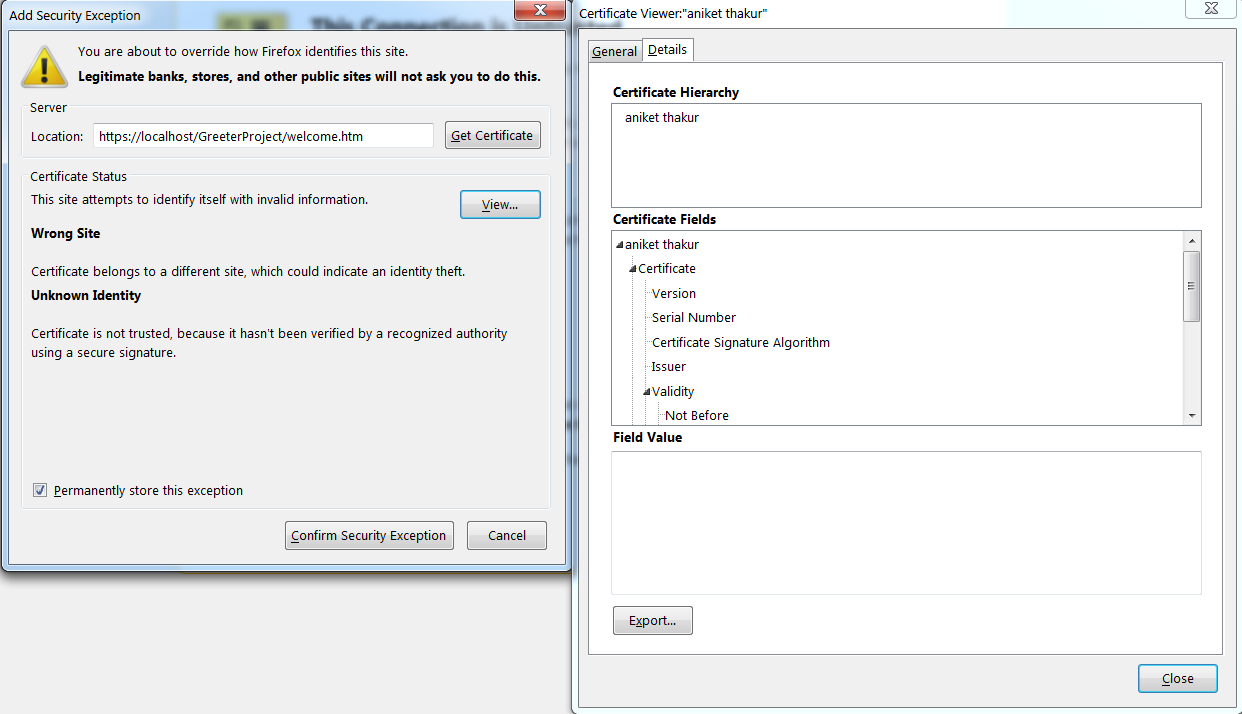
That's it start the server now. You should get screen like below.


Go ahead select "I Understand the Risks" and select "Add Exception". You will again get a popup screen to conform security Exception. You can also View the details of the certificate by clicking View Details.


After you select conform security Exception you can see your webpage with https.


And you are done :) Let me know if you still have any question.

Important Links

Tuesday, 10 June 2014

Change Tomcat Server's timeout in Eclipse

I got the following error on Eclipse while starting Apache Tomcat


So in this post I will show how can we increase the server timeout for Tomcat.

  • Go to the server view

  • Double click the Server. Configuration window would open. On the right hand side you could see Timeouts dropdown tab. You can go in that tab. It will have time limit for start and stop. Change it as per your need.

Default start time limit is 45 second where as stop limit is 15 secs.
t> UA-39527780-1 back to top