Showing posts with label nodeJs. Show all posts

Sunday, 24 February 2019

How to write Mocha and Chai unit tests for your Node.js app?

Background

Testing is an important part of the development lifecycle. Testing can be of many types - unit testing, integration testing, manual testing, QA automation testing. In this tutorial, I am going to show how you can write unit tests for your Node.js application using Mocha and Chai frameworks.  

Mocha is a javascript test framework and Chai is an assertion library. 

Mocha is a feature-rich JavaScript test framework running on Node.js and in the browser, making asynchronous testing simple and fun. Mocha tests run serially, allowing for flexible and accurate reporting while mapping uncaught exceptions to the correct test cases.

Chai is a BDD / TDD assertion library for node and the browser that can be delightfully paired with any javascript testing framework.


Sample Node.js App

Let's start by writing a simple Node.js app that does addition and subtraction and then we will see how we can write tests for it using Mocha and Chai.

Create a directory called mochatest and navigate to that directory using the following commands -
  • mkdir mochatest
  • cd mochatest
Now initialize it as npm module using -
  • npm init -y


You can see the package.json content initialized with default values. Now let's install our dependencies - mocha, and chai. Execute following command -

  • npm install mocha chai --save-dev
Notice we are saving it as dev dependency and not actual dependency since we need this for testing only.


This should create a node_module directory in your current mochatest directory and install your dependencies there. You can also see dependencies added in package.json.


Now let's create our main app. You can see in the package.json above the main file is called index.js. At this point, I would request you to open your application in your favorite IDE. I will be using visual studio code for this. 

Now create a file called index.js in mochatest folder. and add the following content to it


var addition = function(a,b) {
    return a + b;
}
var subtraction = function(a,b) {
    return a - b;
}


module.exports = {
    add: addition,
    subtract: subtraction
}

This essentially exports 2 functions -
  • add 
  • subtract
that does exactly what the name says - adds and subtracts two numbers. Now let's see how we can write mocha tests for these.


How to write Mocha and Chai unit tests for your Node.js app?

In the mochatest folder create a folder called test. We will have test files in this folder. It is recommended to have same file structure as your actual app. Since we just have a single file called index.js in our app, create a file called indexTest.js in your test folder and add following content to it.


const assert = require('chai').assert;
const index = require("../index");

describe("Index Tests", function(){

    describe("Addition", function(){
        it("Addition functionality test", function() {
            let result = index.add(4,5);
            assert.equal(result,9);
        });
        it("Addition return type test", function() {
            let result = index.add(4,5);
            assert.typeOf(result,'number');
        });
    });

    describe("Subtraction", function(){
        it("Subtraction functionality test", function() {
            let result = index.subtract(5,4);
            assert.equal(result,1);
        });
        it("Subtraction return type test", function() {
            let result = index.subtract(5,4);
            assert.typeOf(result,'number');
        });
    });   

});

Let me explain this before we go and test this out. Like I mentioned before chai is an assertion library, so we get a reference to it. Then you get a reference to the actual app file - index.js. Remember it exports two functions -

  • add
  • subtract
Then we have "describe" keyword. Each describe is a logical grouping of tests and you can cascade them further. For example in the above case, we start a grouping on the basis if file meaning these group has tests for file index.js. Inside it, we have cascaded describe for each method - add and subtract. Each "describe" takes 2 arguments - 1st one is the string that defines what the grouping is for and the 2nd one is the function that has the logic of what that group does. It could have other subgroups as you see above.

Inside describe you can define actual tests inside "it" method. This method also takes 2 arguments - 1st one says what the test does and the 2nd one is a function that gets executed to test it. Inside it we use the assert reference we got from chai module. In this case, we have used
  • equal
  • typeof
You can see others in https://www.chaijs.com/guide/styles/


NOTE: By default, mocha looks for the glob "./test/*.js", so you may want to put your test methods in test/ folder.

Now let's run it. Use the following command -


  • mocha


And you can see the results. You can change the logic in index.js to see that tests fail. For example, lets change add method to return a-b instead of a+b and rerun this test. You will see the following output -


Finally, let's plug this in the npm system. package.json already has test script as follows -

  "scripts": {
    "test": "echo \"Error: no test specified\" && exit 1"
  },


change this to


  "scripts": {
    "test": "mocha"
  },


and you can simply run following command to execute tests -

  • npm run test


Let me know if you have any questions. Thanks.


Related Links


Tuesday, 16 October 2018

Lerna Tutorial - Managing Monorepos with Lerna

Background

Lerna is a tool that allows you to maintain multiple npm packages within one repository. There are multiple benefits of using such an approach - one repo, multiple packages. This paradigm is called monorepo (mono - single, repo - repository). You can read more about monorepo -
To summarise pros are -
  • Single lint, build, test and release process.
  • Easy to coordinate changes across modules. 
  • A single place to report issues.
  • Easier to set up a development environment.
  • Tests across modules are run together which finds bugs that touch multiple modules easier.
Now that you understand what a monorepo is, let's come back to Lerna. Lerna is a tool that helps you manage your monorepos. In this post, I am going to show you a complete tutorial of how you can use lerna to manage a custom multi package repo that we will create.


Lerna Tutorial -  Managing Monorepos with Lerna

First of all, you need to install lerna. Lerna is a CLI. To install it you need to execute following command -
  • npm install --global lerna
This should install lerna in your local machine globally. You can run the following command to check the version of lerna installed -
  • lerna -v
 For me, it's 3.4.1 at the time of writing this post. Now let's create a directory for our lerna demo project.  Let's call it lerna-demo. You can create it with the following command -
  • mkdir lerna-demo 
Now navigate inside this directory
  • cd lerna-demo
Now execute following command -
  • lerna init
This should create a basic structure of monorepo. Take a look at below picture to understand it's structure.


 It does following things -
  1. Creates packages folder. All packages go under this.
  2. Creates package.json at the root. This defines global dependencies. It has the dependency on lerna by default.
  3. Creates lerna.json at the root. This identifies lerna repo root.
 Now let's go to packages folder and start creating our packages. We will then see how we can link them and use. So navigate to packages directory.
  • cd packages

Package - AdditionModule

Let's create a package that takes care of addition. Let's call it AdditionModule. Create a directory for this inside packages folder and execute following commands -
  • mkdir AdditionModule 
  • cd AdditionModule 
  • npm init -y
This should create a file called package.json inside AdditionModule directory. Now in the same folder create a file called index.js in the same folder and add following content to it -

module.exports.add = function(x,y){
    return x + y;
}


Save the file. This basically exposes add method to any other package that would have a dependency on this. Your 1st package is done. Let's create one more package for subtraction.

Package - SubtractionModule

 Run similar commands inside packages folder -

  • mkdir SubtractionModule
  • cd SubtractionModule
  • npm init -y
 Now in SubtractionModule folder create a file called index.js and add following code to it -

module.exports.subtract = function(x,y){
    return x - y;
}


Save the file. This basically exposes subtract method to any other package that would have a dependency on this. Now let's create a package that would have a dependency on  AdditionModule and SubtractionModule and can use add and subtract functions.

Package - Calc

Our final package - let's call it Calc would have a dependency on  AdditionModule and SubtractionModule packages. So let's create the package 1st -

  • mkdir Calc
  • cd Calc
  • npm init -y
Now create a file called index.js and add following content to it -

var add = require('AdditionModule');
var subtract = require('SubtractionModule');

var sum = add.add(2,3);
var diff = subtract.subtract(3,2);

console.log("Sum: " + sum + " Diff: " + diff);

Save the file. Now open package.json to add our dependencies. Edit package.json to add following content to it -

  "dependencies": {
      "AdditionModule": "1.0.0",
      "SubtractionModule": "1.0.0"
   },


So your entire package.json looks like -

{
  "name": "Calc",
  "version": "1.0.0",
  "description": "",
  "main": "index.js",
  "scripts": {
    "test": "echo \"Error: no test specified\" && exit 1"
  },
  "keywords": [],
  "author": "",
  "license": "ISC",
  "dependencies": {
      "AdditionModule": "1.0.0",
      "SubtractionModule": "1.0.0"
   },
}

Now you are all set up. Your directory structure should look like below -


Now it's time to use lerna to link packages. Go to lerna-demo directory and execute the following command -
  • lerna bootstrap
 This should do all linking for you. It would create node_modules directory in Calc package and add symlinks to AdditionModule and SubtractionModule. Your directory structure would now look like -


Now you can simply run calc index.js as follows -

  • node packages/Calc/index.js
And you should get expected output -


The important thing was the linking part that lerna does for you so that you do not have to worry about it.


For complete details on all available commands see - https://github.com/lerna/lerna

Related Links


Sunday, 14 October 2018

What is the purpose of Node.js module.exports and how do you use it?

Background

If you have ever used nodejs and npm you must have encountered usage of module.exports syntax. Or perhaps just exports? If you do have encountered this that you might be aware that it exposes a certain functionality of the code so that other outside code can reference and execute it. Though this is a short version of what exports syntax does, in this post we will see a lot more of how it behaves and some examples to help us understand this better.


What is the purpose of Node.js module.exports and how do you use it?

The module.exports object is created by the Module system. module.exports is the object that's actually returned as the result of a require call. exports is just an alias to module.exports. So you could use either. There are some things that you would need to take care if you are just using exports but more of that later. For now, let's just take a simple example and see how it actually works.

First, create a file called calc.js  with the following content -

var add = function(x,y) {
return x + y;
}

var subtract = function(x,y){
return x - y;
}

module.exports = {
add  : add,
subtract: subtract
};


This code is simply defining two functions -  add and subtract and exporting them. Notice how these methods are declared as exports. We will revisit this back in a moment. Now let's try to use this code in a separate node code.

Now create another file - Let's call it demo.js. Now in this file add following code -

var calc = require('./calc.js');

console.log("2 + 3 = " + calc.add(2,3));
console.log("3 - 2 = " + calc.subtract(3,2));

And finally, run the demo.js file as -

  • node demo.js
It should give you the expected results -


If you understood above logic you must have got a basic idea of how exports work. To revisit our earlier statement we said - "module.exports is the object that's actually returned as the result of a require call." In this case, it returns a map of add and subtract which point to corresponding functions that you can invoke.

NOTE: Notice the "./" in the require statement. This is required to tell node that it is a local package.

Another way to use the same module.exports would be as follows -

module.exports.add = function(x,y) {
return x + y;
}

module.exports.subtract = function(x,y){
return x - y;
}


And if you now run demo.js again you would still see the same output. Both are just different ways to expose your code outside.

NOTE: Note that assignment to module.exports must be done immediately. It cannot be done in any callbacks. So following will not work -


var add = function(x,y) {
return x + y;
}

var subtract = function(x,y){
return x - y;
}

setTimeout(() => {
  module.exports = { add : add, subtract : subtract };
}, 0);


This will fail with below error -

TypeError: calc.add is not a function
    at Object.<anonymous> (demo.js:3:31)
    at Module._compile (module.js:653:30)
    at Object.Module._extensions..js (module.js:664:10)
    at Module.load (module.js:566:32)
    at tryModuleLoad (module.js:506:12)
    at Function.Module._load (module.js:498:3)
    at Function.Module.runMain (module.js:694:10)
    at startup (bootstrap_node.js:204:16)
    at bootstrap_node.js:625:3


So make sure your exports are done immediately and not in any callbacks.


Now let's come back to the exports keyword that we said is just an alias to module.exports. Let us rewrite the code with just exports now.  Let's say your code is as follows -


exports.add = function(x,y) {
return x + y;
}

exports.subtract = function(x,y){
return x - y;
}


Now run demo.js and you should still get your desired output. Like I said earlier exports is just an alias to exports.module. Now lets out 1st approach with just exports -

var add = function(x,y) {
return x + y;
}

var subtract = function(x,y){
return x - y;
}

exports = {
add : add,
subtract: subtract
}


And if you run demo.js again you will get an error -

TypeError: calc.add is not a function
    at Object.<anonymous> (demo.js:3:31)
    at Module._compile (module.js:653:30)
    at Object.Module._extensions..js (module.js:664:10)
    at Module.load (module.js:566:32)
    at tryModuleLoad (module.js:506:12)
    at Function.Module._load (module.js:498:3)
    at Function.Module.runMain (module.js:694:10)
    at startup (bootstrap_node.js:204:16)
    at bootstrap_node.js:625:3

So why did this happen? This brings us to another crucial fact -

If you overwrite exports then it will no longer refer to module.exports. The exports variable is available within a module's file-level scope, and is assigned the value of module.exports before the module is evaluated. So if you overwrite exports it is no longer an alias to module.exports and hence it no longer works.

So make sure you do not overwrite exports variable. It is always safer to just use module.exports.

To summarize this in a single picture module.exports work as follows -


Related Links

Saturday, 11 August 2018

Working with async module in Node.js - Part 2 (async.eachSeries)

Background

This is a continuation of my previous post on async module in Node.js -
In the last post, we saw how neatly we can write code using async.waterfall. In this post, I will show you a similar trick with async.eachSeries method. 


Without async

Let's consider the following scenario.

We get the type of events and we need to run them in a loop in order. Following is a sample code to do that -

/**
 * Program to demonstrate asyn nodejs module
 * @author : athalur
 */

const async = require("async");

var startDemo = function () {
    console.log("Starting Demo");
    var events = ["Download", "Process", "Upload", "Del"];
    events.forEach(event => {
        process(event, function () {
            console.log("Got callback for : " + event);
        });
    });
    console.log("Ending Demo");
}

var process = function (processType, callback) {
    var processTime = 0;
    switch (processType) {
        case "Download":
            processTime = 2000;
            break;
        case "Process":
            processTime = 1000;
            break;
        case "Upload":
            processTime = 4000;
            break;
        case "Del":
            processTime = 100;
            break;
    }
    setTimeout(function () {
        console.log("Finished : " + processType);
        callback();
    }, processTime);
}

startDemo();


And the output is -


Wait what happened here? We looped our events array in order -

  1. Download
  2. Process
  3. Upload
  4. Delete
But that did not clearly happen. Mostly because each process takes different time to finish. In a real-world scenario, it would mean it make API calls or disk IO, the time of which we cannot predict. Let's see how async comes to our rescue.

Change the main code as follows -

var startDemo = function () {
    console.log("Starting Demo");
    var events = ["Download", "Process", "Upload", "Del"];
    async.eachSeries(events, function (event, callback) {
        process(event, callback);
    }, function(err){
        if(!err){
            console.log("Ending Demo");
        }
    });
}

and rerun the code.


Now you can see all of them executed in a series.


NOTE1: async.forEach runs through the array in parallel, meaning it will run the function for each item in the array immediately, and then when all of them execute the callback (2nd argument), the callback function will be called (3rd argument).

NOTE2: async.eachSeries runs through the array in series, meaning it will run the function for each item in the array and wait for it to execute the callback (2nd argument) before going to next item and finally when all are done the callback function will be called (3rd argument).


Related Links


Working with async module in Node.js - Part 1 (async.waterfall)

Background

Javascript, as we know, runs on a single thread and to prevent blocking operations like a network call or a disk I/O we use asynchronous callbacks. This essentially means tasks run in the background and we get a callback when the operation is done. If you wish to understand more of how Javascript works please watch below video -


So as you must have known by now there is a lot of asynchronous stuff that happens. Sometimes we need to order these to suit our business logic. Consider a simple example -

  1. Download an mp4 file from the server
  2. Convert it into a gif locally
  3. Upload the gif back to the server
  4. Delete the mp4 from the server

Now in this example, all 4 steps are an asynchronous operation. Also, we cannot move to the next step until the previous step is finished. 

The Callback way

We can use callbacks for this. Something like below -
/**
 * Program to demonstrate asyn nodejs module
 * @author : athalur
 */

var startDemo = function () {
    console.log("Starting Demo");
    download(function () {
        process(function () {
            upload(function () {
                del(function () {
                    console.log("Ending Demo");
                })
            })
        })
    });
}

var download = function (callback) {
    console.log("Starting download");
    delay();
    console.log("Finishing download");
    callback();
}

var process = function (callback) {
    console.log("Starting process");
    delay();
    console.log("Finishing process");
    callback();
}

var upload = function (callback) {
    console.log("Starting upload");
    delay();
    console.log("Finishing upload");
    callback();
}

var del = function (callback) {
    console.log("Starting del");
    delay();
    console.log("Finishing del");
    callback();
}

var delay = function () {
    var i, j;
    for (i = 0; i < 100000; i++) {
        for (j = 0; j < 10000; j++) {
            //do nothing
        }
    }
}

startDemo();
This print below output -


As you can see this is a mess that is created by cascading callbacks. Also if at any point there is an error then we need to send it back to the callback as well and each step would have an if-else check to handle it. Let us see how easy it is with async module.


The async way


First, you need to install async nodejs module -
To do so run following command -

  • npm install async


Now using async our program becomes -

/**
 * Program to demonstrate asyn nodejs module
 * @author : athakur
 */

const async = require("async");

var startDemo = function () {
    console.log("Starting Demo");
    async.waterfall([download,
        process,
        upload,
        del],
        function (err, data) {
            if(err) {
                console.log("There was an error in the demo : " + err);
            }else {
                console.log("Demo complete successfully");
            }
        });
}


NOTE:  I have not included the actual methods again to avoid repetition.

And the output is -


Notice how cleaner our code has become. Async takes care of all the callbacks. It also provides a mechanism to send data from one step to another. If you call the callback with data it will be available in next step.

If you change our download and process method slightly like below -

var download = function (callback) {
    console.log("Starting download");
    delay();
    console.log("Finishing download");
    callback(null, "Downloaded file URL");
}

var process = function (data, callback) {
    console.log("Starting process");
    console.log("In process method. Data from download: " + data);
    delay();
    console.log("Finishing process");
    callback();
}


and re-execute we will get


Also, it provides a cleaner way of error handling. Let's say our download fails. Chain download method as below -

var download = function (callback) {
    console.log("Starting download");
    delay();
    console.log("Finishing download");
    callback("Error in download", "Downloaded file URL");
}


This essentially means our download failed - 1st argument in the callback. In this scenario, the next steps in the waterfall model will not be executed and you would get a callback method that you have provided at the end of the waterfall array. On executing above you will get -


That's all for async module - waterfall. In next post, I will show you how we can use an async module for lopping over an array of data -

Related Links


Friday, 10 August 2018

How to make HTTP/HTTPS request in Node.js

Background

Many times you need to make an external API call from your Node.js application. A simple example would be calling an API gateway from you Node.js based Lambda in your AWS environment. In this post, I will show you two ways to do this -
  1. The standard http/https library
  2. The request library


Using the standard http/https library

 Let's see how we can use the standard http library to make an API request.

To use standard http or https library you can simply import the module using -

const https = require("https");
const http = require("http");

Now you can use these to make your http or https calls. A sample is provided below -


/**
 * Node.js code to demonstrate https calls.
 * @author athakur
 */
const https = require("https");

var startDemo = function () {
    console.log("starting demo code");
    executeHttps(function (err, data) {
        if (err) {
            console.log("Error in running demo code");
        }
        else {
            console.log("Successfully ending demo code");
        }

    });
}


var executeHttps = function (callback) {
    var options = {
        hostname: "opensourceforgeeks.blogspot.com",
        port: 443,
        path: "/p/about-me.html",
        method: 'GET',
        headers: {
            'Content-Type': 'text/html'
        }
    };

    var req = https.request(options, function (res) {
        console.log("Status for API call : " + res.statusCode);
        console.log("Headers for API call : " + JSON.stringify(res.headers));
        res.setEncoding('utf8');

        var body = '';

        res.on('data', function (chunk) {
            body = body + chunk;
        });

        res.on('end', function () {
            console.log("Body for API call : " + body.length);
            if (res.statusCode != 200) {
                console.log("API call failed with response code " + res.statusCode);
                callback("API call failed with response code " + res.statusCode, null)
            } else {
                console.log("Got response : " + body.length);
                callback(null, body);
            }
        });
    });

    req.on('error', function (e) {
        console.log("problem with API call : " + e.message);
        callback(e, null);
    });

    req.end();
}


startDemo();


You can get this code on my Github gist as well - https://gist.github.com/aniket91/2f6e92a005eb2a62fcc1ddd39aac6dc2


To execute just run (Assuming your file name is test.js) -
  • node test.js


You can similarly do it for http as well. For http you need to use -
  • const https = require("http"); 
  • change port to 80 in options
  • call http.request instead of https.request
NOTE: Notice how we are building the body on 'data' event listener and then processing the request on 'end' event. I have seen developers processing data on 'data' event listener only which is not correct. It will break if your response is huge and comes in chunks.

Similarly, you can execute POST method. Change options to -

    var options = {
        hostname: "opensourceforgeeks.blogspot.com",
        port: 80,
        path: "/p/about-me.html",
        method: 'POST',
        headers: {
            'Content-Type': 'text/html',
            'Content-Length': Buffer.byteLength(post_data)
        }
    };


and then before you close request using req.end(); add
  • req.write(post_data);


Now that we have seen how http/https modules work in nodejs let's see how request module works.

Using the request library

Request module is more user-friendly to use.


To begin with, you need to install request module dependency since it is not a standard library that comes with nodejs. To install execute the following command -
  • npm install request


 You should see a folder called node_modules getting created in your directory with the request and other dependent modules getting installed.

You can import request module using -
  • const request = require('request');

Then you can use it as follows -

/**
 * Node.js code to demonstrate https calls.
 * @author athakur
 */
const request = require('request');

var startDemo = function () {
    console.log("starting demo code");
    executeRequest(function (err, data) {
        if (err) {
            console.log("Error in running demo code");
        }
        else {
            console.log("Successfully ending demo code");
        }

    });
}


var executeRequest = function(callback){
    var headers = {}
    headers['Content-type'] = 'text/html'
    //console.log('Payload for refresh_token: ', querString.stringify(payload))
    request({
        url: 'https://opensourceforgeeks.blogspot.com//p/about-me.html',
        method: 'GET',
        headers: headers
    }, function (err, response, body) {
        if (err) {
            console.error('API failed : ', err)
            callback(err)
        } else {
            console.log("Statuscode: " + response.statusCode);
            console.log("Got response : " + body.length);
            callback(null, body);

        }
    })
}


And the output is -


You can execute POST call as well by changing method type to POST. Eg -

    request({
        url: 'https://opensourceforgeeks.blogspot.com//p/about-me.html',
        method: 'POST',
        body: payload,
        headers: headers
    }, function (err, response, body) {
        if (err) {
            console.error('API failed : ', err)
            callback(err)
        } else {
            console.log("Statuscode: " + response.statusCode);
            console.log("Got response : " + body.length);
            callback(null, body);

        }
    });


Hope this helps! Let me know if you have any questions. Thanks.


Related Links 


Friday, 2 February 2018

Simulating environment variables in NodeJs using dotenv package

Background

When you write code there are certain variables that may differ as per the environments like dev, qa prod etc. This might have sensitive data as API keys, passwords etc. You would definitely do not want to put it in your code directly since this will be added to some code repository like git and others may have access to the same. 

General practice that is followed is to use environment variables that can be defined at the environment level and can be read and used in the code. For eg. consider Elastic beanstalk or a Lambda in AWS world. You would define environment variables for the environment and use that in code. If it's your our physical box you might define the environment variables at the OS level or maybe at tomcat level if you are using tomcat as the container. Environment variables work fine in all such cases. 

But how would you do the same in local. In this post I will show how we can simulate environment variables in a NodeJs process with a package called dotenv.


This post expects you to know basics of NodeJs and have NodeJs and npm (Node package manager) installed on your machine. If you have not done that then please refer my earlier post -

Simulating environment variables in NodeJs using dotenv package

First you need to install dotenv package using npm. To do so go to the directory where you would have your NodeJs file and execute following command -
  • npm install dotenv
If you get some warning you can ignore it for now. You should see a directory called node_modules getting created in the same directory where you executed this command. This folder will have the package dotenv that we just installed.


Now that we have package installed let's see how we can simulate an environment variable. For this simply create a file name .env in the same directory and add the environment variable you expect to read in code in it. For this demo I will use 3 environment variables -
  • ENVIRONMENT=local
  • USERNAME=athakur
  • PASSWORD=athakur
Now create NodeJS file in the same directory. Let's call it test.js. The directory structure is as follows -


Add following content in test.js -

'use strict';
const dotenv = require('dotenv');
dotenv.config();

const env = process.env.ENVIRONMENT
const username = process.env.USERNAME
const password = process.env.PASSWORD

console.log("Env : " + env);
console.log("Username : " + username);
console.log("Password : " + password);

Save the file and execute it as -
  • node test.js
You should see following output on the screen -

Env : local
Username : athakur
Password : athakur


And that's it. You can add any number of environment variables in the ".env" file and read it in your node js code as process.env.variable_name.

NOTE :  .env file would be hidden in Ubuntu since Ubuntu hides all files that start with a dot (.). You can just press Ctrl + H to view hidden files or do a "ls -la" in console. More details -


To read more about this package  you can read -


Related Links


Saturday, 11 November 2017

Understanding Promises in javascript

Background

I am really new to nodejs and javascript for that matter. I have used these in past but mainly to manipulate DOM elements, post forms , handle event etc. We saw in last post on node.js working how node.js works on single threaded, non-blocking and asynchronous programming model.
This is achieved mainly using events. So lets say you want to read a file on the file system. You make a call to access this file and essentially provide a callback function which will be invoked on successful completion of file access and meanwhile program can carry on with it's next set of function.

Now sometime we do need to synchronise tasks. For example lets say we want to complete reading files json content which is required to make a network call. One possible way is to do the network call in the callback function of the file access function so that when we get a callback on file access completion we read the file and then make a network call. 

This sounds simple enough for a single function to be synchronised. Try to imagine multiple functions that need to be synchronised.   It can be a nightmare coding that - writing new function in each functions callback (cascading it). 

This is where promises come into picture.


Understanding Promises in javascript


It is literally what it means - a promise. It is an object that may produce a result in the future. Think of it like a Future object in Java (I come from a Java background, hence the reference. Ignore if you are not aware) -

 A promise of a function can be in either one of the following state -
  1. Fulfilled : Asynchronous operation corresponding to this promise is completed successfully. 
  2. Rejected : Asynchronous operation corresponding to this promise has failed. Promise will have the reason why it failed. 
  3. Pending : The asynchronous operation is still pending and is neither in fulfilled or rejected state.
  4. Settled : This is a generic state. Asynchronous operation is complete and can be in - Fulfilled or Rejected state.
A state will be in pending till the asynchronous operation is in progress. Once it is complete state can be fulfilled or rejected and from then state cannot change. 

NOTE : We are saying asynchronous operation because general processed are asynchronous for which promise are created. But it need not be. Promise may correspond to a synchronous operation as well.

Consider a simple promise as follows -


var testPromise = new Promise(function(resolve, reject){
        //your test operation - can be async
        let testSuccess  = true; // can be false depending on if your test async operation failed  
        if(testSuccess) {
                resolve("success");
        }
        else {
                reject("failure");
        }
});

testPromise.then(function(successResult){
        console.log("Test promise succeded with result : " + successResult);
}).catch(function(failureResult){
        console.log("Test promise failed with result : " + failureResult);


This prints output : Test promise succeded with result : success
You can change testSuccess to false and it will print : Test promise failed with result : failure

So let's see what happened here. 
  • First we created a new promise with constructor new Promise()
  • constructor takes an argument as function that basically defines what operation needs to be performed as part of that promise
  • This function takes two callbacks -
    • resolve()
    • reject()
  • You will call resolve() when your operation is successful and will call reject when it fails. resolve() will essentially put the promise in Fulfilled state where as reject will put it in Rejected state ww saw above.
  • Depending on result of our operation (can be asynchronous) we will call resolve() or reject()
  • Once promise object is created we can call it using then() method of promise object. then() method will be called when promise is fulfilled and catch() method will be called when it is rejected/failed.
  • You can toggle the value of testSuccess boolean and see for yourself.
  • Each then() and catch() take an argument which is nothing but variable passed by resolve() and reject() which in this case is success or failure

Now that we know what promise is and how it behaves lets see if this can solve our synchronisation problem. We have 3 asynchronous operations and we need to do it one after the other -


var test1 = new Promise(function(resolve,reject){
        resolve('test1');
});
var test2 = new Promise(function(resolve,reject){
        resolve('test2');
});
var test3 = new Promise(function(resolve,reject){
        resolve('test3');
});


test1.then(function(test1Result){
        console.log('completed : ' + test1Result);
        return test2;
}).then(function(test2Result){
        console.log('completed : ' + test2Result);
        return test3;
}).then(function(test3Result){
        console.log('completed : ' + test3Result);
});


This one outputs - 
completed : test1
completed : test2
completed : test3

Only difference here is in each then function we are returning next promise and calling then on it so that it is run sequentially.

Alternatively you can also do -

var test1Func = function() {
        return test1;
};
var test2Func = function() {
        return test2;
};
var test3Func = function() {
        return test1;
};
test1Func().then(function(test1Result){
        console.log('completed : ' + test1Result);
        return test2Func();
}).then(function(test2Result){
        console.log('completed : ' + test2Result);
        return test3Func();
}).then(function(test3Result){
        console.log('completed : ' + test3Result);
});

Now what if I want to do some task when all three promises are done. For that you can do -

Promise.all([test1Func(),test2Func(),test3Func()]).then(function(){
        console.log('All tests finished');
});


And this will output - All tests finished

Similarly if you want to do something if any one of the promise is complete you can do -


Promise.race([test1Func(),test2Func(),test3Func()]).then(function(){
        console.log('All tests finished');
});

and this will output - One of the tests finished

To sum it up promise looks like below -


Related Links

Wednesday, 1 November 2017

Understanding Node.js working

Background

As you might already know -
  1. Node.js is a JavaScript runtime built on Chrome's V8 JavaScript engine.
  2. Node.js uses an event-driven, non-blocking I/O model that makes it lightweight and efficient. 
  3. Node.js' package ecosystem, npm, is the largest ecosystem of open source libraries in the world.

Node.js runs single-threaded, non-blocking, asynchronously programming, which is very memory efficient. We will see this in a moment.

Understanding Node.js working

Traditional server client architecture is as below -


Server keeps a thread pool ready to server incoming client requests. As soon as a client request is received server takes one of the free threads and uses it to process the incoming request. This limits simultaneous client connections an server can have.Each thread will take up memory/RAM, processor/CPU eventually exhausting computational resources. Not to mention context switch happening. All of this limits the maximum connections and load a traditional server can take.


This is where Node.js differs.  As mentioned before Node.js runs single-threaded, non-blocking, asynchronously programming, which is very memory efficient. So it's just a single thread handling client requests. Only difference is programming is asynchronous and non blocking event driven. So when a client request is received single server thread starts processing it asynchronously. Immediately it is ready to get next client request. When processing for 1st request will be over main thread will get a callback and result will be returned to the client. Aync tasks are done by worker threads.


That being said Node.js is good for CPU intensive tasks given it is single threaded. So if your usecase is cpu intensive Node.js is probably not the way to go.


Related Links

Saturday, 12 March 2016

How to install Node and npm to run node.js programs in Linux

Background

    In one of the previous posts - 
we saw how to install node and npm on widows and also saw running a demo program. In windows it is as simple as downloading the installer and running it. In this post we will see how to install the same in Linux using command line.


Installing Node and NPM on your Linux machine

I am using Ubuntu so I am going to use apt-get to install software’s. You can do the same using yum if you are using fedora or alike.

 First install some of the dependencies that are requied with following command- 

  •  sudo apt-get install python-software-properties python g++ make
Next you will need to add repository to install node and npm from - 
  • sudo add-apt-repository ppa:chris-lea/node.js


Next get an update
  • sudo apt-get update
Now finally install nodejs
  • sudo apt-get install nodejs


This should install both node and npm for you. You can print their version to confirm they are installed -


NOTE : If you see nodejs module installed instead of node then resolve as follows  (May differ across various Ubuntu versions)-

You need to manually create a symlink /usr/bin/node. Shortcut for bash compatible shells:


  • sudo ln -s `which nodejs` /usr/bin/node


Or if you use non-standard shells, just hardcode the path you find with which nodejs:


  • sudo ln -s /usr/bin/nodejs /usr/bin/node


Now lets quickly test it. Create a file called server.js and following contents in it -

 var http = require('http');
 http.createServer(function (req, res) {
    res.writeHead(200, {'Content-Type': 'text/plain'});
    res.end('Hello World\n');
 }).listen(1337, "127.0.0.1");
 console.log('Server running at http://127.0.0.1:1337/');


Now save it as run it -

You should see following in command promt -

aniket@aniket-Compaq-610:~/programs$ node server.js
Server running at http://127.0.0.1:1337


Now go to browser and hit following url -
  • http://127.0.0.1:1337
You should see - Hello World

That means our server is up and running


Updating Node.Js version

You can use a module called n to upgrade you node package in Mac/Ubuntu


  • sudo npm install -g n
  • sudo n stable

This will install latest stable node package. You can run


  • node --version

If you are still seeing old version it might be directory issues where new package is installed. I had to create a symlink to make it work-


  • sudo ln -s  /usr/local/n/versions/node/9.0.0/bin/node  /usr/local/bin/node


Related Links

Saturday, 25 October 2014

Automating a web page button click using HtmlUnit

Background

HtmlUnit is a "GUI-Less browser for Java programs". It models HTML documents and provides an API that allows you to invoke pages, fill out forms, click links, etc... just like you do in your "normal" browser.

It has fairly good JavaScript support (which is constantly improving) and is able to work even with quite complex AJAX libraries, simulating either Firefox or Internet Explorer depending on the configuration you want to use. 


So in this post I am going to host a simple HTML page on a server and use HtmlUnit to get that page and perform click action on the button on that fetched page.


Setting up the server

I am going to use NodeJS to setup the server that renders our simple page with a button. It's a simple fastest way to host a server. You need to have NodeJS installed on your machine for it. I had written a post earlier on it - installation and printing response on server request. You can go through that to setup and go through the basic workflow -


In a directory create two file index.html and server.js and put in the following contents in it.


index.html - 

<html>
<head>
<title>Hello World!</title>
<script>
function displayHelloWorld()
{
    alert("Hello World");
}
</script>
</head>
<body>
<center>
<h3>Hello World Demo by Open Source for Geeks</h3>
<button type="button" id="buttonId" onclick="alert('Hello world!')">Click Me!</button>
</center>
</body>
</html>


server.js -

var http = require('http'),
fs = require('fs');

fs.readFile('./index.html', function (err, html) {
    if (err) {
        throw err; 
    }       
    http.createServer(function(request, response) {  
        response.writeHeader(200, {"Content-Type": "text/html"});  
        response.write(html);  
        response.end();  
    }).listen(8000);
    console.log('Server running at http://127.0.0.1:8000/');
});


and that's it you can start the server by executing node server.js


you can then view the page from your browser - http://localhost:8000/


Go ahead click on the button. You should be able to see "Hello World" alert.


Our server is now ready. We are basically trying to automate this click by using HtmlUnit.

Getting Started with HtmlUnit

As usual I am going to use Ivy as my dependency manager and Eclipse as my IDE. You are free to choose yours. I am using 2.15 version (latest) of HtmlUnit [ Link To Maven Repo ].

My Ivy file structure looks something like - 

<ivy-module version="2.0" xmlns:xsi="http://www.w3.org/2001/XMLSchema-instance"
       xsi:noNamespaceSchemaLocation="http://ant.apache.org/ivy/schemas/ivy.xsd">
    <info
        organisation="OpenSourceForGeeks"
        module="HtmlUnitDemo"
        status="integration">
    </info>
    
    <dependencies>
        <dependency org="net.sourceforge.htmlunit" name="htmlunit" rev="2.15"/>        
    </dependencies>
</ivy-module>

Lets get to the code now - 

Lets create a class called WebpageButtonClicker.java and add our code in it.

import java.io.IOException;
import java.net.MalformedURLException;

import com.gargoylesoftware.htmlunit.AlertHandler;
import com.gargoylesoftware.htmlunit.FailingHttpStatusCodeException;
import com.gargoylesoftware.htmlunit.Page;
import com.gargoylesoftware.htmlunit.WebClient;
import com.gargoylesoftware.htmlunit.html.HtmlButton;
import com.gargoylesoftware.htmlunit.html.HtmlPage;


public class WebpageButtonClicker {
    
    public static void main(String args[]) throws FailingHttpStatusCodeException, MalformedURLException, IOException {
        WebClient webClient = new WebClient();
        webClient.setAlertHandler(new AlertHandler() {
            
            @Override
            public void handleAlert(Page page, String message) {
                System.out.println("Alert was : " + message);
                
            }
        });
        HtmlPage currentPage = webClient.getPage("http://localhost:8000/");
        HtmlButton button = (HtmlButton) currentPage.getElementById("buttonId");
        button.click();
    }
    

}


that's it. Now run the Java code. You should see the following output.

Alert was : Hello world!

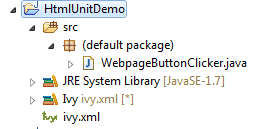
For the reference project structure looks like

Note : See how we have registered a Alert handler in above code. It is a callback that is received on any alert that is triggered. Similarly you can have handlers registered for multiple events like prompt and refresh.

Related Links


t> UA-39527780-1 back to top