Saturday 28 October 2017

How to use Lambda function with API gateway

Background

We have seen some aspects of AWS before like using EC2, S3 , IAM. You can revisit those posts again with below filter -
In this post we will see some of the hot topics in AWS -
  1. Lambda functions(Compute) and 
  2. API gateways(Application services)
We have come a long way in terms of our code deployments. Below diagram shows it all -


 Big companies have their own data centers perhaps for security concerns. But if you think from a startup perspective it has become very simple now. All you need to worry about is your application code.After datacenters we had IaaS (Infrastructure as a service) where we had access to operating systems and we can use it as we see fit without worrying about the underlying hardware. For eg. using Virtual machines. Amazon EC2 is a good example if that. You spin up a Ubuntu and get to work. Next level of ease came with PaaS (Platform as a service) where you need not worry about the OS and just concentrate on your language runtime and application. Popular examples are Google app engine or IBM bluemix or Amazon Elastic Beanstalk. This is the age of serverless platforms where you don't even have to worry about language runtimes. You can concentrate in your business logic. This brings us to our topic of interest - Lambda functions.

In this post we will see how to create a lambda function. Put it behind a API gateway and access this API from a static website hosted from S3. So lets get started.


How to use Lambda function with API gateway

Let's start with a Lambda function. Go to Lambda service and create a new function. Let's call it MyTestFunction

Make changes so that your code looks like following -

exports.lambda_handler = (event, context, callback) => {
    // TODO implement
    callback(null, 'Hello from Lambda athakur!');
};


and change the Handler name to index.lambda_handler.

NOTE : Make sure string after index. in your handler name is same as the method name in the code.


 All we are doing here is when this Lambda function is invoked we are returning string - "Hello from Lambda athakur!"


Now before we add a trigger to Lambda to execute on API gateway call we need to first create an API from API gateway. So go to API gateway service and create an API.  Let's call it MyTestAPI.

You can create a resource if you want under this API. I am going to leave it as blank. Next go to Actions -> Create Method and create a GET request. It should look like below -


NOTE : Make sure your turn in CORS from Actions menu so that there are no issues while invoking this API from java script. CORS is Cross-origin resource sharing and turning it on allows invoking APIs from javascript with different domain/hostname than that from the site from which it is invoked. Since we are using S3 here it will have a different domain than this. So you need to turn it on.

Else you will get an error something like below -
Cross-Origin Request Blocked: The Same Origin Policy disallows reading the remote resource at https://test123.ap-south-1.amazonaws.com/dev. (Reason: CORS header ‘Access-Control-Allow-Origin’ missing).


 Once your API is ready you can test it using the test button on the screen.


 Once test is successful you can go to Action and deploy this API. You need to select a stage to deploy. If you don't have it already just create a new one called dev and deploy. Once you do that you should be able to go to stages section and see your endpoint i.e url to be invoked.


Note this URL down we will use it shortly from our javascript.

Now go back to triggers section of Lambda you created and select "API gateway" from the dropdown and link this API from there. Your screen should look like below -


 Our API and lambda is all setup. All we need to do now is call it from our static website. So now go to S3. Enable static website and give main file as index.html and upload index.html to the bucket with following content -

<html>
    <head>
<script>
    function callAwsLambdaFunction() {
        var xhttp = new XMLHttpRequest();
        xhttp.onreadystatechange = function() {
            if (this.readyState == 4 && this.status == 200) {
                document.getElementById("myDiv").innerHTML = this.responseText;
            }
        };
        xhttp.open("GET", "https://qqzgu3j545.execute-api.ap-south-1.amazonaws.com/dev", true);
        xhttp.send();

    }
    </script>    
        <title>Hello World!</title>
    </head>
    <body>
        <h1>Hello world!</h1>
        <h1>Click below button to call API gatway and display result below!</h1>
        <h1><div id="myDiv"></div></h1>
        <button onclick="callAwsLambdaFunction()">Click me!</button><br>
        Regards,<br/>
        Aniket
    </body>
</html>


NOTE :  Make sure the index.html is publicly accessible . If not make it from permissions section.


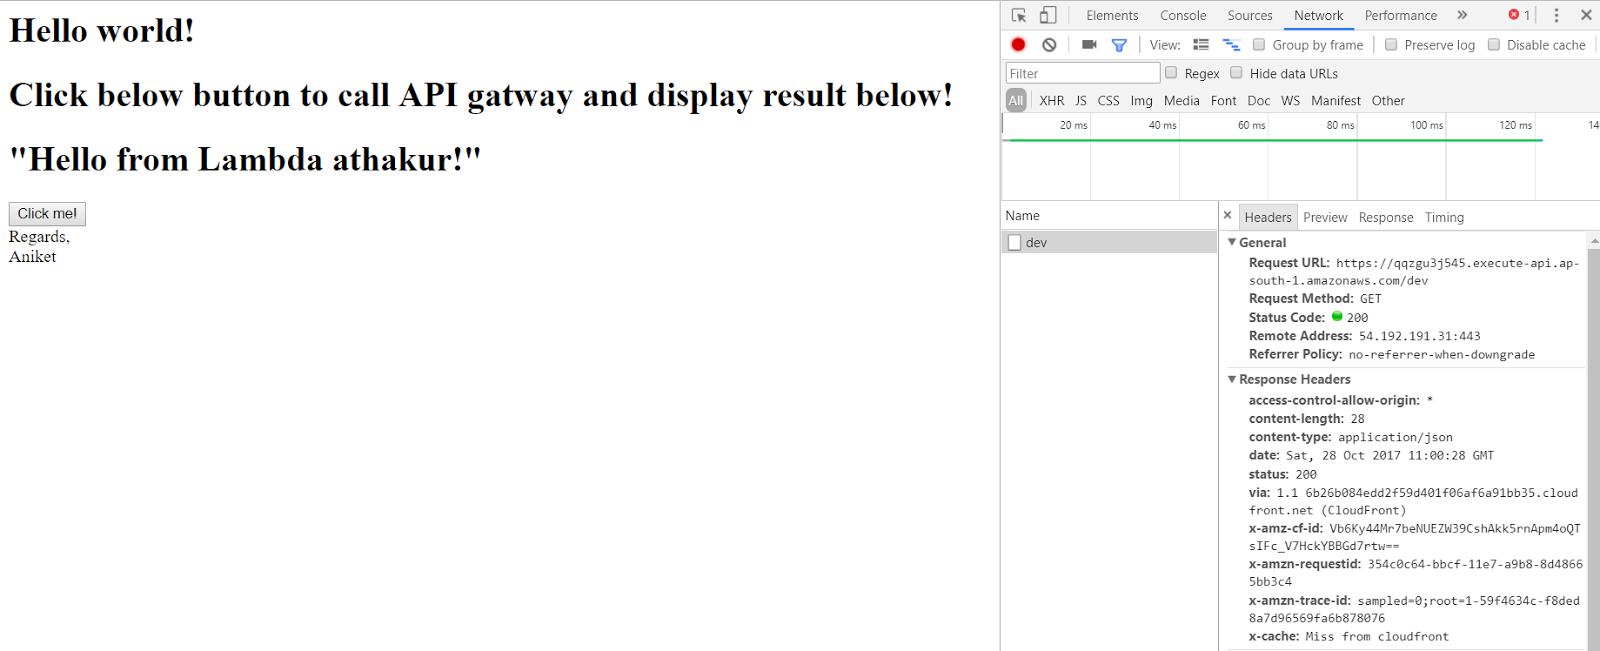
Now open your index.html by opening it in a browser tab -


After you click on the "Click me" button it should make a call to API gateway and get result from our Lambda. This looks as follows -


Related Links

Sunday 22 October 2017

How to enable hidden night mode setting on your Android N device

Background

Everyone likes the night mode settings. It puts less strain on your eye. You must have used f.lux on your PC or laptop. Google's Pixel phones have this feature where you can just toggle night mode. However other models don't. There might be vendor specific feature as well. Like some Samsung models might offer this. 

Night mode was provided in hidden System UI tuner section in the beta build of Android N and was completely removed in the final build. However code still resides in the build and can be turned on. It is not that easy though. And this is exactly what we will see. 

NOTE : This feature was altogether removed on Android 7.1 so below workaround will only work with android 7.0 Android N.


How to check if I have Android N 7.0?

Go to Settings -> About Phone -> Android Version

You should see 7.0 there. You can also tap it 3 time to see a nice Animation of Android N.


How to enable hidden night mode setting on your Android N device

First we need to turn on the hidden System UI tuner.
  • Pull down the notification tray twice and you should see the settings shortcut (cog icon). Long press it and release. You should see a toast message saying System UI Tuner has been added to settings. You should also start seeing wrench icon beside the cog icon indicated the UI Tuner has been enabled.


  • You can now simply toggle to set night mode automatically based on device time.  You can also optionally allow to change brightness as well.


  •  Lastly night mode setting should now be present in your notification tray as well for quick access and toggle.


 This approach worked fine for me. Let me know if you face issues.

Friday 13 October 2017

Host a static website on EC2 instance by deploying it from S3

Background

In one of the previous post we saw how to host a static website on EC2 instance.
But we took a much simple approach. We installed httpd and manually crated index.html which was the rendered by httpd service to outside world. In this post we will try to automate things.
  1. We will try to download the index.html from S3 bucket instead of manually creating it. 
  2. We will also automate all this using bootstrap bash so that every time we spawn our EC2 instance we don't have to manually do all these steps. 

  Host a static website on EC2 instance by deploying it from S3

First we need to create an EC2 role that has access to S2 using IAM. So we don't use new user programmatic access credentials directly like we did in last post. So go to IAM service and go to Roles and create a new role. Select EC2 to grant permission and in next page select S3 full access.


Once created go to EC2 instance and fireup new instance. I am going to use Amazon Linux AMI for this. In configure instance page select role as the one we have created - s3fullaccess


Next go to Advanced Details section in same page. You should see a text box here. Here you can add bootstrap scripts. Here I will add steps to automate our process. Add the following in the bootstrap code -

#!/bin/bash
yum update -y
yum install httpd -y
service httpd start
chkconfig httpd on
cd /var/www/html
aws s3 cp s3://athakur/index.html /var/www/html


Then keep others defaults and launch the instance (Make sure in security groups you give allow port 80). Of course I have put index.html in bucket athakur which has following simple html content -


<html>
    <head>
        <title>Hello World!</title>
    </head>
    <body>
        <h1>Hello world!</h1>
        Regards,<br/>
        Aniket
    </body>
</html>


Once EC2 is up you can directly hit the public DNS and see if it works.


NOTE : Make sure you assign a security group that gives access to port 80 to outside world when you are creating your EC2 instance.


Related Links


Thursday 12 October 2017

Create a user from IAM in AWS

Background

In this post we will see how we can create a new user using IAM in AWS. We will also see couple of things around IAM as well. But the goal is to create a new user and see how we can use it to connect to AWS from command line.


IAM is Identity access management. IAM is service used to create and manage access to AWS. This includes user and group management. 

IAM - Identity access management

Once you land on IAM dashboard you should be able to see a summary of what you have already in place - users, groups , roles etc.

NOTE :  IAM is global. There is no region associated to it. You can notice this in top right corner where you see region selected for various AWS services.


Now go to Users tab. Now click on Add users. Next select the username and then select the access type -

Programmatic access : Enables an access key ID and secret access key for the AWS API, CLI, SDK, and other development tools.
AWS Management Console access : Enables a password that allows users to sign-in to the AWS Management Console. 

You can select both as well. Console access is associated with an username and password where as programmatic access corresponds to access key id and secret access key. 

NOTE : you cannot use accesskey id and secret access key to log into console and you cannot use username and password to programmatically access AWS. Also  by default user created will have no permissions.

For now let's create a user with just programmatic access. I am using username as aniket which is my name.


Next step is to add permissions. This essentially tells what is the intent of this user. You can 
  1. Either assign user to a group (which has set of permissions)
  2. Copy permissions from existing user
  3. or assign one of the predefined permissions
I am going to take 3rd route. What I really want to do is allow this user with administrator privileges but not allow to change IAM setting - Power user is exactly what we need. So go ahead and select that -


Finally review and create your user. You should now see your access key and secret key. Note it down somewhere. You can also download it as CSV - there is an option to do so on top left corner.


NOTE : These credentials are shown only once on creation. So you can download and store the csv in secure location. If you loose then you will have to regenerate these.

 
That's it now lets see how we can use this to access AWS. If it was console access you could directly go to AWS console , use username password from csv and log in. Since this is programmatic we need to use AWS CLI (command line interface.)

As you can see in above link AWS cli is program you need to download and configure it on your local machine. I am going to use my EC2 instance running Amazon Linuz AMI. It has AWS Cli integrated.

Try running

  • aws s3 ls
This is suppose to list all your buckets. However this does not work and gives "Unable to locate credentials error". That means you need to configure your AWS cli to tell it your access key and secret key.

So type

  • aws  configure
You need to provide access key, secret key as we had downloaded it from IAM console in the csv file.


NOTE : Please don't use above creds. I have already deleted those. You can generate creds specific to your user and use it there.

These creds are stored in path ~/.aws/credentials file.


You can view all the AWS region names here -

Since I am based out of Mumbai, India I am going to use - "ap-south-1". As you can see athakur is a bucket created in my S3.

NOTE :  Though this is an option it is not recommended. what if you have this across 10 EC2 instances and one of it is compromised. You will generate new creds and apply to all? Definitely not a good way. You need to use IAM roles for this. You need to create a role for EC2 that provides access only to S3.

 NOTE : IAM can integrate with AD to add SSO functionality.

Related Links

Hosting a static website on Amazon AWS using EC2

Background

This post assumes you are familiar with Amazon AWS services, specially EC2 which we are going to use today to see how we can deploy a static website in a minute. If not kindly refer to my earlier posts in the same -


 Hosting a static website on Amazon AWS using EC2

Go ahead and launch Amazon Linux AMI on EC2. Keep all the configurations default except the security group. We are not really interested in others. In security group you need to allow ports corresponding to, ssh (22), http (80) and https(443) protocols. We are going to use http protocol for this demo. It looks like following for me -


 NOTE :  We need to SSH into your EC2 instance to host our static website. So we need that port open.

Once you have SSHed into your machine. If you don't know how to do this please refer my earlier post (linked in background and related links section). Once done follow below steps -
  1. sudo su 
  2.  yum update
  3. yum install httpd
  4. service httpd status
  5. service httpd start
  6. chkconfig httpd on
 Understanding above commands -
  1.  sudo su will elevate your role to super user. You really don't need this. But I generally do it since I like root user :)
  2. Do a update just to ensure you have the latest patches installed so that you are covered from a security standpoint.
  3. Next install httpd. This is a http daemon used to hist your static website. This essentially listens on port 80 (http) and serves request back. More details on Wiki.
  4. Next we check whether httpd daemon is up and running. service is the command used for that. 1st run should say that this service is stopped.
  5. Now you can start up this service with same command but using start. Again you can rerun above command just to make sure your service is up and running.
  6. chkconfig checks whether service is configured for startup. This commands guarantees httpd service starts on system startup.


 Now that we have out httpd service up and running, you can simply hit your public DNS and see what you can view. It should ideally show your default apache page like follows -


 You can get the public DNS from your EC2 dashboard -


 Now lets try to show our custom webpage. For this go to -
  • /var/www/html
Here create a file called index.html and paste your html content there and save it.


 That's it. Refresh your page and see if you can view your html changes.


 Let me know if there are any questions. Thanks.


If you want to see how a static website directly from S3 you can view following video -


Related Links


t> UA-39527780-1 back to top