Background
Xamrin are set of tools built on .NET framework . It allows you to develop applications for Android, iOS and Windows using C# language and the .NET framework.In this post I am going to show you how to develop a native android application using xamrin.
Setup
For this tutorial you need to have Visual Studio with Xamrin components installed on your Windows operating system. You can get it from Visual Studio installer. Or from Visual Studio you can go to Tools -> Get Tools and Features.
Hello World Xamrin Android project tutorial
Click on File -> New Project and choose Blank App(Android)
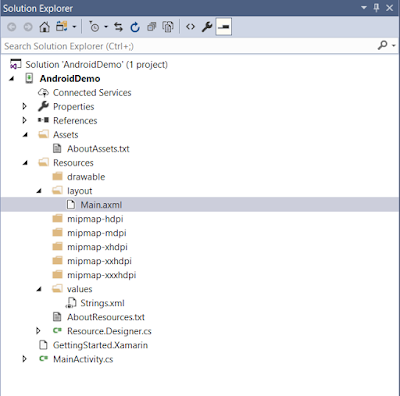
One you have created the project you should see following code structure -
Let's go over some of the important files here -
- MainActivity.cs : This is your main launcher activity.
- Resources/layout/Main.axml : This is your launcher ctivity layout file
- Resources/values/String.xml : This is your string resource file.
Change the id of EditText and Button to "helloWorldeditText" and "ckickMeButton" respectively. So your source would look like -
<?xml version="1.0" encoding="utf-8"?>
<LinearLayout xmlns:android="http://schemas.android.com/apk/res/android"
    android:orientation="vertical"
    android:layout_width="match_parent"
    android:layout_height="match_parent">
    <EditText
        android:layout_width="match_parent"
        android:layout_height="wrap_content"
        android:id="@+id/helloWorldeditText"
        android:text="Hello World!" />
    <Button
        android:text="Click Me!"
        android:layout_width="match_parent"
        android:layout_height="wrap_content"
        android:id="@+id/ckickMeButton" />
</LinearLayout>
Now go to MainActivity.cs and make following changes. We are basically going to implement a button and change the text of EditText on the click of the button.
using Android.App;
using Android.Widget;
using Android.OS;

namespace AndroidDemo
{
    [Activity(Label = "AndroidDemo", MainLauncher = true)]
    public class MainActivity : Activity
    {
        protected override void OnCreate(Bundle savedInstanceState)
        {
            base.OnCreate(savedInstanceState);

            // Set our view from the "main" layout resource
            SetContentView(Resource.Layout.Main);
            EditText helloWorldEditText = FindViewById<EditText>(Resource.Id.helloWorldeditText);
            Button clickButton = FindViewById<Button>(Resource.Id.ckickMeButton);
            helloWorldEditText.Text = "Hello World!";
            clickButton.Click += delegate { helloWorldEditText.Text = "Button Clicked!"; };
        }
    }
}
Notice the resource IDs we changed and use to reference it in the code. And that's it. Just deploy the code to an android device or an emulator and test our changes.


No comments:
Post a Comment