Sunday, 6 July 2014

How to Install Kdiff3 on Ubuntu

Background

Subversion, Git, Mercurial and others support three-way merges (combining mine, theirs, and the "base" revision) and support graphical tools to resolve conflicts.

Which tool do we use ?  In this post I will show how can we install KDiff3.
 It is an open source cross platform tool.


Installation

  1. Download the Kdiff3 tar file from the sourceforge repos, then extract the tar file. The sourceforge link for the Kdiff3 project.
  2. Extract the tar.gz file using tar command

    tar -xzf kdiff3-0.9.98.tar.gz
  3. Make sure you have QT4 installed . If not installed you can install it with following command -

    sudo apt-get install libqt4-dev
  4. After extracting go into the “src-QT4″ directory and compile

    cd kdiff3-0.9.98/src-QT4
    qmake kdiff3.pro
    make
    sudo make install
  5. Now you should be able to launch the program by typing kdiff3 in the console.


Important Links

Saturday, 5 July 2014

Resolving issue with Ubuntu installation getting stuck at VMware tools installation.

Background of the problem

I was installing Ubuntu 12.04 LTS on VMware.
I used the "Easy Mode" option while installation.
When I finish the installation, the VMware automatically tried to install VMware Tools and it was stuck. No graphical interface could be loaded. Restarting the VM and rebooting Ubuntu did not help.

You will get something like following


******************************************************************
******************************************************************
Vmware Easy Install

PLEASE WAIT! VMware Tools is currently being 
installed on your system. Depending on the 
version of Ubuntu you are installing, you may 
log in below and use the system during 
intallation. Otherwise, please wait for the 
graphical environment to launch. Thank you.

******************************************************************
******************************************************************
ubuntu login:_


Some random Screenshot I picked up from the net as I already resolved my issue :) . It looked same as below -


Solution


Follow 3 steps mentioned below

  1. Restore the /etc/issue file:

    Use the command : sudo mv /etc/issue.backup /etc/issue
  2. Restore the /etc/rc.local file:

    Use the command :  sudo mv /etc/rc.local.backup /etc/rc.local
  3. Restore the /etc/init/lightdm.conf file:

    Use the command : sudo mv /opt/vmware-tools-installer/lightdm.conf /etc/init

And then simply reboot your machine. You should see graphical interface coming up now.

But this also leds to another problem. This does not install your vmware tools. On trying you would get the following error.


To fix this delete and re add drives


    1. Power off the virtual machine.
    2. Go to VM > Settings
    3. Select CD/DVD.
    4. Make a note of the current settings for this device, then click Remove.
    5. Click Add.
    6. Select CD/DVD, and click Next.
    7. Select the settings you noted previously (or you can set them later), and click Next > Finish.
    8. Select Floppy.
    9. Make a note of the current settings for this device, then click Remove.
    10. Click Add.
    11. Select Floppy, and click Next.
    12. Select the settings you noted previously (or you can set them later), and click Next > Finish.
    13.Power on the virtual machine and install VMware Tools.

This should install vmware tools.

Note : To install the vmware tools if you get popup saying CD is read only don't worry. Copy the tar.gz file to your home folder. Extract folder contents using tar -xvf filename  and then install it. There is a python script in the extracted folder (ends with extension .py). Simply run it sudo ./filename.py and your vmware tools should get installed.

Friday, 4 July 2014

How to permanently set $PATH on Linux?

Goal

Very basic information that every Linux user needs to know - How to export $PATH . This variable contains all the paths which may have executables that will be recognized throughout the System. For example lets say you installed java. You want to compile a program and so you do javac TestClass.java and you get javac is not a recognized command. One way to resolve this is to do pathtojdk/bin/javac TestClass.java but this is not the best way. You can add path pathtojdk/bin to that $PATH environment variable and then you can access all commands in bin folder from anywhere in your System. So lets see how can we achieve this...

Getting Started...

So lets say I want to add following 3 paths to $PATH env variable
  1. $HOME/mozilla/adt-bundle-linux/sdk/tools
  2. $HOME/mozilla/adt-bundle-linux/sdk/build-tools
  3. $HOME/mozilla/adt-bundle-linux/sdk/platform-tools
You can view your existing $PATH variable by just typing echo $PATH . To add it you can do the following. Execute the following on command line

export PATH=$PATH:$HOME/mozilla/adt-bundle-linux/sdk/tools:$HOME/mozilla/adt-bundle-linux/sdk/build-tools:$HOME/mozilla/adt-bundle-linux/sdk/platform-tools

then again you can check the $PATH variable using echo.


But wait a second. Restart the console and if you notice the exported PATH is gone. Yes it is lasts only for that console session. So lets see how can we export this $PATH permanently.


  1. Edit your ~/.bashrc file and add the export line there.
  2. Save the file.
  3. Lastly execute source ~/.bashrc
Note : source command is basically to make your console aware of the changes that you have made in the file.


and thats it. Those PATHS should be in your $PATH environment variable permanently from there on.

Caution

  • It's often considered a security hole to leave a trailing colon at the end of your bash PATH because it makes it so that bash looks in the current directory if it can't find the executable it's looking for.  
  • Consider the scenario when you unpack a tarball, then cd to the directory you unpacked it in, then run ls---and then realize that the tarball had a malicious program called ls in it.
  • There can be other, more nasty versions. For instance, creating a malicious script called sl and waiting for someone to mistype ls.   

Related Links

Tuesday, 1 July 2014

Getting Started with MongoDB

Introduction

From Wiki

MongoDB (from "humongous") is a cross-platform document-oriented database. Classified as a NoSQL database, MongoDB eschews the traditional table-based relational database structure in favor of JSON-like documents with dynamic schemas (MongoDB calls the format BSON), making the integration of data in certain types of applications easier and faster. Released under a combination of the GNU Affero General Public License and the Apache License, MongoDB is free and open-source software.


Getting Started

  1. Download MongoDB from their website and install it. You have installer file for windows or zip file. Either way you should get MongoDB 2.6 Standard  folder installed. My folder location is C:\Program Files\MongoDB 2.6 Standard. You can find a bin file inside this folder. Add it to the %PATH% environment variable (windows) or export it by adding in .bashrc file(Linux).
  2. Next open command prompt and run MongoDB server. To do so execute command

    mongod --dbpath C:\Users\athakur\Softwares\MongoDB

    Replace the path after --dbpath with your path. It basically says where your db files will be stored. If you do not provide db path your server will not start and will show that dbpath was missing.


    After starting the server with --dbpath


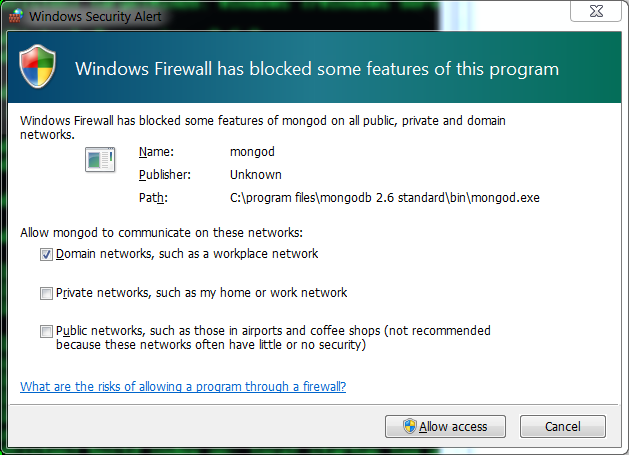
    You may be asked to allow network access to mongo db. Provide the required access.

  3. Next start the client by typing

    mongoThat should open the Mongo shell.


    By default, mongo looks for a database server listening on port 27017 on the localhost interface. To connect to a server on a different port or interface, use the --port and --host options.
  4. Lets create a new database. Type the following command

    use mydb

    and then type

    db

    This should show mydb database. Now try doing

    show dbs

    Nothing? Surprised? Don't be. It is the way Mongo DB behaves. MongoDB will not permanently create a database until you insert data into that database.

    Note :
    Unlike MySQL database you do not create tables and then insert data. Infact there is no relational model here. You simply switch db using use dbName syntax and add data. When you actually add the data the database is created.

  5. Lets go ahead and insert some data in our database. First create documents doc1 and doc2 using

    doc1 = {name : "Aniket"}
    doc2 = {org : "openSourceForGeeks"}


    Then add these documents to the collection (lets call it testDataCollection) database using

    db.testDataCollection.insert( doc1 )
    db.testDataCollection.insert( doc2 )


        When you insert the first document, the mongod will create both the mydb database and the testDataCollection collection.

    You can view your collections by

    show collections

    Confirm that your testDataCollection collection is created.

    The mongo shell will return the list of the collections in the current (i.e. mydb) database. At this point, the only collection is testDataCollection . All mongod databases also have a system.indexes collection.

    Also confirm the database is created ( by show dbs).

  6. Data Stored in MongoDB is essentially JSON. If you wish to see the data in the collection you can use command

    db.testDataCollection.find()

  7. That;s all for basics of mongo db. We say how to create database, collections and insert data in it. We also saw how can we retrieve the data.


Important commands

  1. db - shows current db in use
  2. help - show help
  3. cls - clear screen
  4. exit - exit Mongo shell
  5. show dbs - Show list of databases
  6. use mydb - use some other database
  7. show collections - Show all collection for the db. 

Important Links

Thursday, 26 June 2014

Creating new developer profile on firefox using profilemanager.

Background

It all started when I thought of creating an addon for firefox. Basic setup requires you to set up a new profile to work on. I am not sure why this feature is known to few people developing addons for firefox. Basically you can create multiple profiles in firefox. That means if you  are sharing your computer with some other person you can have two different firefox profiles for each. Each profile has its own bookmarks, active logons etc. Both are mutually exclusive.

Logged into GMail? and friend wants to see his mail ? Use different profile. Keep one profile fixed for yourself.

So lets see how this is done.

Getting Started

  1. Make sure there are no instances of firefox running or the below command won't work.
  2. First add your firefox to your PATH environment variable (It is not necessary but if you are planning for experimenting with firefox like me I would suggest go ahead and do it.)

  3. Next open your command prompt and type
    'firefox --profilemanager'.
    That should open a profile manager. In that you can create a new profile. I have named it 'developer'.

  4. Once created you can launch any profile by the command
    'firefox -p developer'.
    If you want to run two profiles together you can do
    'firefox -no-remote -p default'.
    You need to use 'no-remote' argument.

  5. You can also take backup up your profiles using MozBackup . You can download it from here.

Thats it with setting up the profile. If you only want to have exclusive profiles for use you are good with above. If you want to explore further look below -

Developer configurations

If you are looking ahead to  develop for mozilla firefox then you may want to set up certain configuration properties.

Open your browser with developer profile and enter 
about:config
in the address bar. You should see the following screen - 


Go ahead and select "I promise!" :). You should then get access to advanced configurations.


Set the properties as described in the Setting up an extension development environment.


t> UA-39527780-1 back to top