
Background
In this post, we will see how to create a simple Counter React.js application. This post assumes you have an understanding of React, Redux and can use IDE like Visual Studio or Webstorm to create React applications. You should have npm installed as well.
Creating a simple Skeleton React application
Let's start by creating a React App using the following command
- npx create-react-app my-app

You will see final output like above screenshot when the command is completed.
This will create a default app skeleton for you. If you want to see more details you can visit the official GitHub documentation. Once you have the app you can go into the app directory and execute below command to start the React app on local server.
- npm start

You should be able to access it via browser using some localhost URL. The URL will get printed in the console when you run the above command. (For me it's http://localhost:3000/)
The default application in the browser will look something like the below:

You can now open the project in any IDE you are comfortable working with. I am using Visual Studio for this demo. Your project structure should look something like below:

Note details about some of the main project files:
- index.js - This is your file that has your application's root component added to the actual DOM. This is the starting point of your application.
- App.js - This has your main custom root component defined. This has the code for the UI that you see when your application starts.
- *.css - These are CSS files that add styling to your application.
- package.json - package.json and the corresponding lock file is where your project npm dependencies are stored.
Creating a Counter application using Redux
Now we are going to use the above skeleton to create a simple counter application which supports the functionality of incrementing and decrementing the counter and the state is maintained via Redux.
- Firstly you need to install the redux package to be able to use it. Inside your project directory you can install the redux package using the following command:
- npm install @reduxjs/toolkit react-redux
- Then you need to define a store that your react application is going to use. Create a file store.js and add the following code to it
import { configureStore } from '@reduxjs/toolkit'
import counterReducer from './reducer/CounterReducer'

export default configureStore({
    reducer: {
      counter: counterReducer,
    },
  })
This essentially does - Sets redux store using configureStore imported from @reduxjs/toolkit.
- It provides a reducer that will be used to maintain the state (More on this later)
- Once you have stored configured the store you need to provide it to the React application. For this go to the starting application file - index.js make the following changes
- Put a React Redux <Provider> component around your <App />
- Pass the Redux store as <Provider store={store}>
- Now you need to define how your state stored in the store actually looks like, what are the actions that will be needed to update that state (the reducer methods). You can do that by creating a new file for reducer and add following code to it.
import { createSlice } from '@reduxjs/toolkit' export const counterSlice = createSlice({ name: 'counter', initialState: { value: 0, }, reducers: { increment: (state) => { state.value += 1 }, decrement: (state) => { state.value -= 1 } } }) export const { increment, decrement, incrementByAmount } = counterSlice.actions export default counterSlice.reducer - Note how we have used createSlice method from @reduxjs/toolkit to achieve this functionality.
- This method takes the reducer name, initial state - in our case, we have simply called it value and set it to 0, reducer methods - increment and decrement methods that update the state to increase our counter value by + or -1.
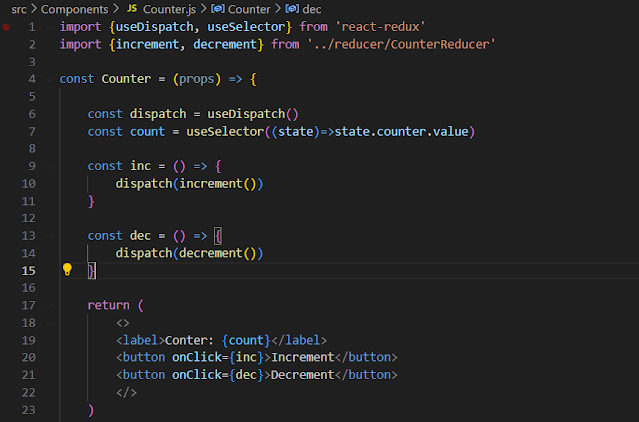
- Lastly, you need to create your Counter component to use the the redux store, the state we define and the reducer methods to update the state. See following code for counter component
import {useDispatch, useSelector} from 'react-redux' import {increment, decrement} from '../reducer/CounterReducer' const Counter = (props) => { const dispatch = useDispatch() const count = useSelector((state)=>state.counter.value) const inc = () => { dispatch(increment()) } const dec = () => { dispatch(decrement()) } return ( <> <label>Conter: {count}</label> <button onClick={inc}>Increment</button> <button onClick={dec}>Decrement</button> </> ) } export default Counter - Note how we are importing reducer methods increment and decrement and calling them on click of respective buttons.
- Also note how we are using two new hooks - useDispatch for dispatching reducer actions and useSelector to select from the state.
- Redux state is immutable and the reducer provides a way to mutate the state to create a new immutable state.
- You can then plug this Counter component in your App.js by importing it and then opening the URL in the browser to see the result. It should look something like below


You can install redux dev tools in Chrome to inspect what's happening in your redux state, what actions are getting dispatched, etc.


No comments:
Post a Comment