Sunday, 28 September 2014

IO in Java (Using Scanner and BufferedReader)

Background

This is one of the most basic questions in Java. How do we take input and print output in Java. There are multiple ways to do so. Mostly everyone would use Scanner or BufferedReader for input and System.out.println and PrintWriter for output without considering it's use case. Programmers who appear for coding competitions will understand what I am taking about. How do you do IO operations define your efficiency in such competitions and you may end up getting what is known as TLE (Time limit Exceeded). So in this post lets discuss what should we use for IO when and why.


Taking Input in Java

There are two most common ways to take the input - 

  1. Scanner :

    In scanner you can do something like -

    Scanner scanner = new Scanner(System.in, ",");
    String stringInput  = scanner.nextLine();
    int intInput = scanner.nextInt();


    Few points to note here

    • Scanner is used for parsing tokens from underlying Stream. In above case we have given standard output stream (System.in) to the Scanner object. 
    • Scanner also can tokenize your stream based on a delimiter. In above case we have provided comma(',') as a delimiter. Default delimiter is space.
    • As of Java 6 Scanner has a buffer size of 1024 characters.
    • Also Scanner is not synchronized meaning it is not thread safe. So you should not use this when multiple threads are involved.

  2. BufferedReader :

    In case of Buffered Reader you do something like -

    BufferedReader reader = new BufferedReader(new InputStreamReader(System.in));
    String line = null;
    while((line = reader.readLine()) != null) {
         System.out.println("Line read : " + line);
    }


    Few points to note here

    • Buffered Reader simply reads the Stream.
    • As of java 6 BufferedReader has a buffer size of 8192 characters.
    • BufferedReader is synchronized, so read operations on a BufferedReader can safely be done from multiple threads.

Comparing Scanner and BufferedReader

  • Scanner parses the token from underlying Stream where as Buffered Reader simply reads the Stream. In fact you can pass BufferedReader (ReadableSource) to Scanner.

    Scanner scanner = new Scanner(new BufferedReader(new InputStreamReader(System.in)));

  • As mentioned in above points BufferedReader has more buffer size (8192 characters) than Scanner (1024 characters).

  • BufferedReader is faster than Scanner as Scanner parses the token after reading it. So if you notice in coding competitions programmers generally use BufferedReader than Scanner. Only drawback being you have to take care of input formats.

    Infact as per code chef's  IO guidelines -

    Scanner is easily the most convenient way of reading in input, however it is very slow and not recommended unless the input is very small. ( less than 50KB of data is to be read )

    For example if input is an integer you may have to do.

    int data = Integer.parseInt(reader.readLine());
  •  

Why wrap with BufferedReader ?

Generally, each read request made of a Reader like a FileReader causes a corresponding read request to be made to underlying stream. Each invocation of read() or readLine() could cause bytes to be read from the file, converted into characters, and then returned, which can be very inefficient. 

FileReader fileReader = new FileReader(new File("data.txt"));
char[] data = new char[10];

fileReader.read(data); 

Efficiency is improved appreciably if a Reader is warped in a BufferedReader.

FileReader fileReader = new FileReader(new File("data.txt"));

BufferedReader bufferedReader= new BufferedReader(fileReader);

String line = null;

while((line = reader.readLine()) != null) {

    System.out.println("Line read : " + line);

}


Printing output in java

This may not seem to be such a big deal but it infact is. Use PrintWriter than using System.out.println as PrintWriter is faster than the other to print data to the console.

PrintWriter writer = new PrintWriter(System.out,true);
writer.println("Hi there!");

The System.out variable is referencing an object of type PrintStream which wraps a BufferedOutputStream (at least in Oracle JDK 7). When you call one of the printX() or write() methods on PrintStream, it internally flushes the buffer of the underlying BufferedOutputStream.

That doesn't happen with PrintWriter. You have to do it yourself. 

Alternatively, you can create a PrintWriter with an autoFlush property set to true which will flush on each write as I have done in example above.

Some other difference between System.out.println (PrintStream) and PrintWriter

  • PrintStream is a stream of bytes while PrintWriter is a stream of characters.
  • PrintStream uses platform's default encoding while with the PrintWriter you can however pass an OutputStreamWriter with a specific encoding.

    PrintStream stream = new PrintStream(output); 
    PrintWriter writer = new PrintWriter(new OutputStreamWriter(output, "UTF-8"));

  • As mentioned above PrintStream methods internally auto flushes the underlying BufferedOutputStream.
  • Note : autoFlush - A boolean; if true, the println, printf, or format methods will flush the output bufferSo if you do -

    PrintWriter writer = new PrintWriter(System.out,true);        
    writer.write("Hello World!");


    it will not cause auto flush. You will have to call flush explicitly.

    PrintWriter writer = new PrintWriter(System.out,true);
     writer.write("Hello World!");
     writer.flush();
    

Pictorial representation of IO


Related Links

Saturday, 27 September 2014

Apache HttpClient tutorial

Background

Assuming you know what REST or Restful APIs (GET, POST etc) are in this post we will cover how can we make these REST calls with Java program.  As the title of the post suggests the library that we are going to use is  - Apache HttpClient

To test the same REST calls we can use the CURL command line utility. You can learn how to do so from my previous posts on CURL

  1. Download and Install cURL on Windows 
  2. Using HTTP POST and GET using cURL

Dependency

We need to include the Apache HTTP client library in the code. I always use Ivy as a dependency manager for my java programming.

 My Ivy file looks like - 

<ivy-module version="2.0" xmlns:xsi="http://www.w3.org/2001/XMLSchema-instance"
       xsi:noNamespaceSchemaLocation="http://ant.apache.org/ivy/schemas/ivy.xsd">
    <info
        organisation="OpenSourceForGeeks"
        module="Demos"
        status="integration">
    </info>
    
    
    <dependencies>
        <dependency org="org.apache.httpcomponents" name="httpclient" rev="4.3.1"/>        
    </dependencies>
    
</ivy-module>


Note : Whenever you want to add any dependency in any dependency Manager like Maven, Ivy, gradle etc you can search the library in Maven Repository.

Code

import java.io.BufferedReader;
import java.io.IOException;
import java.io.InputStreamReader;
import java.io.UnsupportedEncodingException;
import java.util.ArrayList;
import java.util.List;

import org.apache.http.HttpResponse;
import org.apache.http.NameValuePair;
import org.apache.http.client.ClientProtocolException;
import org.apache.http.client.HttpClient;
import org.apache.http.client.entity.UrlEncodedFormEntity;
import org.apache.http.client.methods.HttpGet;
import org.apache.http.client.methods.HttpPost;
import org.apache.http.impl.client.DefaultHttpClient;
import org.apache.http.message.BasicNameValuePair;


/**
 * 
 * @author athakur
 *
 */
public class HttpClientDemo
{
    
    private static final String USER_AGENT = "Mozilla/5.0";
    private static final int TIMEOUT = 5000;
    
    public static void main(String args[])
    {
        
        HttpClient httpClient = new DefaultHttpClient();
        
        HttpClientDemo httpClientDemo = new HttpClientDemo();
        HttpParams httpParams = httpClient.getParams();
        httpParams.setParameter(CoreConnectionPNames.CONNECTION_TIMEOUT, TIMEOUT);
        httpParams.setParameter(CoreConnectionPNames.SO_TIMEOUT, TIMEOUT);
        
        String getResponse = httpClientDemo.performGetRequest(httpClient, "http://www.google.co.in");
        System.out.println("GET Response : " + getResponse);
        String postResponse = httpClientDemo.performPostRequest(httpClient, "http://www.google.co.in");
        System.out.println("GET Response : " + postResponse);
    }
    

    private String performGetRequest(HttpClient httpClient, String url)
    {
        HttpGet httprequest = new HttpGet(url);
        httprequest.addHeader("User-Agent", USER_AGENT);

        
        try {
            System.out.println("Performing GET request on + " + url);
            HttpResponse httpResponse = httpClient.execute(httprequest);
            System.out.println("Status code : " + httpResponse.getStatusLine().getStatusCode());
            
            BufferedReader reader = new BufferedReader(new InputStreamReader(httpResponse.getEntity().getContent()));

            StringBuffer requestResult = new StringBuffer();
            String line = "";
            while ((line = reader.readLine()) != null) {
                requestResult.append(line);
            }
            
            return requestResult.toString();
      
        }
        catch (IOException e) {
            System.out.println("Exception occurred while performing GET request");
            e.printStackTrace();
            return null;
        }
        finally {
            httprequest.releaseConnection();
        }
    }
    
    private String performPostRequest(HttpClient httpClient, String url)
    {
        HttpPost httprequest = new HttpPost(url);
        httprequest.addHeader("User-Agent", USER_AGENT);
        
        List<NameValuePair> urlPostParameters = new ArrayList<NameValuePair>();
        urlPostParameters.add(new BasicNameValuePair("key", "value"));
     
        try {
            httprequest.setEntity(new UrlEncodedFormEntity(urlPostParameters));
        }
        catch (UnsupportedEncodingException e1) {
            // TODO Auto-generated catch block
            System.out.println("Encoding not supported");
            e1.printStackTrace();
            return null;
        }

        
        try {
            System.out.println("Performing POST request on + " + url);
            HttpResponse httpResponse = httpClient.execute(httprequest);
            System.out.println("Status code : " + httpResponse.getStatusLine().getStatusCode());
            
            BufferedReader reader = new BufferedReader(new InputStreamReader(httpResponse.getEntity().getContent()));

            StringBuffer requestResult = new StringBuffer();
            String line = "";
            while ((line = reader.readLine()) != null) {
                requestResult.append(line);
            }
            
            return requestResult.toString();
      
        }
        catch (IOException e) {
            System.out.println("Exception occurred while performing POST request");
            e.printStackTrace();
            return null;
        }
        finally {
            httprequest.releaseConnection();
        }
    }
    
    
}

Output

Performing GET request on + http://www.google.co.in
Status code : 200
GET Response : <!doctype html><html itemscope="" itemtype="http://schema.org/WebPage" lang="en-IN">...
Performing POST request on + http://www.google.co.in
Status code : 405
GET Response : <!DOCTYPE html><html lang=en>  .......

Note :  POST call will not return valid output (200 status code). We got 405 (method not allowed) for post request because POST is not a valid method type for URL http://www.google.com. It only accepts a GET request.

Setting Timeout

Just for the record - 

HttpParams httpParams = httpClient.getParams();
httpParams.setParameter(CoreConnectionPNames.CONNECTION_TIMEOUT, TIMEOUT);
httpParams.setParameter(CoreConnectionPNames.SO_TIMEOUT, TIMEOUT);


is alternate way to do

HttpParams httpParams = httpClient.getParams();
HttpConnectionParams.setConnectionTimeout(httpParams, TIMEOUT);
HttpConnectionParams.setSoTimeout(httpParams, TIMEOUT);
 
With new APIs introduced in version 4.3 we can do

RequestConfig requestConfig = RequestConfig.custom()
  .setConnectTimeout(TIMEOUT)
  .setConnectionRequestTimeout(TIMEOUT)
  .setSocketTimeout(TIMEOUT).build();
CloseableHttpClient client =
  HttpClientBuilder.create().setDefaultRequestConfig(requestConfig).build();

Understanding Timeouts - 

  • Connection Timeout – Time to establish the connection with the remote host.
  • Socket Timeout  – Time waiting for response of a request – after the connection is established.
  • Connection Manager Timeout  – Time to wait for a connection from the connection manager/pool .

Refer to following diagram to understand how REST APIs work -


Related Links


Sunday, 21 September 2014

How to install Java Cryptography Extension (JCE) unlimited strength jurisdiction policy files

Problem

JCE has been integrated into the Java 2 SDK since the 1.4 release.

Below diagram shows a general overview of Java cryptographic architecture. What we are discussing in this post is related to JCE implementation provided by Sun/Oracle.


As per the Oracle documentation - 

Due to import control restrictions by the governments of a few countries, the jurisdiction policy files shipped with the JDK 5.0 from Sun Microsystems specify that "strong" but limited cryptography may be used.

 That mean JDK has a deliberate key size restriction by default. So you cannot perform an encryption with key more than 128 bits (16 bytes). If you do you will get an error something like -

Caused by: java.security.InvalidKeyException: Illegal key size or default parameters

If you get this Exception there is nothing wrong that you are doing. It's just the restriction on the encryption key that comes built into the JDK.

The reason for this is that some countries have restrictions on the permitted key strength used in encryption algorithms.

Again as per the documentation - 

An "unlimited strength" version of these files indicating no restrictions on cryptographic strengths is available for those living in eligible countries (which is most countries). But only the "strong" version can be imported into those countries whose governments mandate restrictions. The JCE framework will enforce the restrictions specified in the installed jurisdiction policy files.


Update -  Updates Since Java 8 and Java 9

There have been multiple updates since Java 8 and 9. Before you dive down into more details review this section based on the Java version you are using. I have shown how to resolve this issue with various Java versions in the video below. 


Java 9 and higher :


The Unlimited Strength Jurisdiction Policy Files are included with Java 9 and used by default (see Security Updates in the Java 9 Migration Guide).

If you get this error with Java 9, it might mean the policy configuration has been changed to a more restrictive policy (limited), see the instructions from the migration guide:

It states -

JCE Jurisdiction Policy File Default is Unlimited

If your application previously required the Java Cryptography Extension (JCE) Unlimited Strength Jurisdiction Policy Files, then you no longer need to download or install them. They are included in the JDK and are activated by default.

If your country or usage requires a more restrictive policy, the limited Java cryptographic policy files are still available.

If you have requirements that are not met by either of the policy files provided by default, then you can customize these policy files to meet your needs.

See the crypto.policy Security property in the  <java-home>/conf/security/java.security file, or Cryptographic Strength Configuration in the Java Platform, Standard Edition Security Developer's Guide.

Java 8 Update 161 and higher

Starting with Java 8 Update 161, Java 8 defaults to the Unlimited Strength Jurisdiction Policy. If you receive this error, it could indicate the configuration has been changed to limited. See instructions in the next section on Java 8 Update 151, or the previous section on Java 9, for changing this back to unlimited.

Java 8 Update 151 and higher

Starting with Java 8 Update 151, the Unlimited Strength Jurisdiction Policy is included with Java 8 but not used by default. To enable it, you need to edit the java.security file in <java_home>/jre/lib/security (for JDK) or <java_home>/lib/security (for JRE). Uncomment (or include) the line

crypto.policy=unlimited
Make sure you edit the file using an editor run as administrator.

The policy change only takes effect after restarting the JVM (this is especially important for long-running server processes like Tomcat).

For backward compatibility, installing the policy files as documented in the next section will still work as well.


Before Java 8 Update 151 - Removing the maximum key size restriction

You can remove the maximum key restriction by replacing the existing JCE jars with unlimited strength policy jars.

 Download the zip file extract the jars and replace them in your JDK/JRE.

For this Copy local_policy.jar and US_export_policy.jar extracted from above zip file to the $JAVA_HOME/jre/lib/security 

Note: These jars will already be present there so you will have to overwrite them.

Then simply restart your java application and the Exception should be gone.

NOTE: If you are using Ubuntu and the webupd8 PPA, you can simply run -

  • apt-get install oracle-java8-unlimited-jce-policy

 An alternate way to maximum encryption key size problem

This way is really a workaround. In fact, this approach is the workaround to all problems and it's not straightforward. Yeah you must have guessed it by now - Reflection

You can override the restriction with Reflection as follows - 

try {
    Field field = Class.forName("javax.crypto.JceSecurity").getDeclaredField("isRestricted");
    field.setAccessible(true);
    field.set(null, java.lang.Boolean.FALSE);
   } catch (Exception ex) {
      ex.printStackTrace();
   }

Note 1: I do not recommend the Reflection approach as it's hacky. If you are using it keep it for testing only. Don't put it in production code :)

Note 2: As the change of replacing policy files is in JDK itself you will have to do it in all your servers. Also, you will have to ask all your clients to do so.

Finding the maximum possible key length

To find maximum key length allowed by an encryption algorithm you can use Cipher.getMaxAllowedKeyLength() method.  For example, for AES algorithm you can do - 

int maxKeyLength = Cipher.getMaxAllowedKeyLength("AES");


Related Links

How to exclude Outlook results from the Start Menu search in Windows 7

Background

If you are using Microsoft outlook as your Email client you would have noticed when you search from your Start button Outlook search results appear. Sometime it gets really irritating when we are searching for something specific and irrelevant outlook searches block the space. Outlook itself had very good search workflow integrated. My personal feeling is that we don't need it unless we are searching mails everyday from start menu. In this post we will see how we can remove outlook results from Windows 7 Start Menu search.

Have picked the following image from google search just to demonstrate how the results appear - 


Excluding Outlook results from Start Menu Search

  1. Click in Start button.
  2. Search for indexing options and click on it.

  3. Select Modify.
  4. Uncheck Microsoft outlook and press ok.


  5. Close the indexing options box.
  6. Outlook searches should no longer appear in Win 7 start menu searches.

Starting and Stopping process in Windows from command Line

Background

In Windows it's all UI. Most people just double click on the icons or shortcuts to run the programs. Click on the cross icon to close it. Though it makes life easier as a programmer we should also know how to do the same using command line. Specially if you are wiring a program to do such a thing. In Linux/Unix it's quite easy. To start a process simply add it to the PATH and call the process. For example simply open the console and type 'firefox'. That should launch firefox  for you. If you want to stop the process you can execute kill -9 processId. Lets see how can we do the same in Windows.

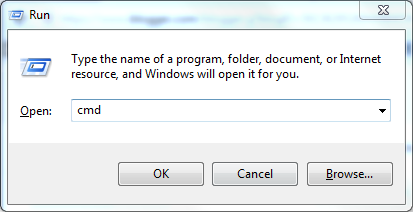
Prior to starting to lean command lets see how can we open the command line - 

One way is
  1. Press Ctrl + R . This should open the "Run" prompt for you.
  2. In this prompt type "cmd" (without quotes) and hit enter.


Or you can open it from start button .
  1. Click on start button.
  2. Search for cmd or command and you should see cmd.exe or command prompt. Both are same. Click on it.


Note if you want to perform some administrative action you need to start the command prompt as Administrator  . To do so -
  1. Click on start button
  2. Search for cmd or command. Right click on cmd.exe or command prompt  and select Run as Administrator.

Getting PID of a process

  1. To get PID of a process is Windows command is tasklist. (Like in Linux we have ps command) 
  2. You can also get it using wmic (Windows Management Instrumentation Command-line) utility (Get PID of specific process). You need to execute following command (explorer.exe is an example)-

    wmic process where "caption='explorer.exe'" get caption,processId


Starting a Process

Starting a process is quite easy. All you have to do is run the following in command line -

start commandName

For example lets say you want to start notepad you can simply type the following in cmd - 

start notepad

Stopping a Process

 One way to stop or terminate Windows process from command line is via the PID of the process. To get the PID use one of the way described in Getting PID of process section  above.
Then to stop a process use the command -

taskill /f /pid pidOfProcess

Complete process (stop and start) of a process is shown in below screenshot -


Important Note : /F option is taskkill denotes force kill. Your unsaved data might be lost!

Note : You can do all the above using Task manager [Ctrl + Shift + Esc] too (UI based). Above method is just a way to do it via command line. It will be specially useful when writing program to execute process like runtime.getruntime().exec() in java.

Saturday, 20 September 2014

Changing Android Launcher

Background

One of the most powerful feature of Android phone according to my opinion is the ability to customize the phone as per your requirements. When you boot up your phone the home screen that you see and the multiple apps screens you see when you click on the Apps shortcut icon (also called apps drawer) together form the launcher. Each Android phone has a default launcher but there are multiple 3rd party launcher Apps available of play store. When people generally talk about "stock Android" their context is about the features provided by the original Android OS (default ones). In this case it would be the default android launcher that comes with the OS provided by Google in the code.


In this post we will see how can we change the launchers in Android.

Launcher you may want to try out


Changing Android Launcher

There are two ways in which we can change the launcher.

  1. For download and install the launcher you want. If you have not tried any launchers before pick one from the above list.
  2. Next go to Apps (Settings -> Apps -> Navigate to All Apps). In this list find the Launcher App (the default one - as shown in the topmost screenshot). Tap on it.
  3. Tap on the Clear Default button. (If this button is greyed out take a look at Notes section below)This should clear your setting for default android launcher.
  4. Next time you click on Home button you will see all the available launchers to select from. You can select the one you have installed. 
  5. Again you will be prompted whether you want this launcher to be used Only once or Always. If you choose Only once you will be prompted to choose Launcher again next time you click on home button.


Alternate Way

Alternately there is an easier way to do this. There is Home category under Device section of Settings where you can directly choose your launcher. (If you do not see Home refer to Notes section below)


Notes

  1. If your Clear Default button is not clickable (greyed out)  then it means either you have already chosen a non default launcher or you have not installed any launcher (All you have is default one).
  2. If you do not see Home category in Device section of your settings that means you have not installed a Launcher or have never changes it before. Try installing the Launcher. If even now Home is not visible change the launcher using the 1st way (Clear Defaults) and then on you should be able to see the Home Category.
  3. Just for the record If you want your app to be recognized as a launcher it has to listen to tte android.intent.category.HOME intent. So basically when you click on Home button on main screen this intent is fired and all activities listening to this intent are shown. Sample manifest would be

    <activity
        android:name="org.openSourceForGeeks.MyActivity"
        android:label="My Android Launcher"
        android:theme="@android:style/Theme.Wallpaper.NoTitleBar.Fullscreen"
        android:launchMode="singleTask"
        android:stateNotNeeded="true"
        >
        <intent-filter>
          <action android:name="android.intent.action.MAIN" />
          <category android:name="android.intent.category.HOME" />
          <category android:name="android.intent.category.DEFAULT" />
        </intent-filter>       
    </activity>


Screenshots of Aviate Launcher from my Moto E


Related Useful Links

Wednesday, 17 September 2014

How to turn off notifications for individual android apps?

Background

Notifications form a very important and integral part of Android operating System. They are used to notify user of various actions/updates. A very apt use case is our native email that we configure. Whenever we get a new Email or have a meeting in the calendar scheduled we should get a notification for the same which is what exactly happens. Developers of Android Apps code their app in such a way. 

But here's the problem. We as an end user do not wish to see all notification. For me I am a programmer as well as gamer. I like to try out new Apps including games. Recent ones that I tried include Clash of ClansBoom Beach and Hay Day  But I hate those gaming notifications that pop up. You are in office you get a notification alert. You expect it to be an important mail and it in-fact is some unwanted notification like your life/strength is full again . God.. I hate that moment!


Some developers provide support to disable notifications from the app itself but not all. For example candy crush game provides option to disable notifications - 


Solution


From Android Jelly Bean (4.1) there is support in OS itself for disabling app notification. You can disable any app notification as follows - 

  1. Under each application info screen there is now a checkbox for "show notifications" (assuming the app sends notifications).
  2. Uncheck that and no more notifications from that app should appear in your notification bar.

  3. When you get a notification you don’t want, pull down the notification bar, and hold down the notification until a box pops up that says “App info.” Tap that box. You will see the activity(screen) same as screenshot in step1.


Note :  Most apps, especially games, keep updating. When they update they turn the notifications on again. So you may have to repeat this process on each game update.

I have tested with my apps and it seems to work fine. Do share your experiences with unwanted notifications and if you tried any other method (other than rating it 1 star and uninstalling it :) ).

In older versions of Android than Jelly bean you are really at the mercy of programmer hoping that he/she has provided notification option in the settings.

Sunday, 14 September 2014

Difference between block level elements and inline elements in HTML

Background

Most of you might already know HTML stands for HyperText Markup Language and is the standard markup language used to create web pages. HTML consists of elements. Most of the elements have stating and ending tag. For eg. <div></div>. Some don't need. For eg. <br />. You can read more about it on Wikipedia or w3schools. In this post I am going to cover what are basic blocks in a HTML.

Blocks in HTML

Elements in HTML are categorized into two types- 
  1. block level elements
  2. inline elements

When block level elements are rendered in a webpage they generally begin and end with a new line. For example <ul>, <table>, <h1>, <p>  tags. Inline elements comprise of tags that come inside(nested) block level element tags. For example <a>, <img>, <b>, <td>.

Difference

Picking this up directly from the W3 documentation -

Certain HTML elements that may appear in BODY are said to be "block-level" while others are "inline" (also known as "text level"). The distinction is founded on several notions:

  • Content model : Generally, block-level elements may contain inline elements and other block-level elements (Exception to this on paragraph/p tag). Generally, inline elements may contain only data and other inline elements. Inherent in this structural distinction is the idea that block elements create "larger" structures than inline elements.
  • Formatting : By default, block-level elements are formatted differently than inline elements. Generally, block-level elements begin on new lines, inline elements do not.

Below are some details on <div> and <span> elements which I have directly picked up from W3schools.I have used them a lot in web pages and JSPs but never knew the basic difference between them and their intended purpose.

<div>  element

  • The HTML <div> element is a block level element that can be used as a container for grouping other HTML elements.
  • The <div> element has no special meaning. Except that, because it is a block level element, the browser will display a line break before and after it.
  • When used together with CSS, the <div> element can be used to set style attributes to large blocks of content.
  • Another common use of the <div> element, is for document layout. It replaces the "old way" of defining layout using tables. Using <table> elements for layout is not the correct use of <table>. The purpose of the <table> element is to display tabular data.

<span> element

  • The HTML <span> element is an inline element that can be used as a container for text.
  • The <span> element has no special meaning.
  • When used together with CSS, the <span> element can be used to set style attributes to parts of the text.


Nesting block level elements inside the <p> tag… right or wrong?

As the documentation clearly says

The P element represents a paragraph. It cannot contain block-level elements (including P itself).

You cannot use block level elements inside paragraph tag. Well no body stops you from adding it but here's what will happen  - opening <div> or any other block level tag will automatically close the <p> element.

Related Links


Saturday, 13 September 2014

Method overloading in Javascript

Background on method overloading

If you are from java or C# background then you must be familiar with the concept of method overloading. You can refer to following post on method overloading in java


Just to summarize (as far as java is considered) two methods are said to be overloaded if they have same method name but different method signatures. Also note method signature is the name of the method plus the number and types of arguments. Signature has nothing to do with return type. Also two methods cannot have same signature.

So for example

public void foo(String arg1);
public void foo(String arg1, String arg2);

are overloaded methods. Also note method overloading is a compile time phenomenon. Which method is to be used for execution is decided at compile time depending on the method signature.

Okay enough of Java overloading background. Lets head to javascript.


Method overloading in Javascript

Method overloading is not possible in Javascript in strict sense!

yeah that's right. You should not do something like

function foo(x)
{
  //some logic 
}

function foo(x,y)
{
  //some logic 
}

Why have i written "should not" rather than "cannot" is because no body can stop you from writing the methods above. It's just that it will not serve it's intended purpose. Why not ?-

The issue is that JavaScript does NOT natively support method overloading. So, if it sees/parses two or more functions with a same names it’ll just consider the last defined function and overwrite the previous ones.

So  foo(x,y) wold override foo(x) in above case.  So if I call method as foo(1) and as per what I have written above foo(x,y) will overwrite foo(x) why is there no some kind of error or Exception ? 

Well because when you specify arguments in the round brackets - they are just like synthetic sugar coating on the real arguments. This is where there is another JavaScript feature, which a lot beginners miss out on. In any JavaScript method, the arguments passed into the method are accessible via an Object array with the name arguments.

So lets say you now have a method

function func1(a,b,c)
{

   //some logic 
} 

and you call func1(1,2,3,4) then a=1(arguments[0]), b=2(arguments[1]),c=3(arguments[2]) and you c(arguments[3]). So as I said arguments inside round brackets are just to improve the functionality.


In fact for above method you can also call it like func1(1,2) and in this case arguments c and d will be undefined. Following the same argument above you can have a function defined with no argument and call it with any number of arguments.

You can check any variable if it is undefined in the following way (using typeof ) -


function func1(a,b,c,d)
{
   if(typeof a == 'undefined')
   {
      alert("a is undefined"); 
    }
     // and so on... 
}


So how do we resolve this issue ?

One of the way I think is suitable for most of the case is follows -

Lets say you have method

function foo(x)
{

} 


Instead of overloading method which is not possible in javascript you can define a new method

fooNew(x,y,z)
{
}


and then modify the 1st function as follows -

function foo(x)
{
  if(arguments.length==2)
  {
     return fooNew(arguments[0],  arguments[1]);
  }
} 

If you have many such overloaded method consider using switch than just if-else statements.

Related Links


Monday, 8 September 2014

Lifecycle of SimpleFormController of Spring MVC

Background

Yes SimpleFormController has been deprecated since Spring 3.0 but is still widely used. So  in this post I am going to discuss the lifecycle or workflow of this controller.

Steps

Workflow is as follows and it is controlled by AbstractFormController class - 

  1. The controller receives a request for a new form (typically a GET).
  2. Call to formBackingObject() which by default, returns an instance of the commandClass that has been configured (see the properties the superclass exposes), but can also be overridden to e.g. retrieve an object from the database (that needs to be modified using the form).
  3. Call to initBinder() which allows you to register custom editors for certain fields (often properties of non-primitive or non-String types) of the command class. This will render appropriate Strings for those property values, e.g. locale-specific date strings.
  4. Only if bindOnNewForm is set to true, then ServletRequestDataBinder gets applied to populate the new form object with initial request parameters and the onBindOnNewForm(HttpServletRequest, Object, BindException) callback method is called. Note: any defined Validators are not applied at this point, to allow partial binding. However be aware that any Binder customizations applied via initBinder() (such as DataBinder.setRequiredFields(String[]) will still apply. As such, if using bindOnNewForm=true and initBinder() customizations are used to validate fields instead of using Validators, in the case that only some fields will be populated for the new form, there will potentially be some bind errors for missing fields in the errors object. Any view (JSP, etc.) that displays binder errors needs to be intelligent and for this case take into account whether it is displaying the initial form view or subsequent post results, skipping error display for the former.
  5. Call to showForm() to return a View that should be rendered (typically the view that renders the form). This method has to be implemented in subclasses.
  6. The showForm() implementation will call referenceData(), which you can implement to provide any relevant reference data you might need when editing a form (e.g. a List of Locale objects you're going to let the user select one from).
  7. Model gets exposed and view gets rendered, to let the user fill in the form.
  8. The controller receives a form submission (typically a POST). To use a different way of detecting a form submission, override the isFormSubmission method.
  9. If sessionForm is not set, formBackingObject() is called to retrieve a form object. Otherwise, the controller tries to find the command object which is already bound in the session. If it cannot find the object, it does a call to handleInvalidSubmit which - by default - tries to create a new form object and resubmit the form.
  10. The ServletRequestDataBinder gets applied to populate the form object with current request parameters.
  11. Call to onBind(HttpServletRequest, Object, Errors) which allows you to do custom processing after binding but before validation (e.g. to manually bind request parameters to bean properties, to be seen by the Validator).
  12. If validateOnBinding is set, a registered Validator will be invoked. The Validator will check the form object properties, and register corresponding errors via the given Errors object.
  13. Call to onBindAndValidate() which allows you to do custom processing after binding and validation (e.g. to manually bind request parameters, and to validate them outside a Validator).
  14. Call processFormSubmission() to process the submission, with or without binding errors. This method has to be implemented in subclasses.


Above was the workflow  as specified in the Spring documentation of AbstractFormController. 

If it's confusing refer to following diagrammatic representations and try to co-relate

Diagrammatic Representation


Note :  If there are any errors in command object fields binding form will be reloaded (as shown in Request 2 of above diagram and after processFormSubmission(), showForm() and referenceData() are again called). onSubmit() is never called if this happens.

Typically a Spring bean lifecycle of a SimpleFormController would look something like below - 


Understanding some basic methods

  • isFormSubmission() : This method determines whether form is submitted (a POST request) or is for initial viewing (a GET request). This method is the base on which the two workflows of SimpleFormController are split.
  • formBackingObject() : This method returns an instance of command object which is the form Object. You can specify the class of this Object by setCommandClass( ) method. Or you can directly specify it in your bean configuration file -

    <property name="commandClass">
    <value>org.opensourceForgeeks.FormBackingObject</value>
    </property>

  • initBinder() : This method is called after the form command object is created and data binder is created by the controller. Developers can override this method to register custom PropertyEditor.
  • isValidateOnBinding(): If this method returns true then the binding validations are performed. By default it is set to true and final. Only way to change it is through setValidateOnBinding() method.
  • referenceData(): This method is used to provide reference data if any. Do not confuse it with formBackingObject() method where form Object is created. This method is used to provide any extra reference data that model may need to render UI page other that the command object. Whole model is then sent  to the View set by formView property of the bean in dispacher-servlet.xml file. Form View will then be rendered (See above diagrams for reference).

Related Links

Tuesday, 2 September 2014

Calling JavaScript function in href vs. onclick

Background

There are multiple ways to call a Javscript function in an anchor tag. You can put the method in href attribute or you can use onclick event or jquery events. This post is about good practices while calling a javascript function in such a scenario.


Usage in order of  increasing good practice


<a id="myLink" href="javascript:MyFunction();">link text</a>
 
<a id="myLink" href="#" onclick="MyFunction();">link text</a>
 
<a id="myLink" href="#" onclick="MyFunction();return false;">link text</a>
 
<a id="myLink" title="Click to do something" href="#" onclick="MyFunction();return false;">link text</a>
 
<a id="myLink" title="Click to do something" href="PleaseEnableJavascript.html" onclick="MyFunction();return false;">link text</a>

But the best practice as of now is to use jquery and attach an even handler to the elements id. Something like -

$('#myLink').click(function()

  {

     MyFunction();

     return false;

  }); 

 Notes

  • The onclick won't fire if someone middle-clicks on your link to open a new tab or if they have JavaScript disabled.
  • In case javascript is enabled adding return false in  onclick will will prevent browser from following the link.
  •  If you don't have a link in href attribute you should do javascript:void(0) rather than # in the href attribute.  '#' will take the user back to the top of the page if it is present in the href attribute and onclick is not returning false.


Related Links


t> UA-39527780-1 back to top