Sunday, 5 April 2015

Difference between functions and methods.

Background

Let me be honest here. I always thought they are the same and used them interchangeably but as it turns out they are not. Each has it's significance or scope.  I stumbled on this question today when I started with python again after a long time. I simply googled "methods in python" and the results on different pages  were using different terminology. And that's when it struck me that methods and functions are indeed different and we should be careful to use each in proper context. I will tell what to use it context of few programming languages but lets start with the understanding process.


I believe programming can be fun.  Above is my 1st meme so please bear with me :)

Difference between Functions and Methods

 Ever tried to explain anyone what a method or function is ? You may have read some definition back in college. Anyway lets try to explain that first.


So a function has a name (called as function name). There it has the data that is passed to it that the function can operate on (called arguments). There arguments are generally provided in parenthesis "()" adjacent to the function name. And lastly there is method body that has the logic to execute when this code module is called. If you ask about a method you may probably answer the same way. 

But there is a difference. 
  • Functions are standalone where as method are associated with an Object. When you call a method it is in scope of that object which has it's own blueprint (called class).  
  • Another difference is that all arguments in function are explicit where as method had one implicit argument and that is reference to the object that the method belongs to. For example methods in Java can use this  in the method body or in python you can use self.
Just think of "Methods" as object oriented way of calling "Functions.

Note :  I can understand if you argue back saying what about static methods in Java? They are not associated with any instance and we definitely cannot use this in static methods. So are they still methods? Well answer is Yes. You will still call them methods. As I said "Methods" are object oriented way of calling "Functions". I know this is a lame argument but that is what it is. Do let me know in comments if you have some other view point. Would love to discuss this :)


Example in Python

I will give example in python due to which this all started for me. We can have both functions and methods in python. Hope it helps to understand this better.

Functions in python :

def test(name, place="India") :
    """ This is a test function"""
    print("Hi " + name + "! Welcome to " + place)


test("Aniket", "USA")
test("John")

Methods in python : 

class TestClass:
    def test(self, name, place="India"):
        """ This is a test method """
        print("Hi " + name + "! Welcome to " + place)

testObj = TestClass()
testObj.test("Aniket", "USA")
testObj.test("John")
 

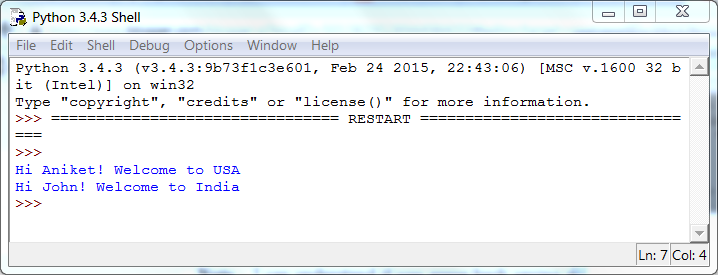
And you should see output as (in both cases) : 


General Terminology

  • For Java, there are only methods.
  • For C, there are only functions.
  • For C++ or Python it would depend on whether or not you're in a class.


Note : I know I have labelled this post as "programming concept" but it is more of a terminology use. There were many instance when I answered on Stack overflow using these words interchangeably and ended up corrected by someone and each time I am like "What.... how does it matter?". Well it does .. specially when you are in a circle of programmers/developers. So better late than never :)  you know now!

Related Links


Friday, 3 April 2015

Difference between JSPs and Servlets

Background

Both JSPs and Servlets are server side technologies based on Java to generate web content dynamically that is then rendered on the requesting client which is typically your web browser. In this post we will see How JSPs work and what is exactly the difference between JSPs and Servlets.


Java Servlet

Servlet is a Java module that listens for HTTP requests like GET, POST etc. Once request is received by the servlet it will return appropriate response for it. A server code would look like - 

import java.io.*;
import javax.servlet.*;
import javax.servlet.http.*;
/**
* @author athakur
*/
public class TestServlet extends HttpServlet {

  public void init() throws ServletException
  {
      //Servlet initialization code go here
  }

  public void doGet(HttpServletRequest request, HttpServletResponse response)
            throws ServletException, IOException
  {
      response.setContentType("text/html");
      PrintWriter out = response.getWriter();
      out.println("<b>Hello World!</b>");
  }
  
  public void destroy()
  {
      // Any code to be executed when servlet is destroyed
  }
}

and your web.xml will have mapping of this servlet and the URL the servlet handles - 

    <servlet>
        <servlet-name>TestServletName</servlet-name>
        <servlet-class>TestServlet</servlet-class>
    </servlet>

    <servlet-mapping>
        <servlet-name>TestServletName</servlet-name>
        <url-pattern>/HelloWorld</url-pattern>
    </servlet-mapping> 

So when ever tomcat server receives a request for URL like http://localhost:8080/projectName/HelloWorld you should see response as Hello World! in bold on a webpage that is rendered on your web browser.


As I said before think of a servlet as Java module that intercepts HTTP request and provides the response for it. It is like HTML in Java .

JSP pages

JSP  (Java server pages) - They are like Java in HTML. A simple JSP would look like below - 

<html>
<head><title>Test JSP</title></head>
<body>
  <%
    String greeting = "Hello World!";
  %>
  <b><%= greeting %></b>
</body>
</html>


As you can see it is  HTML content with embedded Java logic. Lets now see how JSPs actually work?

How JSPs work?

  1. When JSP container gets request for a JSP (Request URL would be something like http://localhost:8080/projectName/greetings.jsp) it checks whether JSP is compiled or not. If it is compiled it check for last modification time. If JSP page is modified after the JSP was previously compiled then JSP will be compiled again.
  2. Before compilation JSP is actually converted to a java servlet. This generated content is in Java just like a normal servlet we saw above. This servlet is then compiled into a class file.
  3. Request is then forwarded to this generated servlet which then handles the request and returns the response.

 The relevant generated servlet content in step 2 above for JSP same page that I have described above would be something like -

out.write("<html>\r\n  ");
String greeting = "Hello World!";
out.write("<b>");
out.print( greeting );
out.write("</b> \r\n");
out.write("</html>\r\n");

 You should be able to see the generated java file under 
  • work\Catalina\localhost\ProjectName\greetings.java


Related Links

Saturday, 28 March 2015

Creating a Dialog fragment in Android

Background

In this post we are going to see how to create a simple custom dialog fragment in Android.


So we will create a dialog box that looks like above. It is a simple dialog box that asks user if he wants to go to google search or not. If user presses "Not Now" then we simply close the dialog box and if user presses "Yes" then we open browser with url as "google.com" using implicit intent.

To The Code...

Code for it is as follows  -

/**
 * 
 * @author athakur
 *
 */
public class VisitGoogleDialog extends DialogFragment {
    
    private static final String GOOGLE_URL = "http://www.google.com/";
    
    Context appContext;
    
    public VisitGoogleDialog(Context context) {
        this.appContext = context;
    }

    @Override
    public Dialog onCreateDialog(Bundle savedInstanceState) {
        // Use the Builder class for convenient dialog construction
        AlertDialog.Builder builder = new AlertDialog.Builder(getActivity());
        TextView dialogMessage = new TextView(appContext);
        dialogMessage.setText(R.string.google_dialog_info);
        dialogMessage.setGravity(Gravity.CENTER_HORIZONTAL);
        builder.setView(dialogMessage)
               .setPositiveButton(R.string.pos_dialog_text, new DialogInterface.OnClickListener() {
                   public void onClick(DialogInterface dialog, int id) {
                       Intent viewGoogleIntent = new Intent(Intent.ACTION_VIEW,Uri.parse(GOOGLE_URL));
                       startActivity(viewGoogleIntent );
                   }
               })
               .setNegativeButton(R.string.neg_dialog_text, new DialogInterface.OnClickListener() {
                   public void onClick(DialogInterface dialog, int id) {
                       dialog.dismiss();
                   }
               });
        // Create the AlertDialog object and return it
        return builder.create();
    }

}

Creating this dialog from any activity is also quite simple. Following is the code to bring this dialog up by selecting "more info" option from menu.

    @Override
    public boolean onOptionsItemSelected(MenuItem item) {
        int id = item.getItemId();
        if (id == R.id.more_info) {
            DialogFragment googleDialogFragment = new VisitGoogleDialog(this);
            googleDialogFragment.show(getSupportFragmentManager(), "GoogleDialog");
            return true;
        }
        return super.onOptionsItemSelected(item);
    }

For me it finally looked like - 

Adding custom layout to the Dialog

Inside  onCreateDialog() method you can add your custom layout to the dialog - 

        AlertDialog.Builder builder = new AlertDialog.Builder(getActivity());
        final View customView =  getLayoutInflater(savedInstanceState).inflate(R.layout.modern_art_ui_layout, null);
        builder.setView(customView);

And in onClickListener you can easily get Views in the layout and do any processing if needed - 

               builder .setPositiveButton(R.string.pos_dialog_text, new DialogInterface.OnClickListener()  {
                   public void onClick(DialogInterface dialog, int id) {
                       View leftImage= customView.findViewById(R.id.leftImage);
                       // process leftImage
                   }
               })


Note : I am not providing resource  file data as I think it should be trivial to understand. For eg value for String resource "google_dialog_info" should be set to "Continue to google search ?" for this demo. Same goes to other resources like layout files.


Related Links

Thursday, 26 March 2015

Intercepting Android network calls using Fiddler Web Proxy

Background

Some time it is important to intercept and inspect network calls that are being made from your android device. Specially of you have made an android app want to debug the outgoing network calls. In a browser it is very simple , you simply right click and then inspect element. Network tab will give you the network calls made with the details. Each browser has their own native inspector. I generally use firebug in my firefox. But as I was saying this is not possible in android devices. So we have to divert all device network calls via a proxy and inspect our calls there.  For this demo I am going to use Fiddler as a proxy.


Getting started

You can download and install Fiddler web proxy from here.

After installing it go ahead and start it up. You should see following screen - 


Note : You can use shortcut Ctrl + X shortcut to clear the captured network data.

Lets set up some settings so that we can use this as a proxy for out android device.

Go to Tools -> Fiddler Options . Navigate to Connections tab and select "Allow Remote computers to connect" option.


After you select this you will see an alert stating that remote connection network traffic will bounce via your computer. Select OK. 


Note1 : You will have to restart Fiddler for changes to take effect.

Note2 : After selecting Accept Remote connections restart fiddler. In case windows firewall prompts you to allow access, check all three checkboxes and click the Allow Access button

Just to make sure your Fiddler web proxy is up and running you can type "localhost:8888" in your browser and Fiddler echo service should respond back 200 status.


If you don not want to inspect and decrypt https connection skip to Configuring Client section.

Decrypting HTTPS Connections


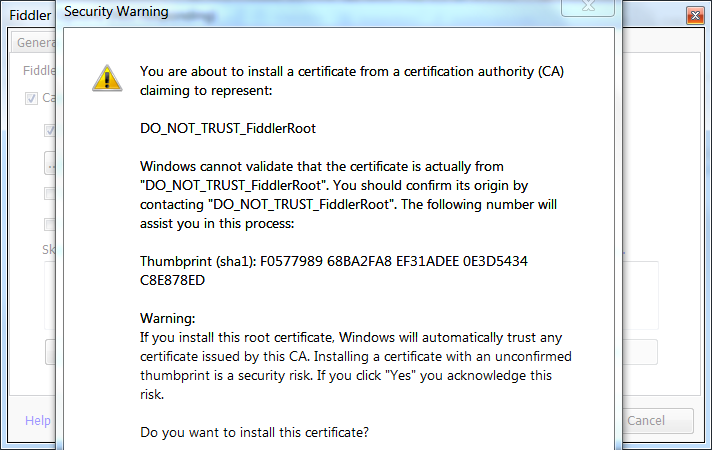
If you want to intercept and decrypt https (SSL) traffic as well. You can again go in Tools -> Fiddler Options. This time navigate to "HTTPS" tab and select "Decrypt HTTS traffic". You will get a prompt to trust a root CA certificate fiddle provides. For now select "No".  Will explain why in some time.


Even if you press yes next window should warn you again.


 Take the hint. It's not safe :) Atleast there is no need for us. We will see why in below section.

You need to add this certificate in list of trusted certificates in your Android device. I will show that in the end of configuring Client section.

What is this CA ROOT certificate that we have to trust and how is it related to HTTPS traffic decryption? 

This section is not really required for testing network traffic. I am just adding for people who are interested in understanding the concept. Others can skip this section.

Whenever https is enabled on a server container like apache tomcat you need to do some SSL configurations. Important thing to provide to the server is the keystore which stores the certificate that the private keys. When any client connects to this server, server provides a copy of the SSL certificate to the client. Now client (Android device in our case) has something called a trust store that which has certificates that the client can trust. If the client does not trust the certificate server has provided then connection errors out.  There certificate are typically generated and provided by know certificate providers like Digi Cert, Go Daddy etc. For more information on Certificate providers read the Wiki - 
What happens in Fiddler is as follows - Client makes an https call. Fiddler intercepts it and forwards it to the actual server. When it gets a response Fiddler uses it's own certificate and forwards the response to the client. Why? Think if Fiddler forwarded the request directly yo the client. Whatever client sends in subsequent https   connection will be signed with the public key that can only be decrypted by the server that has it's private key which in this case will be the mail site server where request is sent. Since Fiddle does not have that Fiddler sends it's own certificate to the client. Client signs subsequent data with that certificates public key and since Fiddle has this certificate (with it's private key) it can decrypt it.

Wow that a security hazard? Well it a well known attack actually. Also called man-in-the-middle (Read Wiki on it) attack. Do not worry about it. Your client should trust that certificate in order for it to work.

So why we did not accept the certificate to trust? Because this on the machine which hosts the Fiddler and we want to intercept the calls from our Android device. So Android device is the client and not the machine that hosts Fiddler. You can accept the certificate as trusted one in your android device. As a test if you go on any https site (on your machine) now you will get the unstrusted certificate warning. Do not accept and proceed :)


After this is your Fiddler is all set to Intercept your calls. All you have to do is configure the client (your android device) to use this as the proxy.
 

Configuring the client (Android device)

Long tap on your Wifi (Note your machine where Fiddler is running and the Android device should be on the same wifi network).  Click on "Show Advance options".

Select Manual as the proxy type. Put in proxy hostname as your machines IP address. Change the port to 8888 which Fiddler runs on by default.

Let every other setting be as it is. 


You can then see captured data in the Fiddler. I tried a simple http site - http://moma.org


Lets try an https site now. https://google.com


Opps what happened? Well we have not added fiddlers certificate to the list of trusted certificate list on device yet. Lets do that now. Again this is only for decrypting https data. Skip below for http connections -

In your browser of android device go to following URL -
You will get the prompt to install certificate. Provide some certificate name. Choose "Wifi" in the credentials Use section and click Ok. Https connections should work now.


Note : Fiddler should be running for this.

After you install the certificate. Typically you should see a toast that says certificate installed -

Don't mind my delay in taking above screenshot :) The toast is almost faded. Anyway after this you should see a notification on your device saying your network activity is monitored -


and when you click on "Check trusted credential" you can see the user installed cert on your system -


After you are done testing you can remote the cert from here. tap on the cert entry and you should see new activity with cert info. Scroll to the bottom and click Remove to remove this cert from your system. Do not forget to remove manual proxy and all goes back to normal :)


Resolving  “enter the password for credential storage” issue?


Note if you have trouble installing certificate as I was (i was continuously getting following prompt).


then remove all security you have for lock screen - I had pattern. Now try installing the certificate again. You will get prompt to add lock security - password or pin.


Go ahead and set it up. Then certificate should get installed.

Important Note : This is a good tool to analyze your devices network data but can be misused if you do not know what are you up to. So don't try this on your personal device with sensitive data . Probably try on emulator first or a test device. I don't take any responsibility for any testing that you do using information in this post!

Related Links

Saturday, 21 March 2015

Recording Android Device screen with ADB

Background

There are various app / recording software's that you get in market to record your Android device videos. But there is an inbuilt way too similar to the the backup method we saw in one of the previous posts - 
From Android 4.4 Kitkat (API 19) there is an inbuilt command to take screencast  of your device. You can read the same in Kitkat official documentation -

"With the screen recording utility, you can capture video of your device screen contents and store the video as an MP4 file on the device. You can record at any device-supported resolution and bitrate you want, and the output retains the aspect ratio of the display. By default, the utility selects a resolution equal or close to the device's display resolution in the current orientation. When you are done recording, you can share the video directly from your device or pull the MP4 file to your host computer for post-production."

So now you can record your device , save it in mp4 format and share it easily. For this you will need Android SDK (ADB ) .

Note : You can also do this directly from your device but your device should be rooted for that.

Prerequisites :  Android device running Android Kitkat (API 19) or higher, USB cable for debugging and machine with adb setup.


 Getting Started with Recording


Connect your device to your machine having ADB setup.  Ensure debugging is enabled. Next open command prompt and type -

C:\Users\athakur>adb devices
List of devices attached
ZX1B32P5VL      device


Make sure you see your device listed as shown above. If it does not show up you may want to troubleshoot it first -

After this you can connect to your device using adb shell and execute the  screenrecord command to start the video capture. Command to be executed is -
  • screenrecord filePathToMP4File
For example I can do something like following

C:\Users\athakur>adb shell
shell@condor_umtsds:/ $ screenrecord /sdcard/test.mp4
shell@condor_umtsds:/ $ exit
C:\Users\athakur>adb pull /sdcard/test.mp4 .
3197 KB/s (2076164 bytes in 0.634s)


Note : Notice after video has been recorded I have pulled it back to my Laptop using adb pull  command.

Yes it's that easy :)

You can read more about the command and it's option by executing following command -
  • adb shell screenrecord --help

Attention! - Not available in Emulators

This does not work on Android Emulator's. This is a bug and does not look like is going to be fixed in near future. If you try above approach on Emulator command will fail with following Error -

ERROR: unable to create encoder input surface (err=-38)
WARNING: failed at 320x480, retrying at 720x1280
ERROR: unable to create encoder input surface (err=-38)

This bug is tracked in 
if you wish to read the discussion around it.

I created following screencast today using this method as it was required by Android course that i am doing from coursera -


Related Links

t> UA-39527780-1 back to top