Saturday, 7 June 2014

Open a new web page to show content using javascript.

Goal

In my last post I showed how can we get started with Web development by making a simple "Hello World" HTML web page. In  this post we will see how can we open a new window to show some content.

Getting Started

 Lets first create a web page that meets our requirement and then we can look at the javascript part.
Again create a file called index.html and add following content in it.

<html>
<header><title>Open Source For Geeks Tutorial</title></header>
<body>
<center>
<h1>Open Source For Geeks Demo</h1>
<table>
<caption>Demo Table</caption>
<tr>
<td>
Enter Some Text : 
</td>
<td>
<input type="text" name="textContent">
</td>
</tr>
<tr>
<td>
Click to Submit : 
</td>
<td>
<input type="button" value="Submit">
</td>
</tr>
</table>
</center>
</body>
</html>


Now view the page in the browser. You should see something like below


What we want to achieve is to enter some text in the text field then click the Submit button and we should be able to see the text content entered on a new page.

Following code is fully functional with javascript function.

<html>
<header>
<title>Open Source For Geeks Tutorial</title>
<script>
function openNewPage() {
    top.consoleRef=window.open('','myconsole',
        ',menubar=0'
       +',toolbar=1'
       +',status=0'
       +',scrollbars=1'
       +',resizable=1');
    top.consoleRef.document.writeln(
      '<html><head><title>Open Source For Geeks Tutorial</title></head>'
       +'<body bgcolor=white onLoad="self.focus()">'
       + '<h1><b><i>This is a new Window!</i></b></h1>'
       + '<textarea rows="40" cols="100">'
       + document.getElementById("SubmitTextID").value
       + '</textarea>'
       +'</body></html>'
     );
    top.consoleRef.document.close();
}
</script>
</header>
<body>
<center>
<h1>Open Source For Geeks Demo</h1>
<table>
<caption>Demo Table</caption>
<tr>
<td>
Enter Some Text : 
</td>
<td>
<input type="text"  id="SubmitTextID" name="textContent">
</td>
</tr>
<tr>
<td>
Click to Submit : 
</td>
<td>
<input type="button" value="Submit" onclick="openNewPage()">
</td>
</tr>
</table>
</center>
</body>
</html>


and lets try it out

Enter some text in the text field and click Submit button. The entered text should now come in the new window.


Now click the submit button. New Window will open as shown below


That was it! It's that simple.Just a java script function. There is a reason I have put the content inside <textarea> tag. This is because you can even have tags inside text area and they will be displayed as tag. That means if your text has <b> in it same will be displayed and will not be interpreted as bold tag. This was just a simple example but you can show complex data that is fetched from the server. You can also show some xml content in it.

Carefull!!!!

Be careful though. document.writeln() method takes a html input. So all your escaped characters will be "un-escaped". Meaning if your display text contains something like &amp; it will be replaced by  & and shown. If you really want to show the escaped characters you need to do something like below - 

function writeConsole(content,idx) {

     top.consoleRef=window.open('','myconsole' + idx,

        ',menubar=0'

       +',toolbar=1'

       +',status=0'

       +',scrollbars=1'

       +',resizable=1');

     top.consoleRef.document.writeln(

      '<html><head><title> Generated Content</title></head>'

       +'<body bgcolor=white onLoad="self.focus()">'

       + '<textarea rows="500" cols="500">'

       + '</textarea>'

       +'</body></html>'

     );

     top.consoleRef.document.close();


     var doc = top.consoleRef.document;

     var textarea = doc.getElementsByTagName('textarea')[0];

     textarea.value = content;

    }


I encountered this scenario and corresponding stack overflow question asked is

HTML Hello World Tutorial

Introduction

Our live as we are living now would not be the same without the internet. What we see while browsing internet are called web pages. What we use to browse these pages is called a browser (client). These pages are written using various technologies like HTML, CSS, JavaScript, JQuery etc. which are client side technologies. There are various backed (server side) technologies like JSP, Servlets that are used to build application that are deployed on the servers eg. Tomcat which help server users/clients request to browse a particular page. What user types in an address bar to fetch a web page is called URL(Universal resource locator). For example you may type http://google.com/. What you see before colon ':' (i.e http or Hypertext Transfer Protocol) is the protocol used to communicate with the server. It can also be https which is secure version of http protocol.You may see the use of this protocol when you browse a page to do some secure action like payments or transactions. Both HTTP and HTTPS fall under application layer in OSI model. Both of them have TCP as their underlying protocol. So basically when browser it to request a web page it first creates a TCP connection with the server and then uses HTTP or HTTPS to get the required pages to display.

Goal

Most of the basic tutorials can be found on W3Schools. Prior to moving to some advance tutorials on web development let me provide this basic Hello World HTML tutorial. Here we will simply crate a web page and open it in our browser that shows "Hello World!" text.

Getting Started

  • Create a file name index.html . Notice the extension html. It is required so that the browser and OS understands it is a web page and will be opened in a web browser.
  • Next add the following text in your file

    <html>
    <header><title>Open Source For Geeks Tutorial</title></header>
    <body>
    <center>
    <h1><b><i>Hello World!!</i></b></h1>
    </center>
    </body>
    </html>
    
  • Simply double click the file. It should open up in your default browser and should look like below

  • See how easy that was? Web pages that you visit in day to day life are much more complex. They have animations, dynamic contexts, logins etc but it all starts from Hello world :)

Understanding the language

  1. HTML is stands for Hyper Text Markup Language. You have bunch of tags that the browser understands and renders.
  2. Notice the <html></html> tag. This is the root element of your web page. Or kind of was. Modern browsers detect the html page even if this tag is not present.
  3. Next comes your tag <head></head> and <body></body>. As the name suggests head tag has your meta info like page titile. you can put it under <title></title> tag in your head. Notice the text on the tab in above image. Your java scripts also go in this head section.
  4. Body as the name suggests has your actual page content to be shown. Here we are simply displaying "Hello World !!" text. But notice the font ? Looks different ? That is because I used some tags.
  5. <center><center/> tag tell the browser that the element/tag that come in between must be rendered in the center of the browser. <b> is for bold and <i > is for italics. <h1> is the size tag that shows text with different size. You can go ahead and try <h2>... etc.
As I told earlier you will find much help on W3Schhools.  So do go through it if you are beginning with Web development. Let me know if you still have any doubts.

Tuesday, 20 May 2014

java.lang.ClassNotFoundException: org.springframework.web.servlet.DispatcherServlet

java.lang.ClassNotFoundException: org.springframework.web.servlet.DispatcherServlet 

I was stuck for last couple of days on this error. So made it the title of this post. A very simple exception - ClassNotFound. We know the jar is missing but what if we know that the exception persists even if the jar is present.

I used Ivy as my dependency manager. To know more on Apache Ivy you can refer to my detailed post I posted earlier.

My directory Structure was


There are two ways to resolve this error

  1. Either move your libraries to WEB-INF/lib . Because this is the folder from where Eclipse searches for corresponding jars. OR
  2. Let Eclipse know that it can search the jars from ivy library folder which is not same as WEB-INF/lib.  So now I will explain how to resolve above problem with 2nd approach in Eclipse.

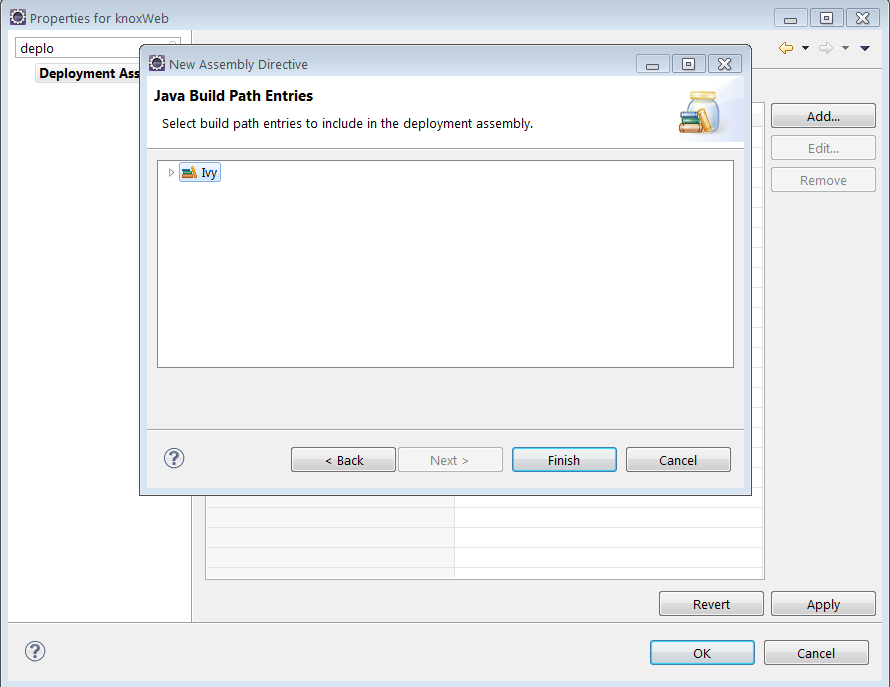
  • Right click the project and select properties. Now go to Deployment Assembly.


  • Now select Add and select Java build path entries.


  • Ivy option is automatically populated. Select that.


  • And you are done.Select Apply and Ok. ClassNotFound Exception vanishes.


That's it for resolving the issue. This issue may also occur if you genuinely don't have the corresponding jar in the lib folder :P . In that case you have to add the Jar. Dependencies I used for my Spring MVC project were

        <dependency org="org.springframework" name="spring-core" rev="4.0.3.RELEASE"/>
        <dependency org="org.springframework" name="spring-context" rev="4.0.3.RELEASE"/>
        <dependency org="org.springframework" name="spring-web" rev="4.0.3.RELEASE"/>
        <dependency org="org.springframework" name="spring-webmvc" rev="4.0.3.RELEASE"/>
        <dependency org="org.springframework" name="spring-beans" rev="4.0.3.RELEASE"/>

Important Links

Saturday, 10 May 2014

Download and Install cURL on Windows

Introduction to cURL

As per Wiki

cURL is a computer software project providing a library and command-line tool for transferring data using various protocols. The cURL project produces two products, libcurl and cURL. It was first released in 1997.

In this post we will see how do we install this tool and use it to perform some common HTTP requests like GET.

Installing cURL on Windows

  1. Go to curl Download Wizard
  2.  Select curl executable
  3. Select Win32 or Win64
  4. Then select package for it(Eg generic/cygwin) as per your requirement
  5. Then you will have to select version. You can select unspecified.
  6. This will directly take you to download link which on click will give you popup to download the zip file.
  7. Extract the zip to get the executable.(I have put the executable in C:\Curl) 
  8. Add this folder in your environment variables and you are done.

  9. You can then execute curl command from cmd.


PS : I had some problems with proxy. Though I don't have one cURL seems to pick it from somewhere. I was using that proxy about a year ago and have not used since. Not sure where cURL picks this confog from. But as a workaround I have use

curl --noproxy * websiteURL


This will essentially disable proxy. But you may not have to do so.

For more reading on various practical usages of curl command you may refer to

15 Practical Linux cURL Command Examples

Important Links

Sunday, 20 April 2014

Installing and using Apache Ivy as dependency manager.

Apache Ant

Before we head on to Apache Ivy lets take some time to understand Apache ant.  Almost every programmer must be knowing what ant is and must have used it sometime or the other. For those who are not aware of it Ant is a Java library and a command line tool. It is mainly used for building java programs.

What is Apache Ant?

Apache Ant is a Java library and command-line tool whose mission is to drive processes described in build files as targets and extension points dependent upon each other. The main known usage of Ant is the build of Java applications. Ant supplies a number of built-in tasks allowing to compile, assemble, test and run Java applications. Ant can also be used effectively to build non Java applications, for instance C or C++ applications. More generally, Ant can be used to pilot any type of process which can be described in terms of targets and tasks. 

More information about Apache Ant can be found their HomePage. You can download Apache Ant from here.

Getting started with Apache Ant

Lets get started with installation of Apache Ant. This is needed for Apache ivy. Download the zip file from  this link. Go ahead and extract it. I have version 1.7.1 and the folder name is apache-ant-1.7.1.  And I have extracted it in the location C:\Users\athakur\Softwares. 

  •  Open command prompt and type ant. 


You will get ant is not a recognized command . That's right extracting ant is not enough you need to add it to the environment variables so that the command is recognized by the command line.

Now lets add the ant path to environment variables. 

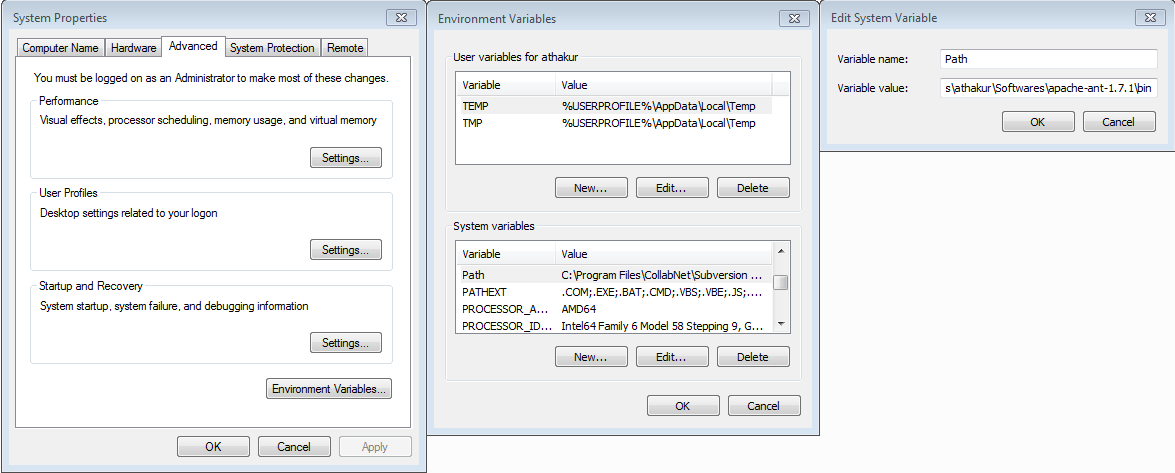
  • Right click on My Computer and select properties . Now on the left Panel under Control Panel Home select Advanced System Properties. Click on it.
You will see a window like below -


At the bottom you can see Environment Variables.. button. Click on it . This will open another window. Under System variables find a variable name PATH. Edit it and append the path to the lib folder under your extracted ant folder to it. For me it is C:\Users\athakur\Softwares\apache-ant-1.7.1\bin.


 And you are done. Again open the command prompt and type ant.  This time you should see some message like build.xml not found. That means ant is now installed. Whenever you execute ant by default it will search for build.xml file in the current folder for the targets to execute.


That's all for the ant.

Using Apache Ant

This post is not really to demonstrate ant usage. So I am skipping this part. But with above setup it should not be very difficult. You can refer to a very simple example below to get started - 


Note : Ant has some predefine ant tasks like javac(for compiling), java(for running) mkdir(creating directory) etc.

What is Apache Ivy?

Apache Ivy™ is a powerful dependencies manager with transitive dependencies support and much more features.

With Apache Ivy you define the dependencies of your module in an xml file, called an ivy-file. Then you usually ask Apache Ivy to retrieve your dependencies to a local lib dir, and it does it for you by locating the artifacts of your dependencies in repositories, such as a maven2 repository for instance.

Dependency Manager ????


Heard of Dependency Manager before? Yes / No ? Lets understand it now.

When ever you are creating a Java Project you may require some additional dependencies. In layman's language you need functionalities that are already implemented and you just import it in your project and use it without wasting time implementing it yourself.  

Let me give an example. Lets say you are creating a Java program that needs to carry out database operation. You will need the driver jar for that. For example JDBC jar for MYSql. What you generally do is download it manually and add it to your projects class path. Looks straightforward isn't it? But now imaging you have hundreds of this dependencies..... does not sound so simple now... does it? Also imagine you have n projects each requiring hundred of same dependencies. You will have to manually download it (once) and add it to classpath of all the projects(n times). To avoid all these there are dependency managers. 

You will have a configuration file per project which defines what dependencies you need. Dependency manager will scan this file download all the dependencies and add it to your projects class path. Smarter way ... isn't it?Want the same for another project simply copy the configuration file to that project. Also since a common cache is maintained for downloaded dependency, dependencies are directly used from cache. So no need to download again.

That's all for why would one go for a dependency manager. 
As far as why would one use Apache Ivy (given that there are other dependency managers like Maven) I would recommend to read their features page and FAQ.  Again I am not saying it is the best dependency manager out there. But I find it simple and powerful enough to suit my basic project needs. 

Installing Apache Ivy

Apache Ivy is already integrated with Apache Ant.Now if you see the lib folder of your ant folder  you will see ivy.jar file there. 

Apache Ivy is integrated with Apache Ant, the most popular Java build management system, so Apache Ivy follows Apache Ant design principles. If you have Apache Ant skills, you already have Apache Ivy skills! The plugin mechanism in Apache Ivy follows the Apache Ant model. Also like Apache Ant, Apache Ivy supports macrodefs and file imports from configuration.

If it is not there no big deal.You may be using an older version. Download the version you want here, unpack the downloaded zip file wherever you want, and copy the ivy jar file into your ant lib directory (ANT_HOME/lib). Here ANT_HOME is your ant folder. 

For more information you can see their Installation page. 

Getting started with Apache Ivy

So lets get started. I use Eclipse so I am going to show how to use Ivy with Eclipse. Of course you can do the same without an IDE as well. You can simply execute command like ant ivy-resolve from command line. Don't worry about the command for now. Only understand it is same with or without and IDE. Only instead of manually executing the commands IDE does it on it's own. 

Note : Without any settings, Ivy retrieves files from the maven 2 repository.

I hope you have installed Eclipse. In Eclipse go to 

  • Help --> Install new Software 
  • In the URL field put http://www.apache.org/dist/ant/ivyde/updatesite
  • Let it fetch the required data. Select the plugin and install it.

You may need to restart Eclipse for changes to get reflected.
After you restart Apache Ivy is all set for use.

Once you install ivy and create a project ivy should be automatically be enabled for that project. But if the project was already created and then you installed ivy then in that case
  • Right click on the project and select add ivy dependency management.
Once that is Done.
  • Again right click the project select new and add ivy.xml file.


It will be in the root of the project. It is an xml file with following syntax

<ivy-module version="2.0" xmlns:xsi="http://www.w3.org/2001/XMLSchema-instance"
       xsi:noNamespaceSchemaLocation="http://ant.apache.org/ivy/schemas/ivy.xsd">
    <info
        organisation=""
        module="TestWebProject"
        status="integration">
    </info>
</ivy-module>

Now lets add some dependencies in it. Lets say you are making a Spring project. So you need Spring framework jars. As mentioned previously Ivy be default looks into maven repository to download dependent jars. So you can search your dependencies there.

So to add Spring jars you will search for spring in the site.


 You will see the dependencies. Each dependency will have

  1. Group 
  2. Artifact ID
  3. Version
Now entries that you make in an ivy file is something like

  • <dependency org="commons-lang" name="commons-lang" rev="2.0"/> 
 To convert this into an Ivy dependency declaration, all you have to do is use the groupId as organization, the artifactId as module name, and the version as revision.

You can find more information about this in their Quick Start page.

I will now add spring-context and spring-core dependencies.

Ivy file will now look like

<ivy-module version="2.0" xmlns:xsi="http://www.w3.org/2001/XMLSchema-instance"
       xsi:noNamespaceSchemaLocation="http://ant.apache.org/ivy/schemas/ivy.xsd">
    <info
        organisation=""
        module="TestWebProject"
        status="integration">
    </info>
    
    <dependencies>
        <dependency org="org.springframework" name="spring-core" rev="4.0.3.RELEASE"/>
        <dependency org="org.springframework" name="spring-context " rev="4.0.3.RELEASE"/>
    </dependencies>
    
</ivy-module>


  • Now simply right click the ivy file and select add Ivy library. This will download the dependencies and add it to your project.
You can see the corresponding jars in the ivy library once above process finishes.


And also you are done. You can search maven repo to find details of dependencies you need for your project and then add it to the ivy file. It's that simple.

Note : For Apache Ivy all dependencies are downloaded once in the folder .ivy which is in your users home folder. For me it is
  • C:\Users\athakur\.ivy
If a dependency is required first this local cache is searched. If found that is used. If not then it is downloaded from the repository.

How Apache Ivy works?


For more details you can refer to their official principle page.
t> UA-39527780-1 back to top