Sunday, 18 March 2018

How To Set Up an HTTPS Service in IIS

Background

Windows provides Internet information service (IIS) to host your local applications on your windows machine. You need to enable IIS from "Turn Windows features on or off".


Once you have done that you can add an application to it and get started. I have created a youtube video to demo the same -


This video shows how to set up a simple website on IIS and also add https support. I am also going to show how to add https support part in this post.

How To Set Up an HTTPS Service in IIS

First, make sure you have self-signed certificate generated in your IIS manager. To do that go to "Server certificates" in your machine home node inside your IIS manager -


Next, double-click the "Server Certificates" section and make sure a self-signed certificate exists. 


If no certs exist for localhost go ahead and create one using "Create self-signed Certificate". 

Once you have the certificate go to Sites in the navigation panel on the left and click on Default website under sites.


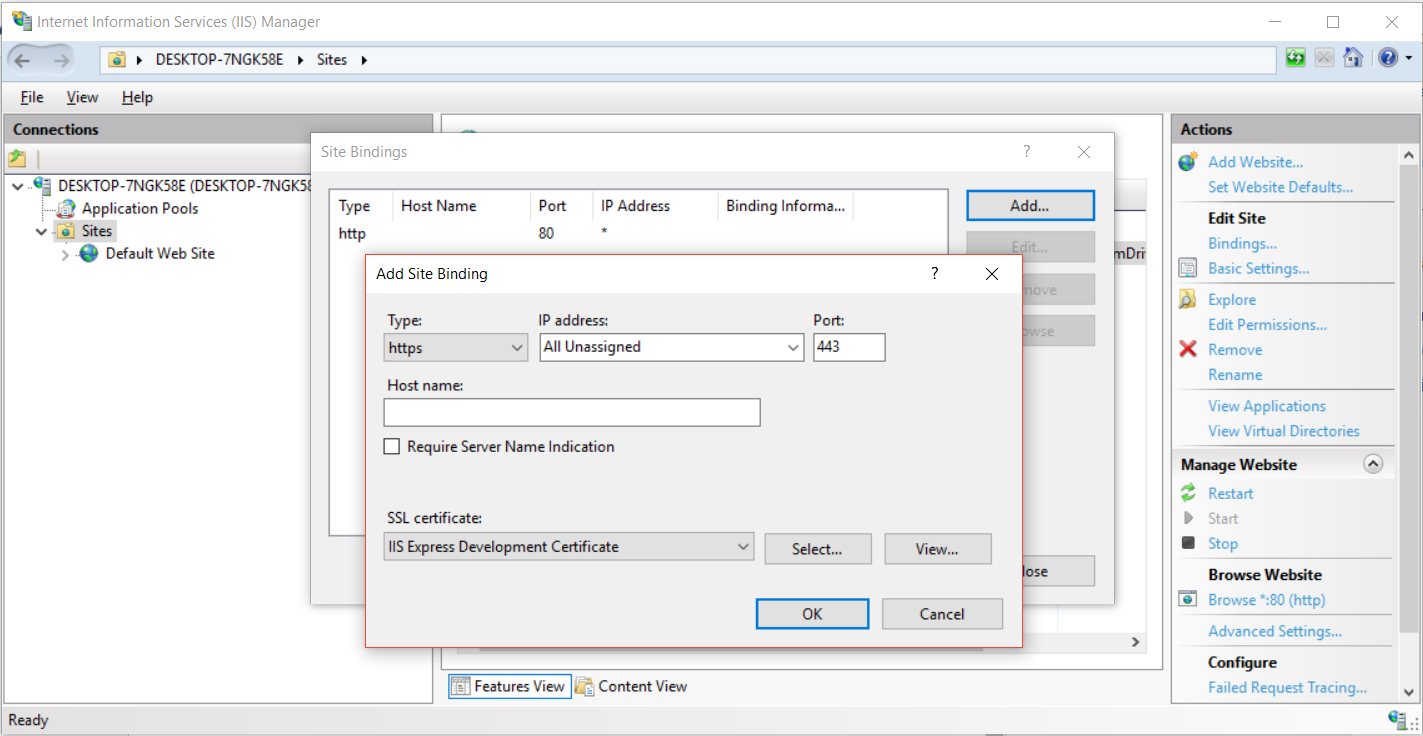
Next, click on "Bindings" in the section on the right and add https binding. Make sure you select correct SSL certificate in the process that we create in previous steps.


Once you are done just click ok and you should have https binding set for your website.


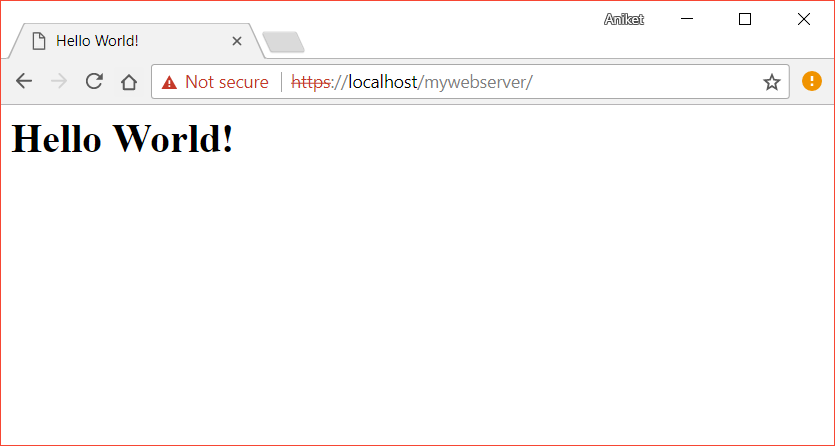
Now you can open your website with https protocol.


Related Links

Sunday, 11 March 2018

AngularJS Routing Using UI-Router

Background

In the last post, we saw AngularJS Hello World example. In this post, we will see how we can create an angular JS app with routing using UI-Router module. If you have not read the previous post I would highly recommend you read that first.


 Setup

There is a small change in the file structure than our previous example. Create files as shown in the following screenshot -


Following are file details -
  • helloWorld.html : Our main HTML file. Starting page similar to the last example.
  • helloworld.module.js : Declares angular module and it's dependencies
  • helloWorld.controller.js : Controller for the module
  • helloworld.config.js : Config for the module.  
  • login.html : login page to route to
  • setting.html : setting page to route to
 Also make sure you install http-server module to host your angular app and test it -
  • npm install -g http-server


Then you can simply run in your project directory as -
  • http-server -o 
NOTE : -o option is to open browser.

AngularJS Routing Using UI-Router


Now let's see one by one content of each file. Let's start with  helloWorld.html -

<html>
    <head>
        <title>Hello World!</title>
        <script type="text/javascript" src="https://ajax.googleapis.com/ajax/libs/angularjs/1.2.26/angular.min.js"></script>
            <script src="//cdnjs.cloudflare.com/ajax/libs/angular-ui-router/0.2.8/angular-ui-router.min.js"></script>
            <script type="text/javascript" src="helloworld.module.js"></script>
        <script type="text/javascript" src="helloWorld.controller.js"></script>
        <script type="text/javascript" src="helloworld.config.js"></script>
    </head>
    <body ng-app="helloWorldApp">
        <div ng-controller="helloWorldAppController" ng-init="init()">
                  <p>Enter Message here : <input type="text" ng-model="message"></p>
                   <p>Entered Message :  {{ message }}!</p>

                   <a href="/login">Login</a> <br/>
                   <a href="/setting">Setting</a>

                <div class="content-wrapper">
                    <ui-view></ui-view>
                </div>    
        </div>
    </body>
</html>


In this base HTML file we have just referenced other angular JS files that we need. An interesting thing to note here is the ui-view tag. This is where the injected code goes. But we will see that in a moment.


Let's see out module and controller files next -


helloworld.module.js

(function() {
    'use strict';
    console.log("In hello world module");
    angular.module('helloWorldApp', ['ui.router']);
})();


This code just declares your module as we did in last example. Only change is that it has an additional dependency on ui.router module. Note we have included a new script in helloWorld.html to get code for this module.


helloWorld.controller.js

(function(){
    'use strict';
    console.log("In hello world controller");
    angular.module("helloWorldApp").controller("helloWorldAppController", function($scope) {
        $scope.init = function() {
            console.log("Init method called");
            $scope.message = "Hello World!";
        }
    });

})();


This is a controller of the module we defined. This is again same as we did in last post. No new changes here.


Now let's see our new logic - helloworld.config.js


(function() {
    'use strict';
    console.log("In hello world config");
    angular.module('helloWorldApp').config([
        '$stateProvider',
        '$urlRouterProvider',
        function($stateProvider, $urlRouterProvider) {
            $stateProvider.state('login',{
                     url: "/login",
                     templateUrl: "login.html"
                })
            .state('settings',{
                    url: "/setting",
                    templateUrl: "setting.html"
            });
        }
    ]);
})();


This is actually the routing logic. For eg. if it encounters URL "/login" it will render page "login.html" that we have in same folder. Same for setting.html.


Finally, let's see out login.html and setting.html files -


login.html -


<h1>This is a login page!</h1>
<a href="/helloWorld.html">Back</a>


setting.html -


<h1>This is a login page!</h1>
<a href="/helloWorld.html">Back</a>


 Once you have all files in place just run http-server as follows -


And you should see following behavior - 


But wait what happened? I thought the code was supposed to be injected at tag ui-view.

This is because we do not actually use angular routing per say to change the state. Let's do some changes to see how we can do that. Change your login href as follows - 

<a href="" ng-click="replaceLoginPage()">Login</a>


and now add this method to the controller -


(function(){
    'use strict';
    console.log("In hello world controller");
    angular.module("helloWorldApp").controller("helloWorldAppController", function($scope, $state) {
        $scope.init = function() {
            console.log("Init method called");
            $scope.message = "Hello World!";
        }

        $scope.replaceLoginPage = function() {
            console.log("In replaceLoginPage");
            $state.go("login");
        }
    });

})();


And now it should replace ui-view tag.


Related Links


Tuesday, 27 February 2018

AngularJS Hello World Example

Background

AngularJS is a client-side javascript framework developed by Google which can interact with HTML. It helps to easily create and maintain SPA (Single page applications)

Some of its features are -
  1. Helps create responsive applications
  2. Provides MVC capabilities
  3. Dependency injection
  4. Powerful and flexible with less code to write
NOTE: AngularJS is a very old framework. The first version is called AngularJS. Later versions are just called angular. You can see the detailed release history - https://github.com/angular/angular.js/releases. This post will try to explain a simple Hello World program in Angular JS. This is mainly for projects that are already on it. If you are starting a new project I would highly recommend to go with later angular versions. You can visit https://angular.io/  for the same.


 AngularJS Hello World Example

Let's start by writing our HTML file. Create a folder where you can store your code files. Now in this folder create two files -
  1. helloWorld.html
  2. helloWorld.js
And add following content to it -

helloWorld.html:

 <html>
    <head>
        <title>Hello World!</title>
        <script type="text/javascript" src="https://ajax.googleapis.com/ajax/libs/angularjs/1.2.26/angular.min.js"></script>       
        <script type="text/javascript" src="helloWorld.js"></script>
    </head>
    <body ng-app="helloWorldApp">

        <div ng-controller="helloWorldAppController" ng-init="init()">
                  <p>Enter Message here : <input type="text" ng-model="message"></p>
                   <p>Entered Message :  {{ message }}!</p>
        </div>

    </body>
</html>


helloWorld.js  :

 (function(){
    'use strict';
    console.log("In JS");
    var helloWorldApp = angular.module("helloWorldApp", []);
    helloWorldApp.controller("helloWorldAppController", function($scope) {
        $scope.init = function() {
            console.log("Init method called");
            $scope.message = "Hello World!";
        }
    });

})();


Now you can simply open the helloWorld.html file and see the changes. 


Understanding the code

Now that we saw the behavior let's try to understand the code.

In our code we have initialized a angular module using ng-app directive. In the javascript we get this module using andular.module() function.  Inside a module you can have multiple controllers controlling various parts of your html. In our case we have defined a controller called helloWorldAppController that controls the div element we have defined. In the javascript we are getting this controller from our module.


Once you have the controller you can define varibles and functions that you can access in the HTML controller by this particular controller. You can also notice the variable called "message" that is defined in the controller is accessible in the HTML using {{message}} syntax. You would also see the binding exist using the ng-model syntax. This is called two way binding. So value changed in the input field is immediately visible in same HTML using {{message}} syntax as well as the controller using $scope.message. In the html where we have declared controller we have also specified init method using ng-init and you can see this menthod defined in controller using $scope.init. This is called when controller is initialized and this function in the controller script initialized messages variable to "Hello World!" that is reflected in HTML page.


Lastly we have injected our controller script (helloWorld.js ) and  angular js script in the html for our angular js code to work. Make sure angular script is the 1st one added.

All keywords starting with ng- are angular directived.
  • ng-app
  • ng-controller
  • ng-init
  • ng-model 

Create a gif from a video using ffmpeg with good quality

Background

In the last post, we saw to Resizing videos and images using ffmpeg. In this post, we will see how we can convert a video into a gif with good quality.


 Create a gif from a video using FFmpeg

You can use the following shell script to convert your video to Gif -

#!/bin/bash
#----------------------------------------------------
#  Author : athakur
#  Version : 1.0
#  Create Date : 27/02/2018
#  Update Date : 27/02/2018
#  Description : Create gif from a video
#    Sample usage : ./creategif.sh input.mp4 output.gif
# ffmpeg static build can be downloaded from https://johnvansickle.com/ffmpeg/
#----------------------------------------------------
echo "Converting $1 to $2"

if [ -z "$1" ] || [ -z "$2" ]
  then
  echo "Incorrect arguments supplied. Format - ./creategif.sh input.mp4 output.gif"
  exit
fi

palette="/tmp/palette.png"

filters="fps=10,scale=1024:-1:flags=lanczos"

ffmpeg -v warning -i "$1" -vf "$filters,palettegen" -y "$palette"
ffmpeg -v warning -i "$1" -i $palette -lavfi "$filters [x]; [x][1:v] paletteuse" -y "$2"

echo "Completed gif creation" 


You can find this code in my GitHub gists section-
 To run you can simply execute following command - 
  • ./creategif.sh input.mp4 output.gif
Input need not be an mp4. It can be an .avi or a .webm too.

Sample video and gif are as follows -

Video :


Gif :


That's it your high-quality gif is ready.


You can do more with FFmpeg like scaling and cropping of video before converting to gig. Eg.

./ffmpeg -loglevel warning -y -i input.mp4 -i palette.png -filter_complex "crop=800:500:0:0[x];[x][1:v]paletteuse=dither=bayer:bayer_scale=3[tl];[tl]fps=10,scale=1024:-1:flags=lanczos"  target.gif


Related Links

Friday, 23 February 2018

Resizing videos and images using ffmpeg

Background

If you are a developer and a geek and need to work on the images/videos formatting in terms of cropping, scaling or resizing then you can use FFmpeg for that. Static build for FFmpeg is available on -
which you can download and store it on your local machine to use.


I have even added this to my Linux PATH so that I can access it from anywhere. If you are not aware how to do that refer -
Once you have added FFmpeg in your PATH you can simply run ffmpeg to see the help content -


Specifically, if you are working on making Android or iOS apps or chrome plugin and you have an icon of standard size and you want to resize it to fit other aspect ratios supported by the corresponding platforms then FFmpeg really comes in handy.


Rescaling images with FFmpeg

I have a simple icon with size 256*256 to be used as replay button.


 I want it in 128*128 size.  You can do this with the following command -
  • ffmpeg -i icon-256.png -vf scale="128:128" icon-128.png
And if you want 48*48 you can similarly do -
  • ffmpeg -i icon-256.png -vf scale="48:48" icon-48.png


If you want to want to retain the aspect ration you can do -
  • ffmpeg -i icon-256.png -vf scale="128:-1" icon-128.png

You can do similar resizing for a video instead of an image -
  • ffmpeg -i input.avi -vf scale="320:240" output.avi
If you want your image to be based on the actual image size then you can do that as well. For eg. You want the image to be double size of what the size it actually is -

  • ffmpeg -i icon-256.png -vf scale="iw*2:ih*2" icon-double.png


Since this is double this would be 512*512 since original was 256*256.
Similarly, if you want half you can do -

  •  ffmpeg -i icon-256.png -vf scale="iw/2:ih/2" icon-half.png


 Since this is half this would be 128*128 since original was 256*256.

NOTE :
  • iw : input width
  • ih : input height


Related Links

t> UA-39527780-1 back to top