Saturday, 20 August 2016

Resolving issue of losing links when saving word document to PDF in Mac

Background

I had a word document already saved in my dropbox which was initially created on windows I think. When I moved to mac I could open the same document in mac word with links working just fine. Now I edited the doc and exported it as PDF. On opening the PDF I realized the links do not work though it gets displayed a hyperlink in the PDF. After bit of poking around I found out it is an known issue. In this post I provide an alternative approach that worked for me.


Making the links work in PDF

  • I had word document of following format - Microsoft Word 97 - 2004 document - 61 KB
  • Open pages app in your mac and open your word doc in it.

  • Verify all links are working. If you need to edit you can edit it here.
  • Save the opened document as pages document. Its format would be - Pages Publication - 271 KB
  • Next reopen this pages document and go to File -> Export to -> PDF and save it as PDF. Links should work now.

Thursday, 18 August 2016

Installing MongoDB in Mac

Background

Sometime back I had written a post on MongoDB. Installation and basic syntax in Windows - Getting Started with MongoDB . This post is starting of series of posts on MongoDB. In this post we will see installation and configuration of MongoDB in Mac.

Installing MongoDB

  • Go to MongoDb download center and download the tgz of the latest build. Your OS should already be selected and you should see the download link.
  • You can also install MongoDB using homebrew
    • brew install mongodb  (To install the MongoDB binaries)
    • brew install mongodb --with-openssl (To install the MongoDB Binaries with TLS/SSL Support)
    • brew install mongodb --devel  (To install the latest development release)
  • Once you have downloaded that tarball you can unpack it using following command - 
    • tar xvf mongodb-osx-ssl-x86_64-3.2.9.tgz
  • Once you have unpacked it navigate to that folder and then into bin folder inside it. Here you will see list of programs. There are two programs here of out interest - 
    • mongo : This is the mongo shell used to connect to the mongo DB.
    • mongod : This is the actual server.
  • That's it your mongo db is installed and ready to be run.
NOTE : MongoDB by default stores its data in directory "/data/db". So make sure this directory is created with necessary permissions. 
  • sudo mkdir -p /data/db
  • sudo chmod -R 777 /data/

If you want to give a custom path you can give it when you start mongodb - 
  --dbpath arg                          directory for datafiles - defaults to "/data/db"
Eg.
  • mongod --dbpath /data/mydb

Running and connecting MongoDB

  • To run MongoDB server go to bin directory and start mongod program.
    • ./mongod
  • This should start your mongodb server listening on default port 27017.
  • To see all mongod configuration options you can type - 
    • ./mongod --help


Once mongodb is up you can try connecting to it using mongo shell.
You can start mongo shell by
  • ./mongo
You can also see incoming connection in your server console -
  • 2016-08-18T22:34:27.315+0530 I NETWORK  [initandlisten] connection accepted from 127.0.0.1:56356 #1 (1 connection now open)
     
Once you are connected you can try following operations - 
  • use mydb
  • db
  • show dbs
  • db.testCollection.insert({"Name":"John"})
  • show collections
  • db.testCollection.find()
 That's it for the basic of installing Mongo DB on your Mac. To avoid always going till bin to execute your programs you can do either of of the follwing -
  1. Add you path to bin to your PATH and export it. OR
  2. Add all these binaries to /usr/local/bin/ by
    • cp * /usr/local/bin
  3. You can verify it by wither running - 
    1. which mongod OR
    2. mongod --help

Related Links

Saturday, 2 July 2016

How to add Eclipse Code Formatter file in Android Studio

Background

For those who have used Eclipse before know we can supply a formatter file that can be used to format the code you write. But Android studio does not seem to provide that functionality. In this post we will see how we can use the same formatter file in Android Studio.

How to add Eclipse Code Formatter file in Android Studio

  • Go to Plugins section in Studio. Shortcut is Ctrl + Shift + A and then type plugin.

  • Next in the plugins window go to -> "Browse Repositories".

  • Now search for "Eclipse code formatter" and install it.

  • Post install you will need to restart Studio to activate the plugin. After restart go to preferences and search for formatter , you should see eclipse formatter in the search results. Select it and provide your formatter.

  • That's is! You can then format your code and this formatter will be used.

Sunday, 26 June 2016

Certificate Pinning in Android

Background

Generally what happens in a https connections is that client asks for SSL certificate from the SSL compliant server it is communicating with over https. Server will provide a certificate from it's key store. After client receives this certificate it validates it's credentials depending on whether

  • hostname is same as requested
  • has a verifiable chain of trust back to a trusted (root) certificate [from clients trust store]

Now if connections are proxied and you can get the device to trust your (rogue) root CA certificate then you can intercept the secure connections. This is essentially man-in-the-middle attack. Now here is what happens in SSL pinning which potentially adds an extra security layer from man-in-the-middle attacks-

App bundles the known server certificates with it. When app tries to make a secure connection with the server, it validates the certificate received by the server with the ones it has bundled with. So even if OS validates the received certificate chain against a (potentially rogue) root CA, the app will reject the connection displaying network error.

Common type of certificates

In summary, there are four different ways to present certificates and their components:

  1.  PEM Governed by RFCs, it's used preferentially by open-source software. It can have a variety of extensions (.pem, .key, .cer, .cert, more)
  2. PKCS7 An open standard used by Java and supported by Windows. Does not contain private key material.
  3. PKCS12 A private standard that provides enhanced security versus the plain-text PEM format. This can contain private key material. It's used preferentially by Windows systems, and can be freely converted to PEM format through use of openssl.
  4. DER The parent format of PEM. It's useful to think of it as a binary version of the base64-encoded PEM file. Not routinely used by much outside of Windows.

NOTE :
PEM on it's own isn't a certificate, it's just a way of encoding data. X.509 certificates are one type of data that is commonly encoded using PEM.

PEM is a X.509 certificate (whose structure is defined using ASN.1), encoded using the ASN.1 DER (distinguished encoding rules), then run through Base64 encoding and stuck between plain-text anchor lines (BEGIN CERTIFICATE and END CERTIFICATE).

You can represent the same data using the PKCS#7 or PKCS#12 representations, and the openssl command line utility can be used to do this.

Convert a PEM-formatted String to a java.security.cert.X509Certificate

public static X509Certificate parseCertificate(String certStr) throws CertificateException{

    //before decoding we need to get rod off the prefix and suffix
    byte [] decoded = Base64.decode(certStr.replaceAll(X509Factory.BEGIN_CERT, "").replaceAll(X509Factory.END_CERT, ""));

    return (X509Certificate)CertificateFactory.getInstance("X.509").generateCertificate(new ByteArrayInputStream(decoded));
}


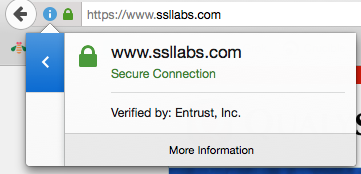
How to get PEM certificate of the SSL/https compatible site

  1. Go to that particular website  on your browser. Lets say we go to - 
    • https://www.ssllabs.com/
  2. Now look at the top left of the URL bar. You should see details of the connection. And certificate details if your connection is https -


  3. Next click on view certificate and click on Details -

  4. Now click on Export and save your file is PEM format -


You can find app for this ready in playstore -

Related Links

Monday, 20 June 2016

Unprotected private key file error while connecting to AWS via SSH

Background

In one of the previous posts, we saw how to connect to your AWS instance.
In that post, we saw how you can remotely connect to your instance using ssh (putty on windows). Recently I migrated to Mac and got following error for connecting.

@@@@@@@@@@@@@@@@@@@@@@@@@@@@@@@@@@@@@@@@@@@@@@@@@@@@@@@@@@@
@         WARNING: UNPROTECTED PRIVATE KEY FILE!          @
@@@@@@@@@@@@@@@@@@@@@@@@@@@@@@@@@@@@@@@@@@@@@@@@@@@@@@@@@@@
Permissions 0777 for 'Documents/Softwares/athakur-securekey.pem' are too open.
It is required that your private key files are NOT accessible by others.
This private key will be ignored.
bad permissions: ignore key: Documents/Softwares/athakur-securekey.pem
Permission denied (publickey).


See screenshot below -

So how do you resolve this?


Solution

You need to give read/write permission just to that user (no groups or other users). So running following command should suffice -
  • chmod 600 athakur-securekey.pem
OR alternatively
  • chmod u=rw athakur-securekey.pem 
  • chmod go=  athakur-securekey.pem


Quoting from AWS documentation -
  • Use the chmod command to make sure your private key file isn't publicly viewable. For example, if the name of your private key file is my-key-pair.pem, use the following command:
    • chmod 400 /path/my-key-pair.pem 
    •  

Related Links

t> UA-39527780-1 back to top