Sunday, 3 May 2020

How to pass variable arguments using *args and **kwargs in Python?

Background

If you are working with python you must have come across following notations:
  • *args
  • **kwargs
args and kwargs are just argument names. It can be replaced by any other variable name, but the important part is the syntax and how it is used. If you have come across this you would also know they are used to pass the variable number of arguments. In this post, I will try to explain how they work with some examples.

Note: If you have not installed Jupyter notebook for python, please refer to my earlier blog post: How to Install IPython Jupyter Notebook on Ubuntu

How to pass variable arguments using *args and **kwargs in Python?


Let's take cases of *args and **kwargs one at a time and then we will see some combined examples.

Understanding *args

  • *args is used to take a variable number of non-keyworded arguments that are not your formal arguments. 
  • arguments passed in *args become iterable. Think of this as a list.
We will understand "non-keyworded" meaning better when we go to **kwargs but for now, let's try to focus on *args.

Consider the following example:


def foo(param1, *param2):
    print("In foo:")
    print(param1)
    print(param2)


And now if you pass:
foo(1,2,3,4)

You will get the output:
In foo: 1 (2, 3, 4)

As you can see argument 1 got mapped to param1 (your formal argument) and the rest for mapped to *param2 (*param2 is your *args. As I mentioned before variable name does not matter). 

You can pass any number of params after 1 and they will be part of param2.

You can even iterate over param2 to print all variables.

def foo(param1, *param2):
    print("In foo:")
    print(param1)
    for no in param2:
        print(no)

Output:
In foo:
1
2
3
4

Understanding *kwargs

  • *kwargs is used to take a variable number of keyworded arguments that are not your formal arguments. When I say keyword it means that you pass arguments by providing a name to that variable
  • Think of this as a dictionary of variable name and value you passed as arguments to the function.
Consider the following example:

def bar(param1, **param2):
    print("In bar:")
    print(param1)
    print(param2)

And if you pass bar(1,a=2,b=3,c=4) it will output
In bar:
1
{'a': 2, 'b': 3, 'c': 4}

1 which is your formal parameter maps to param1 and rest named parameters go as dict in param2.
Obviously, you cannot pass bar(1, 2, 3, a=2,b=3,c=4)
as it does not know what to do with 2,3,4


Hopefully, now you understand what keyworded arguments are. They are basically named parameters passed in the function call.

You can also iterate it as a dictionary

def bar(param1, **param2):
    print("In bar:")
    print(param1)
    for key, value in param2.items():
        print("{}:{}".format(key,value))


Output:
In bar:
1
a:2
b:3
c:4

Your functions would actually have both *args and **kwargs. So let's try to see a combined example

def foobar(param0, *param1, **param2):
    print("In foobar:")
    print(param0)
    print(param1)
    print(param2)


And now if you call this as  foobar(1,2,3,4,a=1)
you will get the following output:
In foobar:
1
(2, 3, 4)
{'a': 1}

Again 1 is your formal parameter and maps to param0
2,3,4 are your non-keyword params that get mapped to param1
and a=1 is your keyword param that gets mapped to param2


  • Note the order is important. *args should always come before **kwargs. 
  • Also, there cannot be positional arguments after  **kwargs
  • Also, you cannot do something like foobar(1,2,3,4,a=1,5) as it will not know how to map 5.


Hopefully, this clarifies differences between *args and **kwargs. You can play around more in the Jupyter notebook or python terminal if you have installed it (See the link below if you haven't)


Related Links

Saturday, 2 May 2020

How to Install IPython Jupyter Notebook on Ubuntu

Background

Jupyter Notebook is an open-source and interactive web app that allows you to create and share documents that contain live code, equations, visualizations, and narrative text. We will use this to run python code but it can be used with other languages as well.

Prerequisites

Firstly make sure you have the following applications installed before installing Jupyter notebook:
  • python3
  • python3-pip
You can install these from default Ubuntu repositories by running the following commands:
  • sudo apt-get install python3
  • sudo apt-get install python3-pip
You can check that the versions are correct with -V option as shown in the screenshot below:


How to Install IPython Jupyter Notebook on Ubuntu

Now that dependencies are in place, let's install Jupyter notebook.

Install python and jupyter
  • pip3 install ipython
  • pip3 install jupyter
IPython (Interactive Python) is a command shell for interactive computing in multiple programming languages, originally developed for the Python programming language, that offers introspection, rich media, shell syntax, tab completion, and history (Wiki).


You can then start the jupyter notebook with the following command:
  • jupyter notebook


It should automatically open a browser window for you, if not you can fo to the URL from the command output, in my case:

  • http://127.0.0.1:8888/?token=f279cc86b6219e3312d623377a247ed4a686e140fac30153
Then you can create a new notebook with python3 kernel and write your code there.


Let me know in the comments if you face any issues.
We will do some more fun stuff and learn more about python. So stay tuned!

Related Links

Friday, 1 May 2020

How to fix Ubuntu update error “waiting for unattended-upgr to exit”

Background

So I logged into my Ubuntu machine after a long time and I decided to update my installed software to the latest versions. But I see following screen and the update is stuck: “waiting for unattended-upgr to exit”


In this post, I will show you how to fix this issue.


Fixing “waiting for unattended-upgr to exit” issue


To begin, make sure all packages are in a clean state and correctly installed For this you can run:
  • sudo dpkg --configure -a
However, this fails for me with the following error


In fact, "sudo apt-get upgrade" also fails for me:

athakur:~$ sudo apt-get upgrade
E: Could not get lock /var/lib/dpkg/lock-frontend - open (11: Resource temporarily unavailable)
E: Unable to acquire the dpkg frontend lock (/var/lib/dpkg/lock-frontend), is another process using it?


This could be due to multiple causes. Most probably some other internal update is running and using the lock. You can check this with the following commands:


  • ps -eaf | grep -i apt
  • lsof /var/lib/dpkg/lock-frontend 

Note: If you see a process like "apt.systemd.daily" using the lock, please wait for a few mins. This is auto-scheduler that updates your system. If you do not want this behavior you can go to "Software and Updates" and disable auto-updates:


Anyways, if you do not wish to wait you can always kill the process. Above commands - ps and lsof should give you PIDs corresponding to the process using the locks. You can kill them by running


  • sudo kill -9 PID
Replace PID with actual PID (Process ID) you see in the output of the above commands. Once done you can resume the software updates. You can also do
  • sudo apt-get upgrade
to upgrade your software.


If above does not work as well you can always delete the lock file (Not recommended)


  • sudo rm -rf /var/lib/dpkg/lock-frontend


and resume any update you might have. Please note we should not do this under ideal conditions. Lock files are meant to be present for special purposes. That being said, sometimes Softwares do go into an inconsistent state, and lock files have to be removed manually.

Once you kill the process or remove the lock file manually run following command to let dpkg fix itself:


  • sudo dpkg --configure -a
This is the same command we ran as the very 1ts step.


Related Links


Saturday, 27 July 2019

How to install IntelliJ Idea plugin from local disk

Background

In the last post, we saw a basic tutorial on how to create a custom plugin for IntelliJ IDE's. In this post, I will show you how you can install a plugin you have on your local disk.

How to install IntelliJ Idea plugin from local disk

To install plugin from local disk, go to setting in IDE(Ctrl+Alt+S) -> Plugins. Next click on the gear icon and select "Install plugin from disk".


Select the zip file of your plugin you have stored locally and select Ok. The plugin should get installed. You may have to restart the IDE for change to take effect.


 Now you can see the plugin in the installed tab of your plugins section of settings. 


Directories used by the IDE to store plugins

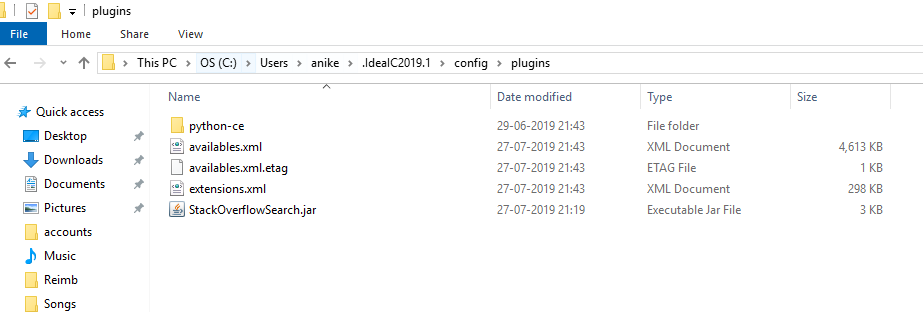
If you are wondering where are plugins instaled then the path is config\plugins under your IDEA directory. For me it is:

  • C:\Users\anike\.IdeaIC2019.1\config\plugins
It should put your plugin jar in above dir.


Related Links


Creating an Intellij plugin

Background

Intellij IDEA is one of the famous IDEs(Integrated development environment) used for Java development. Intellij has a variant of IDE's that they provide like -
  1. Pycharm - For Python
  2. Webstorm - For web development
  3. IDEA - For Java
etc. In this post, I will show how you can write your own plugin for any of these IDEs. To develop a plugin you need Intellij IDEA IDE. You can use this to create a plugin for any other variant of IDE. In fact, the framework for IDE remains the same, so you can create a plugin that can potentially work in all IDEs. 

To start with download IntelliJ IDEA. I am using version 2019.1.3(Community edition).


Idea

In this plugin, we are going to add a simple action functionality that takes in the selected text and searches on Stack overflow site. This action will be visible when you right-click on the editor panel of your IDE. Let's see how to do that,

Creating an IntelliJ plugin


Open your IDEA and create a new project. File-> New -> Project -> Intellij platform plugin


Once done, click on next, enter your project name and submit. This should create a new project for you. One of the important files is Project\resources\META-INF\plugin.xml. This gives information about your plugin. Think of it as the manifest file of Android project (If you have worked on Android apps before). Got me location is C:\Users\anike\IdeaProjects\StackOverflowSearch\resources\META-INF\plugin.xml 
 and my project name is StackOverflowSearch.

NOTE: You can choose Groovy as well to develop your plugin. I have selected default, which uses Java.

In the source folder create a class called StackoverflowSearch. This is going to be our action class. Make this class extend com.intellij.openapi.actionSystem.AnAction. AnAction is an abstract class provide by Intellij SDK framework. Once you extend it, you will have to implement the abstract methods in it

    @Override
    public void actionPerformed(@NotNull AnActionEvent anActionEvent) {
        
    }

Then you can add the following code to complete your simple action -

import com.intellij.ide.BrowserUtil;
import com.intellij.openapi.actionSystem.AnAction;
import com.intellij.openapi.actionSystem.AnActionEvent;
import com.intellij.openapi.actionSystem.CommonDataKeys;
import com.intellij.openapi.editor.CaretModel;
import com.intellij.openapi.editor.Editor;
import com.intellij.psi.PsiFile;
import org.jetbrains.annotations.NotNull;


public class StackoverflowSearch extends AnAction {
    @Override
    public void actionPerformed(@NotNull AnActionEvent anActionEvent) {
        PsiFile file = anActionEvent.getData(CommonDataKeys.PSI_FILE);
        Editor editor = anActionEvent.getRequiredData(CommonDataKeys.EDITOR);
        CaretModel caretModel = editor.getCaretModel();
        String selectedText = caretModel.getCurrentCaret().getSelectedText();
        BrowserUtil.open("https://stackoverflow.com/search?q=" + selectedText);
    }
}


This essentially gets the selected text from your editor and open a browser URL with that query parameter. If you do not understand much with this code, don't worry just go to the official documentation and see what each class means. For eg. PSIFile - it s file representation in Intellij framework world. You can see more details here


Once done, you will have to list this action in the plugin.xml file we saw above. In this file, you should see the <actions> tag. Add below content inside it.


    <action
            id="Action.Stackoverflow.Search"
            class="StackoverflowSearch"
            text="Search Text on Stack Overflow"
            description="Search Text on Stack Overflow">
      <add-to-group group-id="EditorPopupMenu" anchor="last"/>
    </action>

Once done you are all set to go. The only important thing to note above is the add-to-group group-id field. EditorPopupMenu means this action will be shown in Editor when you right-click. You could have other possible values to show it in Console or top menubar.

My complete plugin.xml looks like below -

<idea-plugin>
  <id>com.your.company.unique.plugin.id</id>
  <name>Stackoverflow Search Plugin</name>
  <version>1.0</version>
  <vendor email="opensourceforgeeks@gmail.com" url="http://opensourceforgeeks.blogspot.com/">OSFG</vendor>

  <description><![CDATA[
      Simple plugin to open selexted text in Stack overflow site
    ]]></description>

  <change-notes><![CDATA[
      Simple plugin to open selexted text in Stack overflow site
    ]]>
  </change-notes>

  <!-- please see http://www.jetbrains.org/intellij/sdk/docs/basics/getting_started/build_number_ranges.html for description -->
  <idea-version since-build="173.0"/>

  <!-- please see http://www.jetbrains.org/intellij/sdk/docs/basics/getting_started/plugin_compatibility.html
       on how to target different products -->
  <!-- uncomment to enable plugin in all products
  <depends>com.intellij.modules.lang</depends>
  -->

  <extensions defaultExtensionNs="com.intellij">
    <!-- Add your extensions here -->
  </extensions>

  <actions>
    <!-- Add your actions here -->
    <action
            id="Action.Stackoverflow.Search"
            class="StackoverflowSearch"
            text="Search Text on Stack Overflow"
            description="Search Text on Stack Overflow">
      <add-to-group group-id="EditorPopupMenu" anchor="last"/>
    </action>
  </actions>

</idea-plugin>


Now you can simply run your project,


Run configuration should automatically be created when you click on run. It should be similar to the following -


NOTE:  Notice that the JRE is Intellij Idea SDK.

This should start a new IDE instance with your plugin activate. You can verify your plugin in installed by going to settings(Ctrl_Alt+S) -> Plugins -> Installed


Now you can select a text, right-click and see the "Search Text on Stackoverflow" action. Click that and it should open the Stack overflow site with your selected text as a search parameter,


Distributing the plugin

To distribute the plugin, simply right click your plugin project and select - "Prepare plugin module for deployment". This should export a zip file which can be distributed. You should see a message like below when you have selected the above option.


To know how to install plugin from local disk refer - How to install IntelliJ Idea plugin from local disk

You can also put it into a plugin repository for others to use instead of distributing zip file. For more details on the plugin, repo see here. I will be adding more details on how to create an Intellij plugin. So stay tuned.


Related Links

t> UA-39527780-1 back to top