Background
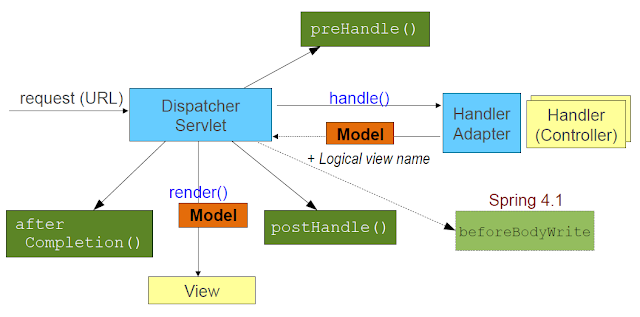
Interceptors as their name suggest intercepts request that are delegated to your controller by the dispacher setvlet. Why would we do that you ask? Well there are multiple possibilities. You can implement in these interceptors functionality that is common to multiple controllers. Like for eg -
- Add common model attributes
- Set response header
- Audit requests
- Measure performance etc
In this post we will see how to implement those interceptors in Spring MVC.
HandlerInterceptor interface
HandlerIntercetor is an interface with following methods -
- boolean preHandle(HttpServletRequest request, HttpServletResponse response, Object handler);
- void postHandle(HttpServletRequest request, HttpServletResponse response, Object handler. ModelAndView modelAndView);
- void afterCompletion(HttpServletRequest request, HttpServletResponse response, Object handler. Exception ex);
NOTE :
preHandle() returns either true or false -
- true : continue doewn the interceptor chain
- false : invoke controller and skip remaining interceptors
As in most case you don't want to implement all 3 methods so Spring has a separate class called - HandlerInterceptorAdapter which you can easily extend and override those methods that you need.
Configuring Interceptors
- Always keep in mind interceptors are are HandlerMapping level!
Spring as you know has multiple components like
- HandlerMapping
- HandlerAdapter
- ViewResolver
- HandlerExceptionResolver
and user define components like
- Controllers/Handler
- Interceptors
There are 3 ways to configure interceptors
- Define interceptor as a property of your HandlerMapping bean -
<bean class="...DefaultAnnotationHandlerMapping">
    <preoperty name="interceptors">
        <list>
            <bean class=""/>
            <bean class=""/>
        </list>
    </property>
</bean>
- OR use mvc namespace to define interceptors -
<mvc:interceptors>
    <bean class="myPackage.Interceptor1"/>
    <bean class="myPackage.Interceptor2"/>
</mvc:interceptors>
NOTE : This will be applied to all HandlerMapping beans. If you want to restrict your interceptors to particular HandlerMapping use - - mapping paramter. You can optionally give exclude paramter too (available from Spring 3.1+)
<mvc:interceptors>
    <mvc:interceptor>
        <mvc:mapping path="/secure/*" />
        <mvc:exclude-mapping path="/secure/help" />
        <bean class="" />
    </mvc:interceptor>
</mvc:interceptors>
Interceptor Example
Lets see an example of how to create an interceptor -
Lets first create s simple servlet configuration to configure our dispacher Servlet -
<?xml version="1.0" encoding="UTF-8"?>

<web-app xmlns:xsi="http://www.w3.org/2001/XMLSchema-instance" xmlns="http://java.sun.com/xml/ns/javaee" xmlns:web="http://java.sun.com/xml/ns/javaee/web-app_2_5.xsd" xsi:schemaLocation="http://java.sun.com/xml/ns/javaee http://java.sun.com/xml/ns/javaee/web-app_2_5.xsd" version="2.5">

  <servlet>
    <servlet-name>admin</servlet-name>
    <servlet-class>org.springframework.web.servlet.DispatcherServlet</servlet-class>
    <init-param>
      <param-name>contextConfigLocation</param-name>
      <param-value>
                /WEB-INF/spring/*.xml
            </param-value>
    </init-param>
    <load-on-startup>1</load-on-startup>
  </servlet>
  <servlet-mapping>
    <servlet-name>admin</servlet-name>
    <url-pattern>/admin/*</url-pattern>
  </servlet-mapping>

</web-app>
As you can see our dispacher servlet will server all requests that are of format
- http://localhost:8080/projectName/admin
Now lets create the Spring configuration. Create a file under /WEB-INF/spring with xml extension and add following contents to it -
<?xml version="1.0" encoding="UTF-8"?>
<beans xmlns="http://www.springframework.org/schema/beans"
    xmlns:xsi="http://www.w3.org/2001/XMLSchema-instance"
    xmlns:context="http://www.springframework.org/schema/context"
    xmlns:mvc="http://www.springframework.org/schema/mvc"
    xsi:schemaLocation="http://www.springframework.org/schema/beans
                        http://www.springframework.org/schema/beans/spring-beans.xsd
                        http://www.springframework.org/schema/mvc
                        http://www.springframework.org/schema/mvc/spring-mvc.xsd
                        http://www.springframework.org/schema/context
                        http://www.springframework.org/schema/context/spring-context.xsd">


    <bean class="org.springframework.web.servlet.view.InternalResourceViewResolver">
        <property name="prefix" value="/WEB-INF/"/>
        <property name="suffix" value=".jsp"/>
    </bean>

    <context:component-scan base-package="myPackage" />

    <mvc:annotation-driven/>


    <mvc:interceptors>
            <bean class="myPackage.TestInterceptor" />
    </mvc:interceptors>


</beans>
If you notice we have configured an interceptor to intercept all requests (i.e applicable for all handler mappings)
If you want it to be for specific URL you can do something like -
    <mvc:interceptors>
        <mvc:interceptor>
            <mvc:mapping path="/**" />
            <bean class="myPackage.TestInterceptor" />
        </mvc:interceptor>
    </mvc:interceptors>
or
    <mvc:interceptors>
        <mvc:interceptor>
            <mvc:mapping path="/home" />
            <bean class="myPackage.TestInterceptor" />
        </mvc:interceptor>
    </mvc:interceptors>
Finally lets create our Controller and interceptor -
WelcomeController.java
@Controller

public class WelcomeController {
    @RequestMapping(value="/home", method = RequestMethod.GET)
    public String welcome() {
        return "welcome";
    }
}
and TestInterceptor.java
public class TestInterceptor extends HandlerInterceptorAdapter {
    @Override
    public boolean preHandle(HttpServletRequest request,
            HttpServletResponse response, Object handler) throws Exception {
        System.out.println("Request intercepted");
        return true;
    }

}
After you have done this setup you can hit -
- http://localhost:8080/projectName/admin/home
Also not interceptors will be hit only if the path that you are hitting is valid. Si if you try /home/test then interceptor will not be hit. It will be hit only if the requested path forms a part of valid HandlerMapping (like /home in above case).
Also will remind you again interceptors are configured at HandlerMapping level. In this case it would be RequestMappingHandlerMapping (Spring 3.1+ with mvc:annotation-driven) or DefaultAnnotationHandlerMapping.


