Saturday, 2 August 2014

Installing Groovy plugin in Eclipse

Background

You may want to go through the previous post on what is groovy and how to set the environment required to run Groovy programs. In this post I will show how to install it's Eclipse plugin.


Getting Started

  1. In Eclipse go to Help -> Install new Software .


  2. For the plugin site refer to the Groovy page for Eclipse plugin. The site depends on which version on Eclipse you are using. I am using Juno. So link for me is http://dist.springsource.org/release/GRECLIPSE/e4.2/.


  3. Select "Groovy-Eclipse" and click on next.


  4. Check install Details and Click on Next. Accept the agreement and click install. It will take some time to install the plugin depending on your internet bandwidth. You can see the progress at the bottom of Eclipse or from Progress tab.

Create a new groovy Project

  1.  Create a new Groovy project named GroovyTestProject.


  2. Create a groovy class named GroovyTest.groovy. Enter the following code and then run it as Groovy Script.

    class GroovyTest {
        public static void main(def args){
            println("Hello World!")
        }
     }


  3.  You should see the output in console.

Spurious wakeups in Java and how to avoid them.

Spurious wakeups

If you haven't heard this word now would be a good time for it. A very interesting topic. I was not aware of this problem some time back  and when I did some research on it turns out the concept does exist and must be taken care of in production level code. It is in fact a well thought design decision (Read more in Interesting Explanation section).

What are Spurious wakeups?

As per Wiki

Spurious wakeup describes a complication in the use of condition variables as provided by certain multithreading APIs such as POSIX Threads and the Windows API.

Even after a condition variable appears to have been signaled from a waiting thread's point of view, the condition that was awaited may still be false. One of the reasons for this is a spurious wakeup; that is, a thread might be awoken from its waiting state even though no thread signaled the condition variable. For correctness it is necessary, then, to verify that the condition is indeed true after the thread has finished waiting.

Why do they occur?


The pthread_cond_wait() function in Linux is implemented using the futex system call. Each blocking system call on Linux returns abruptly with EINTR when the process receives a signal. ... pthread_cond_wait() can't restart the waiting because it may miss a real wakeup in the little time it was outside the futex system call. This race condition can only be avoided by the caller checking for an invariant. A POSIX signal will therefore generate a spurious wakeup.

Interesting Explanation


Just think of it... like any code, thread scheduler may experience temporary blackout due to something abnormal happening in underlying hardware / software. Of course, care should be taken for this to happen as rare as possible, but since there's no such thing as 100% robust software it is reasonable to assume this can happen and take care on the graceful recovery in case if scheduler detects this (eg by observing missing heartbeats).

Now, how could scheduler recover, taking into account that during blackout it could miss some signals intended to notify waiting threads? If scheduler does nothing, mentioned "unlucky" threads will just hang, waiting forever - to avoid this, scheduler would simply send a signal to all the waiting threads.

This makes it necessary to establish a "contract" that waiting thread can be notified without a reason. To be precise, there would be a reason - scheduler blackout - but since thread is designed (for a good reason) to be oblivious to scheduler internal implementation details, this reason is likely better to present as "spurious".

How to avoid a spurious wakeup?

A thread can also wake up without being notified, interrupted, or timing out, a so-called spurious wakeup. While this will rarely occur in practice, applications must guard against it by testing for the condition that should have caused the thread to be awakened, and continuing to wait if the condition is not satisfied. In other words, waits should always occur in loops, like this one:


     synchronized (obj) {
         while (<condition does not hold>)
             obj.wait(timeout);
         ... // Perform action appropriate to condition
     } 


Important Links

Setting up Groovy environment

What is Groovy?

Groovy is a dynamic language that runs on the JVM and is tightly integrated with the Java language.  Groovy provides lots of simplifications compared to standard Java language features and advanced language features as properties, closures, native support for lists, maps and regular expressions, duck typing and the elvis operator.


Setting up groovy environment

Groovy requires Java, so you need to have a version available (while groovy 1.6 supported JDK 1.4 or greater, for groovy 1.7 onwards, minimum JDK 1.5 is needed)

Download the latest version from Groovy.  Unzip it and put it in some folder on your hard drive.
Then you have to set the GROOVY_HOME environment variable and add %GROOVY_HOME%/bin  to your PATH variable (Similar to JAVA_HOME. See above link on how to set up java environment).

Open groovyConsole.bat by double clicking on the icon in the bin directory of the Groovy distribution. If that does not work you may want to open the command line, navigate to bin directory and execute the bat file. Even if it does not open you will see the errors responsible for not starting the bat file.

Type in println("Hello World from yourName!")  and you should see it printed on the console (screenshot attached). After typing do Ctrl + R to execute the code.


Loading external jars in Grrovy

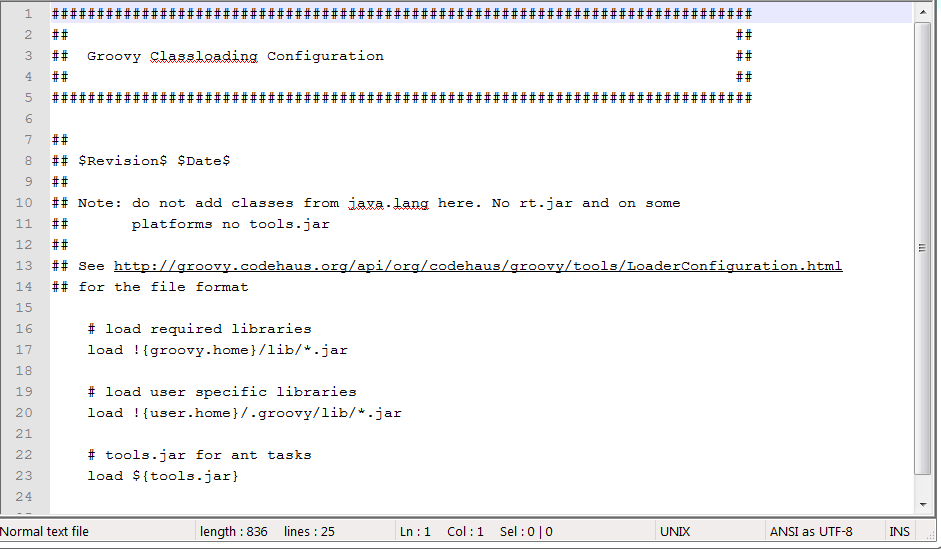
If you see your groovy-2.3.6\conf folder you will see groovy-starter.conf file which looks like - 


And if you notice it loads jars from
  1. {groovy.home}/lib/*.jar or
  2. !{user.home}/.groovy/lib/*.jar
You can put your jars in any of the above folder. Also .gradle folder should be automatically be created in your user directory. For me it's C:\Users\athakur\.groovy.

Difference between Groovy and Java

  •  In Java 'java.lang' package is imported by default, but in groovy some others general purpose packages and classes are imported by default. Eg   
    • groovy.lang.*,
    • groovy.util.*,
    • java.io.*,
    • java.net.*,
    • java.util.*,
    • java.lang.*
  • In Java '==' operator is used for comparing primitive types and .equals is used to compare Objects but in grooby we can use '==' to compare both primitive and objects.
  • Semicolon is optional in groovy
  • In groovy all classes and methods and public by default.
  • Array is initialized as int[] array = [1,2,3] in groovy unlike Java where you do int[] array = { 1, 2, 3}.
  • In groovy you need to specify a variable of it is primitive or instance of some class. All you have to do is use keyword 'def' and groovy is smart enough to understand the instance type. Eg. def str = "Hello World!"
  • The return keyword is optional.
  • You can use the this keyword inside static methods (which refers to this class).
     

Reference to more information 

Setting up your Java environment

Goal

This is the most basic task that needs to be done before writing Java programs. I had written a couple of basic posts on Java to explain the basics which also includes downloading and installing Java.  Goal of this post is to list down steps to do so. This will be kept as a reference for all future posts.


Previous related posts

Steps to set up Java on your machine

  1. Download suitable Java distribution from  oracle site.
  2. Run the installer. 
    1. For Windows simple run the .exe file.
    2. For debian based system you can simply
      execute sudo apt-get install oracle-java7-installer
      from command line. 
  3. Next we need to add JAVA_HOME environment variable. Though not required for running standalone java programs. Many other software's use this to locate Java installation.   To do so follow the steps 
    1. Windows
      1. Open the System control panel
      2. Open Advanced tab
      3. Click on the Environment Variables button
      4. Add a new System variable with the name JAVA_HOME. Value should be the directory Java was installed in (something like C:\Program Files\Java\jdk1.7 
    2. Linux
      1. Refer How to permanently set $PATH on Linux?
      2. Path is above post is different, You should add your Java installation path (Something like /home/user/java/jdk1.7/bin)
  4. For windows when you run the installer java will be automatically added to %PATH% variable. You can easily verify that by executing following in cmd - java -version. If not added you can do so by adding %JAVA_HOME%\bin to your system path (assuming you followed step 3 else provide complete path).
t> UA-39527780-1 back to top