Sunday, 14 October 2018

What is the purpose of Node.js module.exports and how do you use it?

Background

If you have ever used nodejs and npm you must have encountered usage of module.exports syntax. Or perhaps just exports? If you do have encountered this that you might be aware that it exposes a certain functionality of the code so that other outside code can reference and execute it. Though this is a short version of what exports syntax does, in this post we will see a lot more of how it behaves and some examples to help us understand this better.


What is the purpose of Node.js module.exports and how do you use it?

The module.exports object is created by the Module system. module.exports is the object that's actually returned as the result of a require call. exports is just an alias to module.exports. So you could use either. There are some things that you would need to take care if you are just using exports but more of that later. For now, let's just take a simple example and see how it actually works.

First, create a file called calc.js  with the following content -

var add = function(x,y) {
return x + y;
}

var subtract = function(x,y){
return x - y;
}

module.exports = {
add  : add,
subtract: subtract
};


This code is simply defining two functions -  add and subtract and exporting them. Notice how these methods are declared as exports. We will revisit this back in a moment. Now let's try to use this code in a separate node code.

Now create another file - Let's call it demo.js. Now in this file add following code -

var calc = require('./calc.js');

console.log("2 + 3 = " + calc.add(2,3));
console.log("3 - 2 = " + calc.subtract(3,2));

And finally, run the demo.js file as -

  • node demo.js
It should give you the expected results -


If you understood above logic you must have got a basic idea of how exports work. To revisit our earlier statement we said - "module.exports is the object that's actually returned as the result of a require call." In this case, it returns a map of add and subtract which point to corresponding functions that you can invoke.

NOTE: Notice the "./" in the require statement. This is required to tell node that it is a local package.

Another way to use the same module.exports would be as follows -

module.exports.add = function(x,y) {
return x + y;
}

module.exports.subtract = function(x,y){
return x - y;
}


And if you now run demo.js again you would still see the same output. Both are just different ways to expose your code outside.

NOTE: Note that assignment to module.exports must be done immediately. It cannot be done in any callbacks. So following will not work -


var add = function(x,y) {
return x + y;
}

var subtract = function(x,y){
return x - y;
}

setTimeout(() => {
  module.exports = { add : add, subtract : subtract };
}, 0);


This will fail with below error -

TypeError: calc.add is not a function
    at Object.<anonymous> (demo.js:3:31)
    at Module._compile (module.js:653:30)
    at Object.Module._extensions..js (module.js:664:10)
    at Module.load (module.js:566:32)
    at tryModuleLoad (module.js:506:12)
    at Function.Module._load (module.js:498:3)
    at Function.Module.runMain (module.js:694:10)
    at startup (bootstrap_node.js:204:16)
    at bootstrap_node.js:625:3


So make sure your exports are done immediately and not in any callbacks.


Now let's come back to the exports keyword that we said is just an alias to module.exports. Let us rewrite the code with just exports now.  Let's say your code is as follows -


exports.add = function(x,y) {
return x + y;
}

exports.subtract = function(x,y){
return x - y;
}


Now run demo.js and you should still get your desired output. Like I said earlier exports is just an alias to exports.module. Now lets out 1st approach with just exports -

var add = function(x,y) {
return x + y;
}

var subtract = function(x,y){
return x - y;
}

exports = {
add : add,
subtract: subtract
}


And if you run demo.js again you will get an error -

TypeError: calc.add is not a function
    at Object.<anonymous> (demo.js:3:31)
    at Module._compile (module.js:653:30)
    at Object.Module._extensions..js (module.js:664:10)
    at Module.load (module.js:566:32)
    at tryModuleLoad (module.js:506:12)
    at Function.Module._load (module.js:498:3)
    at Function.Module.runMain (module.js:694:10)
    at startup (bootstrap_node.js:204:16)
    at bootstrap_node.js:625:3

So why did this happen? This brings us to another crucial fact -

If you overwrite exports then it will no longer refer to module.exports. The exports variable is available within a module's file-level scope, and is assigned the value of module.exports before the module is evaluated. So if you overwrite exports it is no longer an alias to module.exports and hence it no longer works.

So make sure you do not overwrite exports variable. It is always safer to just use module.exports.

To summarize this in a single picture module.exports work as follows -


Related Links

Thursday, 11 October 2018

How to install Eclipse plugin manually from a local zip file

Background

Eclipse is an integrated development environment (IDE) used in computer programming and is the most widely used Java IDE. It contains a base workspace and an extensible plug-in system for customizing the environment. You can download Eclipse from their official site - 
It also supports installing the plugin to customize your IDE environment. If you have already used Eclipse you might know how you can install a new plugin. All you need is the sites link where the plugin is hosted and you are all set. You can do this from
  • Help -> Install new Software


In this post, I will show you how to install a plugin downloaded as a zip file from the local disk.

 How to install Eclipse plugin manually from a local zip file

First, make sure your zip file is a valid Eclipse plugin. To verify that you can simply view contents of that zip. You should see two folders-
  1. features,
  2. plugins
The new version of Eclipse might also have following files -
  1. content.jar, 
  2. artifacts.jar
Eg.


 If above files exist then it means this is an archived update site. Once you have verified that your plugin zip file is correct it's time to get it installed.

Now go back to
  • "Help" -> "Install New Software"
Now click on "Add"


 Now click on "Archive"


 Now select the zip file you downloaded earlier. You can leave the name blank. Now click on Ok.

You can now see the plugin details. Select it for installation. Make sure you unselect "Contact all update sites...." checkbox as it can sometimes create problems.

Click "Next", accept terms and conditions and click "Finish".


You should now see a warning that you are installing unsigned content.


You can view the details if you want. Finally, click Ok and restart eclipse for changes to take effect.

 Once installed you can go to -
  • "Help" -> "Installation details" 
to see the installed plugin details.


 You can also uninstall the plugin from here. Just click on the "Uninstall" button at the bottom.


Related Links


Saturday, 6 October 2018

How to do iterative tasks with a delay in AWS Step Functions

Background

Very recently I did a video series on Building Web application using AWS serverless architecture -
In one of the videos, I covered AWS step function service that can be used to create distributed applications using visual workflows.

Step functions use Lambdas internally to execute business logic with the provided workflow. But there could be limitations that arise. Eg.
  1. The business logic that the Lambda is executing might take more than the maximum allowed time of 5 minutes.
  2. The API that you are calling from the Lambda might have the rate limiting.
One straightforward way would be to break down the Lambda into multiple lambdas and execute the business logic. But it is not always possible. For eg. let's say you are importing some data from a site through an API and then saving it in your DB. You may not always have control over the number if user returned and processed. It is always a good idea to handle it on your end. Fortunately, step functions provide a way to handle such scenarios. In this post, I will try to explain the same.

 How to do iterative tasks with a delay in AWS Step Functions

 Let us assume we have the following flow -
  1. Get remote data from an API. Let's say we can process only 50 items in that data in a minute. Let's say the API that we call to process each item allows only 50 APIs per minute.
  2. Let's assume we get more than 50 items in the fetch API call. Now we have to batch 50 items at a time and process it.
  3. Wait for 60 seconds and then process the next batch of 50.
  4. Do this till all items fetched are processed.


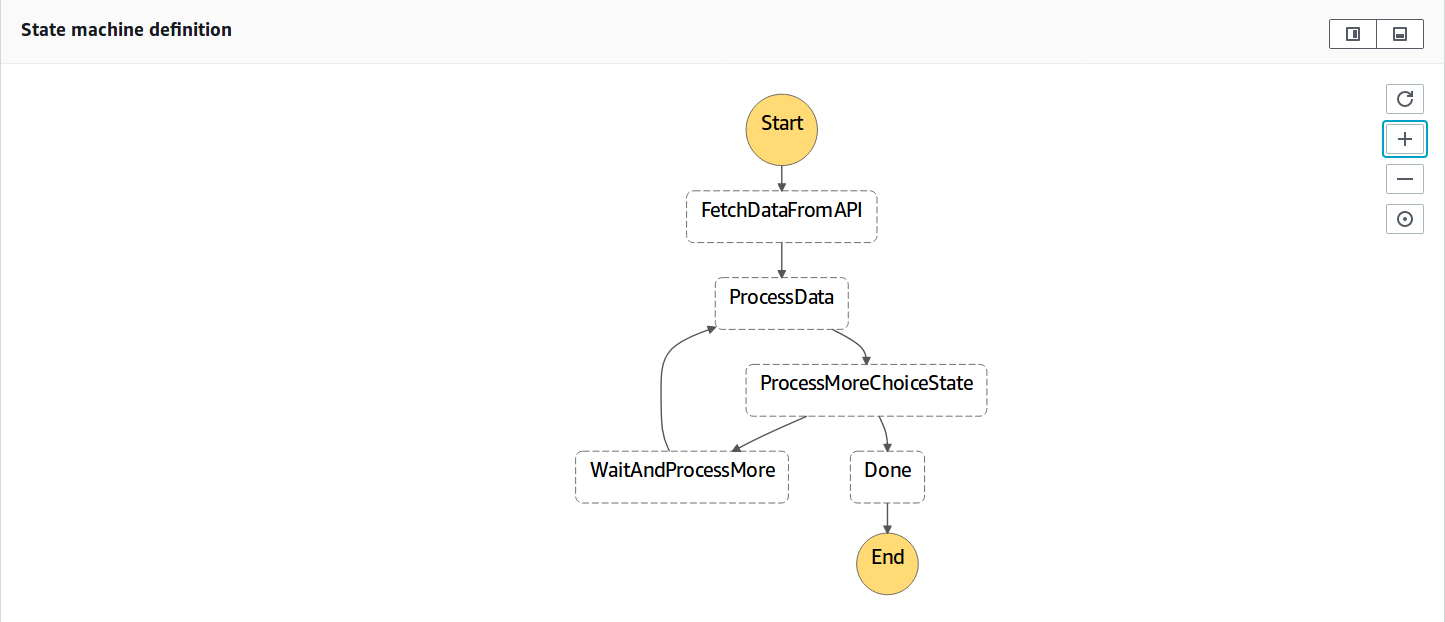
To do this we can use the following Step machine definition -


 {
    "Comment": "Step function to import external data",
    "StartAt": "FetchDataFromAPI",
    "States": {
        "FetchDataFromAPI": {
            "Type": "Task",
            "Resource": "arn:aws:lambda:us-east-1:499222264523:function:fetch-data",
            "Next": "ProcessData"
        },

        "ProcessData": {
            "Type": "Task",
            "Resource": "arn:aws:lambda:us-east-1:499222264523:function:process-data",
            "Next": "ProcessMoreChoiceState"
        },

        "ProcessMoreChoiceState": {
            "Type": "Choice",
            "Choices": [{
                "Variable": "$.done",
                "BooleanEquals": false,
                "Next": "WaitAndProcessMore"
            }],
            "Default": "Done"
        },

        "WaitAndProcessMore": {
            "Type": "Wait",
            "Seconds": 60,
            "Next": "ProcessData"
        },

        "Done": {
            "Type": "Pass",
            "End": true
        }
    }
}


Visually it looks like below -


If you have gone through the video link shared earlier most of this would have made sense to you by now. The only difference here is the "Wait" state that waits for 60 seconds before retrying.

You will have to send the entire array and the number of items processed so far as output to "ProcessMoreChoiceState" and subsequently to "WaitAndprocessMore" state so that it can be sent back to "ProcessData" state again to process remaining entries. If all entries are processed we just set "done" variable to true which transitions to "Done" state finishing the state machine execution.

Hope this helps. If you have any questions add it in the comments below. Thanks.

Related Links

Friday, 5 October 2018

Building a web application using AWS serverless architecture

Background

The last couple of weeks I have tried to record Youtube videos to demonstrate how to build a web application using AWS serverless architecture.


Serverless essentially means you do not have to worry about the physical hardware or the operating system or the runtimes. It's all taken care by the service offered under the serverless architecture. This has essentially given way to "Function as a service". 


In this post, I will try to summarize what I have covered in those videos over the last 2 week so that anyone looking to put it all together can refer.
If you do not wish to proceed and are just interested in the video links here's a list of them -

  1. AWS Serverless 101(Building a web application): https://youtu.be/I5bW0Oi0tY4
  2. AWS Serverless 102(Understanding the UI code): https://youtu.be/dQJCr0r_RuM
  3. AWS Serverless 103(AWS Lambda): https://youtu.be/Kn86Lq29IMA
  4. AWS Serverless 104(API Gateway): https://youtu.be/yKI_UCYblio
  5. AWS Serverless 105(CI/CD with code pipeline): https://youtu.be/GEWrpZuBEkQ
  6. AWS Serverless 106(Cloudwatch Events): https://youtu.be/9gUB2n0hV7Q
  7. AWS Serverless 107(Step functions): https://youtu.be/rL6EqaMbC5U

Github repo: https://github.com/aniket91/AWS_Serverless

I will go over each of the topics and explain what has been covered in each of the videos. If you think a specific topic interests you, you can pick that up. However, note that some videos might have references to setup done in previous videos. So it is recommended to go through them in the order provided. 


AWS Serverless 101(Building a web application)


This video is primarily to introduce you to the world of serverless. It covers a bit of cloud deployment history, information about serverless architecture - What and Why?. It also covers what are the prerequisites for this series and what exactly are we trying to build here. If you are completely new to AWS or AWS serverless concept this is a good place to start.

This web application has a UI with a button on click on which an API call is made to get all the image files from an S3 bucket and are rendered on the UI. API call goes to API Gateway which forwards the request to Lambda. Lambda executes to get all the image files from S3 and returns it to API gateway which in turn returns the response to the UI code(javascript). Response is then parsed as json array and images are rendered on UI.

AWS Serverless 102(Understanding the UI code)


This video covers the UI component of the web application. This is in plain HTML and javascript. UI code is hosted on a static website in an S3 bucket.

AWS Serverless 103(AWS Lambda)


AWS Lambda forms the basic unit of AWS serverless architecture. This video talks about AWS Lambda - what is Lambda, How to configure it, How to use it and finally code to get the list of files from an S3 bucket.

AWS Serverless 104(API Gateway) 


 API Gateway is an AWS service to create and expose APIs. This video talks about API Gateway service - how you can create APIs, resources, and methods, How we can integrate API gateway with Lambda. How to create stages and see corresponding endpoints. It also talks about CORS and logging in the API gateway service.

AWS Serverless 105(CI/CD with code pipeline)


 This video shows how we can automate backend code deployment using code pipeline AWS service. This includes using Code pipeline, Code build, and Cloud formation services.

AWS Serverless 106(Cloudwatch Events)


This video shows how you can use Cloud watch events to trigger or schedule periodic jobs just like cron jobs in a Linux based system. We are using this service to do a periodic cleanup for non-image files in the S3 bucket.

 AWS Serverless 107(Step functions)


This video covers how to use state machines of AWS step functions service to build distributed applications using visual workflows. We are using this service to do a asynchronous processing of various image files like jpg, png etc.

Related Links


Thursday, 13 September 2018

How to use API Gateway stage variables to call specific Lambda alias?

Background

When you are using an API Gateway you create stages like for dev, QA, and production. Sometimes you might want to call different aliases of the same lambda for different stages you have created. Stage variables let you do that. Let's see how we can achieve that in this post.


 If you do not wish to read the post below you can just view the youtube video that covers the same flow.


How to use API Gateway stage variables to call specific Lambda alias?

I am going to assume you -
  • Have already created an API
  • Deployed it to a stage called "dev"
  • You have a lambda created. You have published a new version. You have created a new alias and pointed to this new version.

Once you have above setup go to your API gateway and create a resource/method as you like. Once done select integration type as "Lambda" and in place for lambda function add -
  • MyTestLambda:${stageVariables.lambdaAlias}

Here MyTestLambda is the lambda name and stageVariables.lamndaAlias is using a stage variable named. We will see how we can set this later. Once done save this configuration.


On save, AWS will prompt you saying you are using stage variable and you need to grant appropriate permission -

You defined your Lambda function as a stage variable. Please ensure that you have the appropriate Function Policy on all functions you will use. You can do this by running the below AWS CLI command for each function, replacing the stage variable in the function-name parameter with the necessary function name. 


Execute this command in your console.


NOTE: You should have aws cli configured along with a profile that corresponds to your AWS account you are trying this on. If you have multiple AWS profiles configured you might want to use --profile and --region parameters as well. See screenshot below for command and response.


You can now test your method invocation with manually providing the lambdaAlias stage variable value which is "dev" in our case.


You should see appropriate response once executed. Now let's see how we can add it to our actual stages. First, click on your API and deploy it to the stage you need it in, For me, I have created a stage called "dev". In this go to "Stage variables".


 Now create a stage variable with name "lambdaAlias" and value "dev" and save it. Now you are all set up. You can not invoke the actual API URL and you should get back the response returned by the lambda alias function.


 Related Links


t> UA-39527780-1 back to top