Friday, 5 October 2018

Building a web application using AWS serverless architecture

Background

The last couple of weeks I have tried to record Youtube videos to demonstrate how to build a web application using AWS serverless architecture.


Serverless essentially means you do not have to worry about the physical hardware or the operating system or the runtimes. It's all taken care by the service offered under the serverless architecture. This has essentially given way to "Function as a service". 


In this post, I will try to summarize what I have covered in those videos over the last 2 week so that anyone looking to put it all together can refer.
If you do not wish to proceed and are just interested in the video links here's a list of them -

  1. AWS Serverless 101(Building a web application): https://youtu.be/I5bW0Oi0tY4
  2. AWS Serverless 102(Understanding the UI code): https://youtu.be/dQJCr0r_RuM
  3. AWS Serverless 103(AWS Lambda): https://youtu.be/Kn86Lq29IMA
  4. AWS Serverless 104(API Gateway): https://youtu.be/yKI_UCYblio
  5. AWS Serverless 105(CI/CD with code pipeline): https://youtu.be/GEWrpZuBEkQ
  6. AWS Serverless 106(Cloudwatch Events): https://youtu.be/9gUB2n0hV7Q
  7. AWS Serverless 107(Step functions): https://youtu.be/rL6EqaMbC5U

Github repo: https://github.com/aniket91/AWS_Serverless

I will go over each of the topics and explain what has been covered in each of the videos. If you think a specific topic interests you, you can pick that up. However, note that some videos might have references to setup done in previous videos. So it is recommended to go through them in the order provided. 


AWS Serverless 101(Building a web application)


This video is primarily to introduce you to the world of serverless. It covers a bit of cloud deployment history, information about serverless architecture - What and Why?. It also covers what are the prerequisites for this series and what exactly are we trying to build here. If you are completely new to AWS or AWS serverless concept this is a good place to start.

This web application has a UI with a button on click on which an API call is made to get all the image files from an S3 bucket and are rendered on the UI. API call goes to API Gateway which forwards the request to Lambda. Lambda executes to get all the image files from S3 and returns it to API gateway which in turn returns the response to the UI code(javascript). Response is then parsed as json array and images are rendered on UI.

AWS Serverless 102(Understanding the UI code)


This video covers the UI component of the web application. This is in plain HTML and javascript. UI code is hosted on a static website in an S3 bucket.

AWS Serverless 103(AWS Lambda)


AWS Lambda forms the basic unit of AWS serverless architecture. This video talks about AWS Lambda - what is Lambda, How to configure it, How to use it and finally code to get the list of files from an S3 bucket.

AWS Serverless 104(API Gateway) 


 API Gateway is an AWS service to create and expose APIs. This video talks about API Gateway service - how you can create APIs, resources, and methods, How we can integrate API gateway with Lambda. How to create stages and see corresponding endpoints. It also talks about CORS and logging in the API gateway service.

AWS Serverless 105(CI/CD with code pipeline)


 This video shows how we can automate backend code deployment using code pipeline AWS service. This includes using Code pipeline, Code build, and Cloud formation services.

AWS Serverless 106(Cloudwatch Events)


This video shows how you can use Cloud watch events to trigger or schedule periodic jobs just like cron jobs in a Linux based system. We are using this service to do a periodic cleanup for non-image files in the S3 bucket.

 AWS Serverless 107(Step functions)


This video covers how to use state machines of AWS step functions service to build distributed applications using visual workflows. We are using this service to do a asynchronous processing of various image files like jpg, png etc.

Related Links


Thursday, 13 September 2018

How to use API Gateway stage variables to call specific Lambda alias?

Background

When you are using an API Gateway you create stages like for dev, QA, and production. Sometimes you might want to call different aliases of the same lambda for different stages you have created. Stage variables let you do that. Let's see how we can achieve that in this post.


 If you do not wish to read the post below you can just view the youtube video that covers the same flow.


How to use API Gateway stage variables to call specific Lambda alias?

I am going to assume you -
  • Have already created an API
  • Deployed it to a stage called "dev"
  • You have a lambda created. You have published a new version. You have created a new alias and pointed to this new version.

Once you have above setup go to your API gateway and create a resource/method as you like. Once done select integration type as "Lambda" and in place for lambda function add -
  • MyTestLambda:${stageVariables.lambdaAlias}

Here MyTestLambda is the lambda name and stageVariables.lamndaAlias is using a stage variable named. We will see how we can set this later. Once done save this configuration.


On save, AWS will prompt you saying you are using stage variable and you need to grant appropriate permission -

You defined your Lambda function as a stage variable. Please ensure that you have the appropriate Function Policy on all functions you will use. You can do this by running the below AWS CLI command for each function, replacing the stage variable in the function-name parameter with the necessary function name. 


Execute this command in your console.


NOTE: You should have aws cli configured along with a profile that corresponds to your AWS account you are trying this on. If you have multiple AWS profiles configured you might want to use --profile and --region parameters as well. See screenshot below for command and response.


You can now test your method invocation with manually providing the lambdaAlias stage variable value which is "dev" in our case.


You should see appropriate response once executed. Now let's see how we can add it to our actual stages. First, click on your API and deploy it to the stage you need it in, For me, I have created a stage called "dev". In this go to "Stage variables".


 Now create a stage variable with name "lambdaAlias" and value "dev" and save it. Now you are all set up. You can not invoke the actual API URL and you should get back the response returned by the lambda alias function.


 Related Links


Wednesday, 12 September 2018

How to enable CloudWatch Logs for APIs in API Gateway

Background

AWS API gateway lets you create APIs that can scale. In this post, I will show you how to turn on cloud watch logging for your API gateway.

 If you do not wish to read the post below you can just view the youtube video that covers the same flow.


How to enable CloudWatch Logs for APIs in API Gateway

I am assuming you already have an API created in API gateway and have deployed it in a stage. 


Before you turn on cloud watch logging for your API deployed in a stage you need to provide API gateway a role to provide permission to send logs to cloud watch. To do so first create a role from IAM service for API gateway with permission to send logs to cloud watch. To do so go to IAM and then roles and click on create Role.


Next, select the permission that it shows - the one that allows API gateway to publish logs to cloud watch. Click review and create this role.


Once the role is created open it and copy the role ARN.


Now go to API gateway and go to Settings. Here you should see "CloudWatch log role ARN" field. Paste the copied ARN into this and save.


Once this is set up all that is left is to turn on cloud watch logging for your API. To turn it on go to your stage where your API is deployed. Next, go to the "Logs/tracing" tab and select the checkbox that says "Enable CloudWatch Logs". You can also optionally select "Log full requests/responses data".


Now you can go to Cloud watch -> Logs and see logs corresponding to each stage of your API gateway.


NOTES:

  1.  If you successfully enabled CloudWatch Logs for API Gateway, you will see the entry /aws/apigateway/welcome listed in the Log Groups section of the right pane.
  2. You might need to redeploy your API after enabling CloudWatch logs from the API Gateway console before your logs are visible in the CloudWatch console.
  3.  Your API will have a Log Group titled API-Gateway-Execution-Logs_api-id/ that contains numerous log streams.


Related Links

Tuesday, 21 August 2018

How to delete private EC2 AMI from AWS

Background

Most of the times you would want to customize the EC2 image that you want to run. It would help you quickly spin up a new instance or put it behind an auto scaling group. To do this you can create an image out of your current running EC2 instance. But this is an incremental process. So you may want to create a new image after making some changes to EC2 instance spun up from the current image. Once the new image is created you can delete the previous AMI/image. In this post, I will tell you what are the steps to do so.


How to delete private EC2 AMI from AWS

To delete a private AMI follow the steps below -

  1. Open the Amazon EC2 console  (https://console.aws.amazon.com/ec2/).
  2. Select the region from the drop-down at the top based on which region your Alocatedocaled.
  3. In the navigation pane, click AMIs.
  4. Select the AMI, click Actions, and then click Deregister. When prompted for confirmation, click Continue.
    • NOTE: It may take a few minutes before the console removes the AMI from the list. Choose Refresh to refresh the status.
  5. In the navigation pane, click Snapshots.
  6. Select the snapshot, click Actions, and then click Delete. When prompted for confirmation, click Yes, Delete.
  7. Terminate any EC2 instances that might be running with old AMI.
  8. Delete any EBS volumes for those EC2 instances if "delete on termination" is not set.

When you create an AMI it creates a snapshot for each volume associated with that image. So let's say your EC2 instance has 2 EBS volumes C drive and D drive of 30 GB and 50GB respectively in size then you would see 2 snapshots for them under snapshots section. Your AMI size will be the sum of individual snapshot size (i.e 30GB + 50GB = 80GB). To successfully delete the AMI you need to deregister the AMI and then delete the snapshots manually. And finally, when both are done terminate the EC2 instances that you might have running with old AMI.


NOTES:
  1. When you deregister an Amazon EBS-backed AMI, it doesn't affect the snapshot that was created for the root volume of the instance during the AMI creation process. You'll continue to incur storage costs for this snapshot. Therefore, if you are finished with the snapshot, you should delete it.
  2. You can deregister an AMI when you have finished using it. After you deregister an AMI, you can't use it to launch new instances.
  3. When you deregister an AMI, it doesn't affect any instances that you've already launched from the AMI. You'll continue to incur usage costs for these instances. Therefore, if you are finished with these instances, you should terminate them.
  4. AWS will not let you delete a snapshot associated with an AMI before you deregister the AMI.
  5. Delete EBS volumes (unless they are set to delete on termination, in which case, they would be removed on terminating EC2 instance). This isn't necessary for S3 backed instances


Related Links


Thursday, 16 August 2018

How to send an email using the AWS SES service?

Background

In many business use cases, you need to notify your users over an email. AWS provides its own service to do so. You can use AWS SES (Simple email service) to send out emails to your users. In this post, we will see how we can configure AWS SES service and send out emails.

If you want to skip all the text post below you can refer to the video I have created to cover the same thing -


Setting up configurations in AWS SES service

First and foremost go to SES service in your AWS console. There are limited regions were AWS SES service is available. Please choose one of those regions -


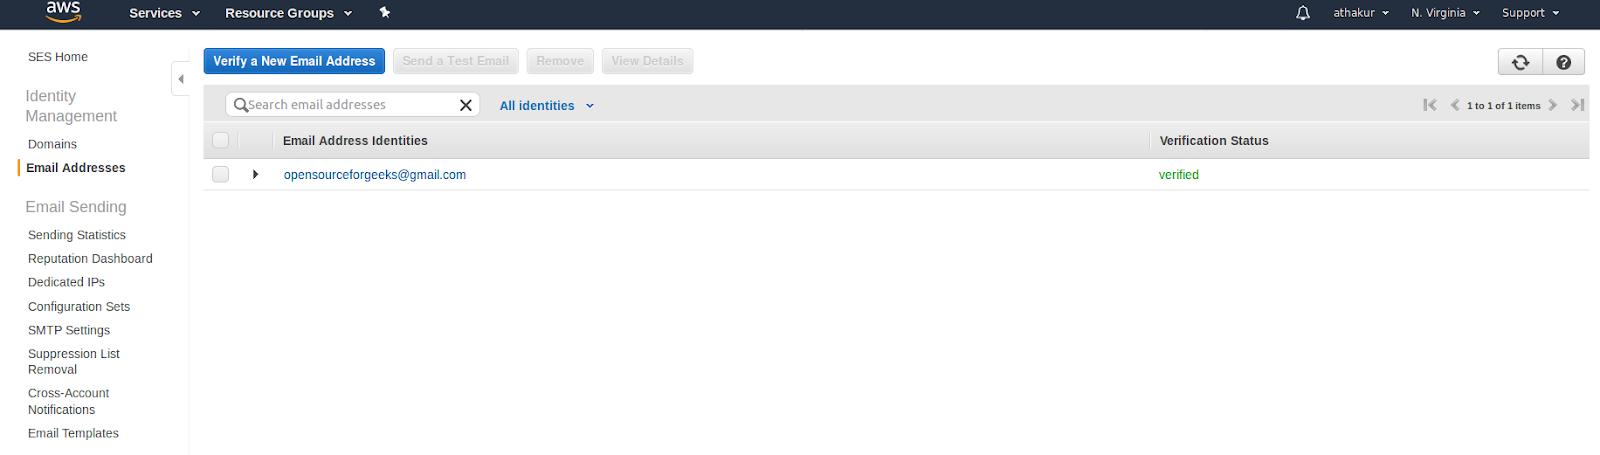
Next thing that you need to do is verify your email address - the address from which you want to send out emails. For this go to "Email addresses" section in the left panel. Now click on "Verify a New Email Address" button. Enter your email address and click "Verify this email address". Once done you should get an email to confirm and validate your email address. 


Click on the confirmation link. Once done you should see your email address as verified in SES "Email addresses" section.


Next thing that we would need to setup is email template. The email template is the content that you went send in your email. This would include your unique template name, subject, body etc. Also, this can be parameterized which means you can have placeholders in the template that can be replaced at the runtime. A sample template would be -


{
    "Template": {
        "TemplateName": "testtemplate",
        "SubjectPart": "Test email for username {{userName}}",
        "TextPart": "Test email body!",
        "HtmlPart": "<html>\r\n\r\n<head>\r\n    <title>Test Title<\/title>\r\n<\/head>\r\n\r\n<body>\r\n    <h1> Username : {{userName}}<\/h1>\r\n<\/body>\r\n\r\n<\/html>"


    }
}

HtmlPart is JSON escaped version of your actual HTML content. TemplateName is unique template name for your template that you would reference later from your code to send the mail. SubjectPart is the email subject. For more details refer -

Notice how we have added {{userName}} in the subject and text. This is a placeholder that will be replaced at runtime. We will see how in some time. Once your template is set up it is time to add it to AWS SES. To do this you need to call following API -
  • aws ses create-template --cli-input-json fileb://test_template.json --region us-east-1 --profile osfg

If you have already created the template and want to update it you can execute -

  • aws ses update-template --cli-input-json fileb://test_template.json --region us-east-1 --profile osfg

NOTE: You need to have AWS CLI configured on your machine and setup with your AWS profile. I have multiple profiles on my machine which is why you see --profile argument. if you just have one then you do not have to mention it.

Once you have executed this API you can see your template under "Email Templates" section of SES service.


Now that you have your email verified and template setup you can send an email. Following is the node.js code to do it -

const aws = require('aws-sdk');
aws.config.loadFromPath('./config.json');
const ses = new aws.SES();

/**
 * author: athakur
 * aws ses create-template --cli-input-json fileb://test_template.json --region us-east-1 --profile osfg
 * aws ses update-template --cli-input-json fileb://test_template.json --region us-east-1 --profile osfg
 * @param {*} callback 
 */
var sendMail = function (callback) {
    var params = {};

    var destination = {
        "ToAddresses": ["opensourceforgeeks@gmail.com"]
    };
    var templateData = {};
    templateData.userName = "athakur";

    params.Source = "opensourceforgeeks@gmail.com";
    params.Destination = destination;
    params.Template = "testtemplate";
    params.TemplateData = JSON.stringify(templateData)


    ses.sendTemplatedEmail(params, function (email_err, email_data) {
        if (email_err) {
            console.error("Failed to send the email : " + email_err);
            callback(email_err, email_data)
        } else {
            console.info("Successfully sent the email : " + JSON.stringify(email_data));
            callback(null, email_data);
        }
    })
}


sendMail(function(err, data){
    if(err){
        console.log("send mail failed");
    }
    else {
        console.log("Send mail succedded");
    }
})


In the above code, you can see that we provide the ToAddresses which is an array field. So you can give multiple addresses here. I have used the same email address as the one we have used in the source (from email address - the one we whitelisted and verified in the first step of setup). Also, notice the template name that we have provided - it is the same name we had configures in the json template file. Finally, notice the placeholder value we have provided - for userName. This will be replaced by "athakur" in the template and the email will be sent.

You can find this code snippet in my GitHub gist-


And you should get an email. In my case, it looks as follows -


NOTE: If you are not able to see the mail check your spam folder. Since it is sent by AWS SES service it might land up there. Mark it as non-spam and you should be good going forward.

Related Links


t> UA-39527780-1 back to top