Saturday, 28 January 2017

Creating Threads with the ExecutorService

Background

You know there are 2 ways to create your threads and run it asynchronously from main thread. You can either -
  • extend Thread class or
  • implement Runnable interface and pass it to a thread.
Consider the following example -

    public static void main(String[] args) {
        
        Thread t1 = new Thread(() -> System.out.println("My ThreadId : " + Thread.currentThread().getId()));
        Thread t2 = new Thread(() -> System.out.println("My ThreadId : " + Thread.currentThread().getId()));
        Thread t3 = new Thread(() -> System.out.println("My ThreadId : " + Thread.currentThread().getId()));
        t1.start();
        t2.start();
        t3.start();
        System.out.println("Main ThreadId : " + Thread.currentThread().getId());
        
    }


One of the possible outputs is -
My ThreadId : 10
My ThreadId : 12
Main ThreadId : 1
My ThreadId : 11

Obviously, we cannot determine for sure the order of execution of threads as it is dependent on OS level thread scheduler. We will not get into that. Important points to note here is how we created and started a thread, used lambda expression for the runnable interface.


Runnable as we know is a functional interface and can be used in lambda expressions -

@FunctionalInterface
public interface Runnable {
    public abstract void run();
}


So that's the normal way. But why manage thread starting/stopping, handing results if any on your own when Java provides you with a convenient way. And this is where ExecutorService comes into the picture.

In this post we will see what ExecutorService is, how we can use to create and run threads, various types of methods it supports etc.

Creating Threads with the ExecutorService

ExecutorService is an interface but it has multiple concrete implementations we can use. It is essentially a framework that creates and manages threads for you. It has other features like thread pooling and scheduling we will come to later.

Consider the following example -

    public static void main(String[] args) {
        
        ExecutorService service = null;
        try {
        service = Executors.newSingleThreadExecutor();
        service.execute(() -> System.out.println("My 1st ThreadId : " + Thread.currentThread().getId()));
        service.execute(() -> System.out.println("My 2nd ThreadId : " + Thread.currentThread().getId()));
        service.execute(() -> System.out.println("My 3rd ThreadId : " + Thread.currentThread().getId()));
        System.out.println("Main ThreadId : " + Thread.currentThread().getId());
        } finally {
        if(service != null) service.shutdown();
        }
        
    }


Here we have used newSingleThreadExecutor which is basically ExecutorService with a single thread. You send multiple runnable implementations to it and that single thread runs it sequentially. Since it is a single thread it's output will be sequential too (and hence predictable). However, you cannot predict the complete output of the above program as main threads output you cannot predict with respect to other threads as that runs independently.

One of the possible outputs of the above program -

My 1st ThreadId : 10
Main ThreadId : 1
My 2nd ThreadId : 10
My 3rd ThreadId : 10

Another thing you might have noticed above is the shutdown method. You need to be very careful here. You need to call shutdown on executor service when you are done because executor service create non-daemon threads and your application will never shut down if those threads are not stopped. Once shutdown is called no more tasks are accepted by executor service but it continues running already accepted tasks. Below is it' life cycle -
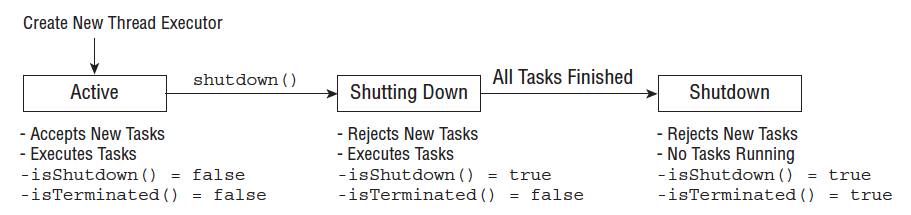


NOTE: ExecutorService interface does not implement AutoCloseable, so you cannot use a try-with-resources statement.

Submitting tasks to executor service

As you must have seen in the code snippet above we use executor services execute() method to submit our runnables. But the problem with these is we never really know if the runnables have completed their operation. Fortunately, there is another method we can use called submit() - this also takes a Runnable as an argument but returns a Future object that can be used to determine if task is complete or not.

    public static void main(String[] args) throws InterruptedException, ExecutionException {
        
        ExecutorService service = null;
        try {
        service = Executors.newSingleThreadExecutor();
        Future<?> result =  service.submit(() -> System.out.println("My 1st ThreadId : " + Thread.currentThread().getId()));
        while(!result.isDone()){
            System.out.println("Executor task in progress");
            Thread.sleep(100);
        }
        System.out.println("Executor task completed : " + result.isDone());
        } finally {
        if(service != null) service.shutdown();
        }
        
    }


Above prints -

Executor task in progress
My 1st ThreadId : 10
Executor task completed : true

In case you noticed Future object also has a get method. So if you are wondering what does it return then the answer is it depends. So far we have seen simply Runnable instance provided to submit method and since we know Runnable does not return anything (void return type) get on corresponding future will also return null. However, there is another interface called Callable similar to Runnable.

  • Callable allows you to return a value. 
  • It also allows you to throw checked exceptions.
  • And you can use it in submit/execute method of ExecutorService.
  • And yes it's also a functional interface like Runnable.

@FunctionalInterface
public interface Callable<V> {
    /**
     * Computes a result, or throws an exception if unable to do so.
     *
     * @return computed result
     * @throws Exception if unable to compute a result
     */
    V call() throws Exception;
}


The Callable interface was introduced as an alternative to the Runnable interface,
since it allows more details to be retrieved easily from the task after it is completed.

Sample example for Callable interface use -

    public static void main(String[] args) throws InterruptedException, ExecutionException {
       
        ExecutorService service = null;
        try {
        service = Executors.newSingleThreadExecutor();
        Future<String> result =  service.submit(() -> "My 1st ThreadId : " + Thread.currentThread().getId());
        while(!result.isDone()){
            System.out.println("Executor task in progress");
            Thread.sleep(100);
        }
        System.out.println("Executor task completed : " + result.get());
        } finally {
        if(service != null) service.shutdown();
        }
       
    }


Output -

 Executor task in progress
Executor task completed: My 1st ThreadId : 10


NOTE: Callable functional interface is similar to Supplier functional interface. Both don't take any argument and return something. If Java compiler at any point finds this ambiguous then it will throw a compilation error. You need to typecast it to work.

Eg.

    public static void useMe(Supplier<String> input) {}
    public static void useMe(Callable<String> input) {}
    
    public static void main(String[] args) {
        useMe(() -> {throw new IOException();}); // DOES NOT COMPILE
    }


The compilation will fail with following error -

The method useMe(Supplier<String>) is ambiguous for the type Java8Demo

Also, note Callable can throw checked exception while Supplier cannot. But Java does not check this as seen in above example.

NOTE: Until now we have only seen a single threaded executor service. But you can have a pool as well i.e executor service with a predefined number of threads in the pool.

 For eg.  ExecutorService executor = Executors.newFixedThreadPool(5);

NOTE: ExecutorService was introduced since Java 5.

Related Links

Saturday, 14 January 2017

Sending xml(JAXB) and json(Jackson) response with Spring MVC @ResponseBody annotation

Background

In some of our earlier posts we saw examples of how Spring controllers work. 

In those examples we returned a view name from controller method and subsequently corresponding JSP was returned and rendered. In this post we will see how we can send a xml or a json response instead of a JSP.


 Sending xml(JAXB) and json(Jackson) response with Spring MVC @ResponseBody annoatation

Your controller would look like below -

package com.osfg.controllers;

import javax.servlet.http.HttpServletRequest;
import org.slf4j.Logger;
import org.slf4j.LoggerFactory;
import org.springframework.http.MediaType;
import org.springframework.stereotype.Controller;
import org.springframework.web.bind.annotation.RequestMapping;
import org.springframework.web.bind.annotation.RequestMethod;
import org.springframework.web.bind.annotation.ResponseBody;

import com.osfg.model.Employee;

/**
 * 
 * @author athakur
 * Controller to handle employee information
 */
@Controller
public class EmployeeController {

    Logger logger = LoggerFactory.getLogger(EmployeeController.class);

    
    @RequestMapping(value = "/getEmployeeInfoData", method = RequestMethod.GET, produces = {MediaType.APPLICATION_JSON_VALUE, MediaType.APPLICATION_XML_VALUE})
    @ResponseBody
    public Employee getEmployeeInfo(HttpServletRequest request) {
        logger.debug("Receive GET request for employee data information");
        Employee empForm = new Employee();
        empForm.setName("Aniket Thakur");
        empForm.setAge(25);
        return empForm;
    }

}
 
 Most of annotations and code you would already know from previous examples. New thing here is the produces field which is set to 
  • MediaType.APPLICATION_JSON_VALUE,
  • MediaType.APPLICATION_XML_VALUE
which mean your controller method can give response in json or xml. 
NOTE : Spring framework matches this produces field with  accepts header of incoming request.

and your Employee model object would look like -

package com.osfg.model;

import java.io.Serializable;

import javax.xml.bind.annotation.XmlElement;
import javax.xml.bind.annotation.XmlRootElement;

/**
 * 
 * @author athakur
 * Model class for Employee
 */
@XmlRootElement(name = "employee")
public class Employee implements Serializable {
    
    private static final long serialVersionUID = 1L;
    
    private String name;
    private int age;
     
    @XmlElement
    public String getName() {
        return name;
    }
    public void setName(String name) {
        this.name = name;
    }
    
    @XmlElement
    public int getAge() {
        return age;
    }
    public void setAge(int age) {
        this.age = age;
    }
     
}


Notice the annotations used. Those are required for XML transformation by JAXB library.

NOTE : Don't forget to add <mvc:annotation-driven/>  tag in your spring configuration file.

Once above code and configurations are in place all you have to do is put JAXB and jackson jars on classpath. I am using ivy so add following dependency on youe ivy xml -

<dependency org="com.fasterxml.jackson.core" name="jackson-databind" rev="2.8.5"/>

NOTE : I am using Java 8. JAXB is inbuilt in java since java 7. So no need to explicitly add it.


You can find the working snippet of above code in my github repo -
https://github.com/aniket91/WebDynamo/blob/master/src/com/osfg/controllers/EmployeeController.java
file of
https://github.com/aniket91/WebDynamo

 Related Links

What's the difference between <mvc:annotation-driven /> and <context:annotation-config /> in servlet?

Background

With Spring 3.0 came mvc name space and along with it came a lot of simplifications in Spring framework. The one that we are going to discuss today is - <mvc:annotation-driven />

This is the simplest tag you can add in your spring configuration file to enable many new features.

This is obvious you spring configuration xml tag. For java equivalent you can add the annotation @EnableWebMvc to one of your @Configuration classes.

@Configuration
@EnableWebMvc
public class WebConfig {
}

The above registers a 
  • RequestMappingHandlerMapping, 
  • a RequestMappingHandlerAdapter, and 
  • an ExceptionHandlerExceptionResolver 
(among others) in support of processing requests with annotated controller methods using annotations such as @RequestMapping, @ExceptionHandler, and others.


What's the difference between <mvc:annotation-driven /> and <context:annotation-config /> in servlet?

With <mvc:annotation-driven /> following features get enabled -


  1. Configures the Spring 3 Type ConversionService (alternative to PropertyEditors)
  2. Adds support for formatting Number fields with @NumberFormat
  3. Adds support for formatting Date, Calendar, and Joda Time fields with @DateTimeFormat, if Joda Time is on the classpath
  4. Adds support for validating @Controller inputs with @Valid, if a JSR-303 Provider is on the classpath
  5. Adds support for support for reading and writing XML, if JAXB is on the classpath (HTTP message conversion with @RequestBody/@ResponseBody)
  6. Adds support for reading and writing JSON, if Jackson is on the classpath (along the same lines as #5)
This is the complete list of HttpMessageConverters set up by mvc:annotation-driven:

  1.  ByteArrayHttpMessageConverter converts byte arrays.  
  2.  StringHttpMessageConverter converts strings. 
  3.  ResourceHttpMessageConverter converts to/from org.springframework.core.io.Resource for all media types. 
  4.  SourceHttpMessageConverter converts to/from a javax.xml.transform.Source. 
  5.  FormHttpMessageConverter converts form data to/from a MultiValueMap<String, String>. 
  6.  Jaxb2RootElementHttpMessageConverter converts Java objects to/from XML — added if JAXB2 is present and Jackson 2 XML extension is not present on the classpath. 
  7.  MappingJackson2HttpMessageConverter converts to/from JSON — added if Jackson 2 is present on the classpath. 
  8.  MappingJackson2XmlHttpMessageConverter converts to/from XML — added if Jackson 2 XML extension is present on the classpath. 
  9.  AtomFeedHttpMessageConverter converts Atom feeds — added if Rome is present on the classpath. 
  10.  RssChannelHttpMessageConverter converts RSS feeds — added if Rome is present on the classpath.

context:annotation-config on the other hand looks for annotations on beans in the same application context it is defined and declares support for all the general annotations like @Autowired, @Resource, @Required, @PostConstruct etc etc.


Related Links


Sunday, 25 December 2016

Combine multiple PDF files into one in your Mac OS

Background

Couple of days back I had to upload a signed copy of an online document So I took it's printout and then scanned each page as a PDF. TO re upload I had to make it back into a single pdf file. Well of its a generic document you can use online pdf tools. But in my case the document was somewhat private and well it had my sign. So I could not do it online. In mac you can do it offline with in in built application called preview. Let us see how we can do it.


Combine multiple PDF files into one in your Mac OS

  • First open your PDF file with preview application. To do so you can right click and select over with preview.

  • Next go to View and Enable Thumbnails. You should see your current pfd in thumbnail panel on the left.

  • Now go to edit and select edit -> Page from file and then select other pdf file you need to combine. Do this for as many pdf files as you need to combine.

  • You can also drag and reorder pdf files in the thumbnail panel. You can also select pdf in this panel and click delete to delete the page.

  • Finally click on File -> Save to save the combined PDF.

Sunday, 18 December 2016

Greasemonkey script to dim white background webpages in Firefox

Background

In some of the previous posts we saw some greasemomkey scripts -
 This is a similar script.

Bright white pages strain your eyes. I love dark black/grey themes and they dont strain your eyes as well. So was looking out for an addon to do this.
Chrome has a beautiful addon called -
Unfortunately there is no such good plugin available on Firefox. Hence this script. You can configure RGB to the background color you wish to have. The script will be executed when your DOM(Document object model) is loaded.

Greasemonkey script to dim white background webpages in Firefox

I am not going to paste the code here. It is available on my Github gists page -
Feel free to fork it and change it as per you need. Google homepage looks like below post this change -


It has sort of greyish background.


NOTE : This is not a script originally written by me. I have just modified it to suit my needs. Feel free to edit it and use as per your requirements.

Related Links

t> UA-39527780-1 back to top