Saturday, 8 August 2015

Creating and customizing new user in Ubuntu Linux

Background

In this post we will see how to add a new user using command line. Then we will add it to sudoers list which will essentially make this user administrator. Next we will also see how can we personalize this new users profile and then we will see how we can change permissions or copy files from other users directory to this new users. We will also see how to remove an existing user and how to list files that belong to a user/group. And all of it with command line :)


Adding a new User

If you want to see list of existing user then you can browse the file /etc/passwd
  • less /etc/passwd
Here  you will see list of all user with their configurations like what shell the user uses.

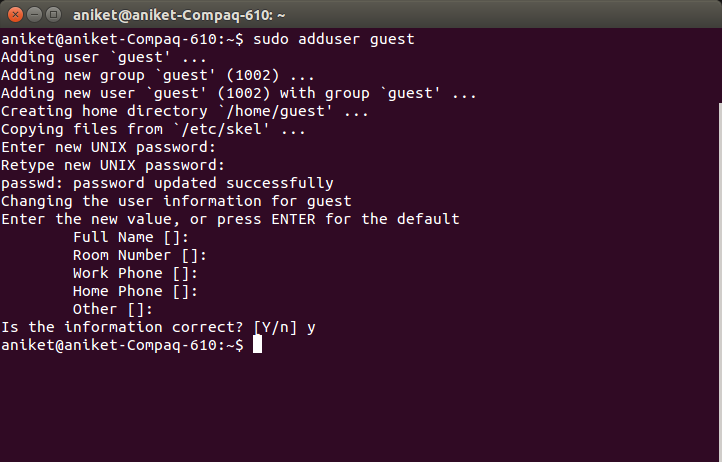
To add new user use following command -
  • sudo adduser <username>
 You will have to enter user details like name, phone no etc. You can just press enter if you do not wish to provide this information.


User should get created now. To verify
  1. You can see directory with same username getting created in /home folder.
  2. You can also inspect contents of /etc/passwd file. You should now start seeing row corresponding to this new user

Lastly to change user you can use following command
  • su <username>
You will need to provide corresponding users password.

Adding user to sudoers list

 Just creating a user will not grant it administrative privileges. This user can't use sudo command and thereby not execute tasks that requires administrative privileges.

To add a user to sudoers list you can execute following command - 
  • sudo adduser <username> sudo
Note that the user from which you execute this command should be in sudoers list.


 Personalizing User profile

What I mean here by personalizing is setting environment variables and aliases that user will need in his or her daily usage. For example lets say a developer create his/her account and now want JAVA_HOME variable set. Sure it can be exported and be done for the day but lets see how we can permanently set it.

All of this magic happens in a file called .bashrc that is located in the home folder of user. You can export your variable or set aliases here. For eg

  • export PATH=$PATH:$HOME/firefox/adt-bundle-linux-x86-20140702/sdk/tools:$HOME/firefox/adt-bundle-linux-x86-20140702/sdk/build-tools:$HOME/firefox/adt-bundle-linux-x86-20140702/sdk/platform-tools


For demo purpose lets create an alias to print hello world. Go to ~/.bashrc file and add following line

  • alias hw='echo hello world!'
save the file. Then in console just type hw and you should see "Hello World!" printed.


This was just an example you can set alias to command use frequently use.

Note : If you making any change in the .bashrc file you will have to open a new terminal window to see the effects. If you want to see the changes in same terminal you have to use source command as show in screenshot above.
  • source ~/.bashrc

Changing file permissions 

To change a permission of a file or a folder you can use chmod command. Yo give all read, write and execute permissions to all - user, group, others you can use - 

  • chmod ugo+rwx filename
 You can mix and match u,g,o and r,w,x combinations.
  • u = user
  • g = group
  • o = others
  • r = read
  • w = wite
  • x = execute
  • + = adds the specified modes to the specified classes
  • - =  removes the specified modes from the specified classes
  • = = the modes specified are to be made the exact modes for the specified classes
Also

  • r  = 4
  • w = 2
  • x = 1

Use this with caution. You don't want to give others unauthorized access to your profile.

Also if you want to do this action recursively you can use -R option.

If you want to change ownership of a file or a directory you can use chown command.

To change file owner user you can use
  • sudo chown <username> <filename>
To cahnge file owner group you can use
  • sudo chown :<groupname> <filename>
Or to change both user and group simultaneously
  • sudo chown <username>:<groupname> <filename> 


  Removing an User

To remove an existing user simply execute following command -
  • sudo userdel <username>
You will see row corresponding to this user in /etc/passwd file will get removed.

Note : Though user gets deleted it's home directory will not get deleted. You have to manually delete it. To delete users home directory use following command
  • sudo rm -rf /home/<user_directoryname>

Finding all files owned by a particular User/Group

For finding files owned by a group you can use 
  • find directory-location -group {group-name} -name {file-name}
For finding files owned by a user you can use
  • find directory-location -user {username} -name {file-name}

Related Links

Friday, 31 July 2015

Setting up open vpn client on Ubuntu with two factor authentication Support

Background

In this post we will see how to setup open vpn on ubuntu and then configure it to use Duo Two factor Authentication.

Installing openvpn

Installing openvpn is fairly simple. Just execute following command in command line

  •  sudo apt-get install openvpn
 This should install openvpn client in you Linux machine. You can verify the installation by checking the version.
  • openvpn --version

Connecting to VPN


 You can then connect to your vpn by executing command - 
  • sudo openvpn --config /path/to/config.ovpn
Next obvious question  -  What is this config.ovpn file? and where do I get it?

This is the file you would typically get from your vpn service provider. You can simply log on to your vpn with browser and download it from there. Note this file contains inline private keys and must be kept confidential.It will also have your vpn configuration like vpn address, ports , protocols etc.

Connecting to VPN with two factor Authentication like Duo

If two factor authentication is enabled on your server then your authentication will fail. 


You need to do some extra setup before you can start handling two factor authentications.

Configuring open VPN client
  1. Make sure you have following like in your OpenVPN client configuration file 
    • auth-user-pass    
  2. Next you should append you openvpn connect command with following - 
    • --auth-retry interact
And you should be all set for your vpn connection. You can run the command -

  • sudo openvpn --config /path/to/config.ovpn --auth-retry interact
You should not get a prompt to enter your dual auth password.


Simply enter your dual auth password and you should be good.

Related Links


Saturday, 4 July 2015

Understanding CSS Specificity

Background

Life is good when you have a small web project with limited and simple CSS but as your project size grows and more CSS is to be applied complexity increases. 

In there are two or more conflicting CSS rules that point to the same element then your web browser will apply some rules to figure out which rule should be given higher precedence and be applied.

We term this rule weight as selectivity. More the selectivity more is the preference given to that rule.

Example


Enough of the theory lets see an example. Consider following html

<html>
    <head>
        <style type="text/css">
            .redbutton{color: red;}
            .bluebutton{color: blue;}
             #innerdiv input {color: green;}
        </style>
        <script src="http://ajax.googleapis.com/ajax/libs/jquery/1.7.1/jquery.min.js" type="text/javascript"></script>
        <script>
            function changecolor()
            {
                jQuery("#colorbutton").addClass("bluebutton");
            }
        </script>
    <title>Testing CSS Selectivity</title>
    </head>
    <body>
        <div id="ouderdiv">
            <div id ="innerdiv">
                <input id="colorbutton" type="button" class="redbutton" value="Click Me" onclick="changecolor()"/>
            <div>
        <div>
    </body>
    
</html>

What do you expect will be the color of the button on page load and on click ? Well think a bit and then try it out. Paste above html in a file and open it in any browser. Observer the color, click on the button and then observer the color again. 

Before Cick

After Click


Whats happening?

Have questions? Will be answered soon. Lets take a step back and review our html code. We have a button. For this button we provided a class called redbutton (which should make the button red) and then on click we are dynamically changing the class to bluebutton (which should make the button blue). But none of these worked. It is still green. As you must have guessed correctly by now there is another css rule that is getting applied.

#innerdiv input {color: green;}

But why? Because CSS specificity of this rule is more than other class rules that we have defined. Next natural question - How is css specificity determined by the browser?

How is CSS specificity calculated?

There are some basic rules to determine specificity of a CSS rule.

Determination of specificity of a CSS rule depends on what type of selector is used
  • HTML selector (Eg input) has specificity 1
  • Class selector (Eg .redcolor) has specificity 10
  • ID selector (Eg. #innerdiv) has specificity 100
And if you have multiple such selectors in an CSS rule then their individual specificity just get added to form rule specificity that is used by the browser to determine precedence.

Here are few example
  • a - specificity 1 (1 HTML selector)
  • div a - specificity 2 (2 HTML selectors,  1+1)
  • div .someclass - specificty 11 (1 HTML selector and 1 class selector, 1 + 10)
  • div #someid - specificity 101  (1 HTML selector and 1 id selector, 1 + 100)  
  • div #someid .someclass - specificity 111  (1 HTML selector and 1 id selector and 1 class selector, 1 + 100 + 10)  

and so on.... Hope you got the point.

Note : If two conflicting rules have same selectivity then the one applied or parsed later is picked up.

So lets apply it to our rules.

  • .redbutton{color: red;} - specificity 10 (1 class selector)
  • .bluebutton{color: blue;} - specificity 10 (1 class selector)
  • #innerdiv input {color: green;} - specificity 101 (1 id selector and 1 html selector, 100+1)
So how can we leverage this information now? Lets increase the specificity of first two color rules now.

  • #innerdiv .redbutton{color: red;} - specificity 110 (1 id selector and 1 class selector,100+10)
  • #innerdiv .bluebutton{color: blue;} - specificity 110 (1 id selector and 1 class selector,100+10)
  • #innerdiv input {color: green;} - specificity 100 (1 id selector and 1 html selector,100+1)

With above rules now test our page again.

 Before Click


 After Click


That's all with CSS selectivity. Ideal scenario is when no two rules conflict but in my personal experience conflicting rules are bound to happen for a big web project. This is when this rules come handle. Let me know if you still have any questions :).

Thursday, 18 June 2015

How to clear terminal history in Linux

Background

Yup you read it correctly. How would you clear terminal history in Linux? Before we see how that is done lets address even better question why would be clean our command line history? I am not going to answer this  question for you :). It is same as asking why would you clear your browser history or launch incognito mode ? Sometime we have too - that's all I have.

 For Linux users who have not heard about this command just type history in your console and you can see your previously typed commands  there. 


I personally use it a lot. Specially to SSH to various linux servers (who would remember IP address of each). I simply do 

  • history | grep ssh
or even better option would be
  • (Ctrl + R) Start typing your command.
 But let's stick to our agenda for today. We will see how to clear our terminal history.

Clear terminal history in Linux

To clear the entire history you will have to execute command
  • history -c   OR
  •  history -cw


Note : This may just clear history for current terminal and may not be reflected to in other terminals. This did not work for me on my Ubuntu 14.04 machine. 

Deleting the source

Let's go a step ahead. All the bash history is stored in file 
  • ~/.bash_history
Go ahead and read that file. You can see your history getting saved there. So now you know the source. You can simply delete the history from this file.


Note : ~ notation is shortcut for current user. History is stored in a file called bash_history which is in root folder of the user.

To clear this file simply use following command
  • >~/.bash_history
Note : You will have to relaunch terminal to see the changes.

More details on your history File

Now you know where your history file is. Root folder of your user with file name - bash_history. But this is stored in your environment variable $HISTFILE
  • echo $HISTFILE
For me I get following result :

aniket@aniket-Compaq-610:~$ echo $HISTFILE
/home/aniket/.bash_history


So to disable logging history what you can do is use following commands -

  • unset HISTFILE OR
You can also do
  • Turn Off : set +o history
  • Turn On : set -o history

Related Links

Sunday, 14 June 2015

Using Shared Preferences in your Android Application

Shared Preferences

Shared preferences are like sessions (if you can relate to sessions running in your browser). For eg. when you are shopping on a site like Amazon or Flipkart you don't have to login to browse each item, do you? That's because you are in a session and the session data is stored in cookies in your browser. It will get invalidated when you logout or when the time expires. Shared preferences in Android are something like that. You can save or persist your settings across activities when user navigates across them. One major difference from sessions though is that sessions expire where as shared preference is a persistence storage. We will shortly see the code for it.

NOTE : Shared preference is a persistence storage.

When to use shared preferences?

If you have a relatively small collection of key-values that you'd like to save, you should use the SharedPreferences APIs. A SharedPreferences object points to a file containing key-value pairs and provides simple methods to read and write them. Each SharedPreferences file is managed by the framework and can be private or shared. (Source)

Goal

Lets set our goal first before we begin to write code. We are going to store setting in shared preference which will be used to play music or sound. So User can choose whether he wants to listen to the music or not.

Getting Started with using PreferenceActivity

Lets write our own class that extends PreferenceActivity

public class MyPreferenceActivity extends PreferenceActivity {
    
    private static final String OPT_MUSIC = "music";
    private static final Boolean OPT_SOUND_DEF = true; //default value of the setting

    @Override
    protected void onCreate(Bundle savedInstanceState) {
        super.onCreate(savedInstanceState);
        addPreferencesFromResource(R.xml.settings);
    }
    
    public static boolean getSound(Context context) {
        return PreferenceManager.getDefaultSharedPreferences(context).getBoolean(OPT_MUSIC, OPT_SOUND_DEF);
    }
}

Note : Notice the getSound() method that returns the boolean ? We will use that to see what setting is currently set. Also note it is static so we can directly call it using the class name. Note the use of PreferenceManager here and how we supply the default value (true in this case).

Loading Settings


As you can see above piece of code gets settings from an xml file named "settings". Inside folder res/xml  create a file named settings.xml and populate it with following content - 

<?xml version="1.0" encoding="utf-8"?>
<PreferenceScreen xmlns:android="http://schemas.android.com/apk/res/android" >

    <CheckBoxPreference
        android:defaultValue="true"
        android:key="sound"
        android:summary="@string/music_setting_summary"
        android:title="@string/music_setting_title" />

</PreferenceScreen>

In above xml I am showing a simple check box preference. It will be as simple as user checking and unchecking the checkbox to enable/disable music.

Displaying Settings

Now that we have coded for the music setting lets create a workflow to show it to the user. You can put in anywhere. For simplicity I am assuming it is one of the options in the options menu. Lets call it Settings (see 3rd option in below screenshot).


Now on click of it we should open the shared preference intent that we have created above. Code to do that is as follows - 

    @Override
    public boolean onOptionsItemSelected(MenuItem item) {
        switch(item.getItemId()) {
        case R.id.settings:
            Log.i(TAG, "Showing Preference Activity");
            startActivity(new Intent(this, MyPreferenceActivity .class));
            break;
        }
        return true;
    } 

Now on click you should see another activity with a checkbox to enable/disable sound/music (Like below).


Obeying the Setting

That's the code to create and display the setting but we also need to obey our music playing logic according to this setting. So lets go ahead and see how that works.


        if(MyPreferenceActivity .getSound(context)) {
            try {
                final ToneGenerator tg = new ToneGenerator(
                        AudioManager.STREAM_NOTIFICATION, 100);
                tg.startTone(ToneGenerator.TONE_PROP_BEEP);
            } catch (Exception ex) {
                Log.e(TAG, "Could not play notification sound", ex);
            }
        }

What above code does is very simply. Get the sound setting and if it is enabled then play a beep tone else don't. You can easily inject this code in some View's onclicklistener.

Last but not the least

Lastly don't forget to list your preference activity in your applications manifest file :)

        <activity
            android:name=".MyPreferenceActivity "
            android:label="@string/title_activity_prefs" >
        </activity> 


Using shared preferences without PreferenceActivity

Yes you can simply use shared preferences without Preference activity as well. Refer to following syntax.

Setting value in Preference : 

SharedPreferences.Editor editor = getSharedPreferences(PREFERENCE_NAME, MODE_PRIVATE).edit();

editor.putBoolean("music", true);

editor.putString("someStringSetting", "StringSettingValue");

editor.putInt("someIntSetting", 1);

editor.commit();

Retrieving Value from preference :

SharedPreferences prefs = getSharedPreferences(PREFERENCE_NAME, MODE_PRIVATE); 

boolean musicPref = prefs.getBoolean("music", true);

String stringSetting = prefs.getString("someStringSetting", "StringSettingFefaultValue");

String intSetting = prefs.getString("someIntSetting", 1);


NOTE : You can only store primitive type of data like String, integer, boolean etc. You cannot store your custom Objects. To Store your object instances you can convert them in json string (serialize) and then store it. While retrieving convert json string to your object (deserialize) and use it.

Related Links

t> UA-39527780-1 back to top