Saturday, 14 March 2015

Understanding Explicit and Implicit intents in Android

Background

Intents form the very basics of Android operating Systems. Primarily they are used to start new activities and transfer data between activities. There are two broad categories in which Intents can be classified - 
  1. Explicit Intents
  2. Implicit Intents
In Explicit intents we specify which exact Activity need to be started by giving the class of the Activity to be started. Android OS will start that exact Activity.

Implicit intents on the other hand behave differently. In implicit intents you provide various parameters like action, category, data etc. Activity that supports these parameters will be started by Android OS. For eg. lets say we provide "view" action which is the action to view a web page in browser. Android OS will see a browser (lets say chrome) supports this action and will start it. But wait a minute - what happens when multiple activities support these parameters. Like when we have multiple browsers installed. In this case Android OS will simply give option to the user to choose from list of Activities that support those combination of parameters.


We will see these is detail a little later. But I hope you got the overview of the basic difference between explicit and implicit intents.

Explicit Intents

As mentioned earlier explicit intents are used to start a specific Activity directly. Lets create two activities 
  1. PrimaryActivity and
  2. SecondaryActivity
Primary Activity will have a button which on press will start Secondary Activity using an explicit intent.

I am going to skip contents of other files like manifest file or resources file as aim of this post is to demonstrate types of intents. If you wish to learn resources and other folder that constitutes an Android project see one of my previous posts -

PrimaryActivity.java :

 package com.example.explicitintentdemo;

import android.app.Activity;
import android.content.Intent;
import android.os.Bundle;
import android.view.View;
import android.view.View.OnClickListener;
import android.widget.Button;

public class PrimaryActivity extends Activity {

    @Override
    protected void onCreate(Bundle savedInstanceState) {
        super.onCreate(savedInstanceState);
        setContentView(R.layout.activity_primary);
    
        Button explicitIntentButton = (Button) findViewById(R.id.explicit_intent_button);
        explicitIntentButton.setOnClickListener(new OnClickListener() {

            @Override
            public void onClick(View v) {
                Intent explicitIntent = new Intent(PrimaryActivity.this, SecondaryActivity.class);

                // explicit intent
                startActivity(explicitIntent);
            }
        });
        
    }
}


SecondaryActivity.java :

package com.example.explicitintentdemo;

import android.app.Activity;
import android.os.Bundle;

public class SecondaryActivity extends Activity {

    @Override
    protected void onCreate(Bundle savedInstanceState) {
        super.onCreate(savedInstanceState);
        setContentView(R.layout.activity_secondary);
    }
}


You can test it on your Android device or emulator. Pressing on "Start Secondary Activity" loads the secondary Activity.


So when the button is pressed we create a intent with Application context and class of Activity that needs to be started (Explicit intent). Then we simply start the activity using startActivity() method.


Now lets see how implicit intents are used.

Implicit Intents

As mentioned earlier implicit intents are kind of generic intents that are used to fire up Activities supporting some action. For example activities that can understand web page URLs and render them (typically browsers). As we know there can be many such activities (many browsers installed or same android OS for instance). In this case Android OS lets user decide which activity should be started. 

Lets see this in code. We will try to open simple google URL - "http://www.google.com" using proper intent.

Lets refactor our Primary Activity to use implicit intent and render the google URL.

PrimaryActivity.java :

package com.example.explicitintentdemo;

import android.app.Activity;
import android.content.Intent;
import android.net.Uri;
import android.os.Bundle;
import android.view.View;
import android.view.View.OnClickListener;
import android.widget.Button;

public class PrimaryActivity extends Activity {

    @Override
    protected void onCreate(Bundle savedInstanceState) {
        super.onCreate(savedInstanceState);
        setContentView(R.layout.activity_primary);
    
        Button explicitIntentButton = (Button) findViewById(R.id.explicit_intent_button);
        explicitIntentButton.setOnClickListener(new OnClickListener() {

            @Override
            public void onClick(View v) {
                Intent baseIntent =  new Intent(Intent.ACTION_VIEW, Uri.parse("http://www.google.com"));
                Intent chooserIntent = Intent.createChooser(baseIntent, "Choose your browser");
                startActivity(chooserIntent);
            }
        });
        
    }
}

Here the logic in onClick() method is slightly changed. Instead of using an Intent with Application Context and the class of Activity to be started we are providing it with an Action (Intent.ACTION_VIEW) and a data which is essentially an URI.

Note : Think of chooserIntent as a wrapper Intent. When the dialog is shown to choose from multiple activities that support the action (category, data etc) the title text  can be supplied using such Chooser Intents [See the second argument of Intent.createChooser() method call.]. 

Lets see this in action.

UI for PrimaryActivity is the same. Click on the "StartSecondaryActivity" to launch implicit intent.


Notice the title of the chooser dialog ? It is the same String we supplied in Chooser intent - 
  • Intent chooserIntent = Intent.createChooser(baseIntent, "Choose your browser");
I hope you got the difference between the two - implicit and explicit intents. If you are wondering what is the action (Intent.ACTION_VIEW) and the data that we supplied are and how intents are related see following documentation links.

After going through the documentation if you are wondering how intent- filter would look for the Activity that supports viewing URL like the one in above example then it is as follows -

        <activity
            android:name=".MyBrowserActivity"
            android:label="@string/my_app_name" >
            <intent-filter>
                <action android:name="android.intent.action.MAIN" />

                <category android:name="android.intent.category.LAUNCHER" />
            </intent-filter>
            <intent-filter>
                <action android:name="android.intent.action.VIEW" />
                <category android:name="android.intent.category.DEFAULT" />
                <data android:scheme="http"/> 
              </intent-filter>
        </activity>


Infact the MyBrowser Activity you saw in chooser list is one of the browser like demo app that I had created.
 So to give summary about intent filters - they define what kind of operation the Activity is capable of handling and is specified in the Applications manifest file inside the respective activity tag. If you would recollect starting activity of each application have intent filters like -

            <intent-filter>

                <action android:name="android.intent.action.MAIN" />
                <category android:name="android.intent.category.LAUNCHER" />

            </intent-filter>


These intent filters tell Android OS that this activity is a launcher activity.

Note : I have used startActivity() everywhere to start new Activity but if you want your new started activity to return some data/result to the starter activity you can use startActivityForResult() method. For more details on that you can refer -

Related Links

Tuesday, 10 March 2015

Escaping special characters of XML in Java

Background

In previous post I had shown how to parse XML from String - 
 So lets parse a simple String that contains Google Play App name. Eg - 
  • <AppName>Temple Run</AppName>
Code is as follows -

    public static void main(String args[]) throws SAXException, IOException, ParserConfigurationException {
            String xmlString = "<AppName>Temple Run</AppName>";
            DocumentBuilder db = DocumentBuilderFactory.newInstance().newDocumentBuilder();
            Document doc = db.parse(new InputSource(new StringReader(xmlString)));
            System.out.println(doc.getFirstChild().getTextContent());
    }

and output is as expected - Temple Run

Now lets change out input xml string/ app name as follows -
  • <AppName>Angels & Demons</AppName>
 Run the code again with above xml String input. You will get following Exception -

[Fatal Error] :1:18: The entity name must immediately follow the '&' in the entity reference.
Exception in thread "main" org.xml.sax.SAXParseException; lineNumber: 1; columnNumber: 18; The entity name must immediately follow the '&' in the entity reference.
    at com.sun.org.apache.xerces.internal.parsers.DOMParser.parse(Unknown Source)
    at com.sun.org.apache.xerces.internal.jaxp.DocumentBuilderImpl.parse(Unknown Source)
    at StringXMLParser.main(StringXMLParser.java:20)


Reason being '&' is a special character and you need to escape it in a String before parsing the String as XML. Same goes for HTML as well. Special characters like '&' should be escaped. '&'
 in it's escaped form looks like '&amp;'. So the input should be something like -
  • <AppName>Angels '&amp; Demons</AppName>

Special Characters in XML

Special characters in XML are  - 
  1. & - &amp;
  2. < - &lt;
  3. > - &gt;
  4. " - &quot;
  5. ' - &apos;
So when you are creating an XML from some input that has these special characters then you need to take care of it. Obviously you wont expect your clients to enter the app name as ''Angels &amp; Demons".


Reason for escaping these so called special characters is that these have special meaning in XML and when used in data will led to parsing errors as the one show in the code snippet above. For example & character is used to import other XML entities.

Escaping Input for XML in Java

You can very well write your own piece of code to parse these special characters from the input and replace them with their escaped version. For this tutorial I am going to use Apache commons lang’s StringEscapeUtils class which provide escaping for several  languages like XML, SQL and HTML.

As usual I am using Ivy as my dependency manager and Eclipse as my IDE. To install and configure Apache Ivy refer to the link provided in "Related Links" section at the bottom.

My ivy file looks like following - 

<ivy-module version="2.0" xmlns:xsi="http://www.w3.org/2001/XMLSchema-instance"
       xsi:noNamespaceSchemaLocation="http://ant.apache.org/ivy/schemas/ivy.xsd">
    <info
        organisation="OpenSourceForGeeks"
        module="XMLEscaper"
        status="integration">
    </info>
    
    <dependencies>
        <dependency org="org.apache.commons" name="commons-lang3" rev="3.3.2"/>        
    </dependencies>
    
</ivy-module>

now lets get to the code -

import java.io.IOException;
import java.io.StringReader;

import javax.xml.parsers.DocumentBuilder;
import javax.xml.parsers.DocumentBuilderFactory;
import javax.xml.parsers.ParserConfigurationException;

import org.apache.commons.lang3.StringEscapeUtils;
import org.w3c.dom.Document;
import org.xml.sax.InputSource;
import org.xml.sax.SAXException;


public class StringXMLParser {
    
    public static void main(String args[]) throws SAXException, IOException, ParserConfigurationException {
           
            String appNameInput = "Angels & Demons";
            System.out.println("App Name Before Escaping : " + appNameInput);
            String escapedInput = StringEscapeUtils.escapeXml(appNameInput);
            System.out.println("App Name After Escaping : " + escapedInput);
            String xmlString = "<AppName>" + escapedInput + "</AppName>";
            DocumentBuilder db = DocumentBuilderFactory.newInstance().newDocumentBuilder();
            Document doc = db.parse(new InputSource(new StringReader(xmlString)));
            System.out.println(doc.getFirstChild().getTextContent());
    }
}
 

Compile and run above code. You should get the following output - 

App Name Before Escaping : Angels & Demons
App Name After Escaping : Angels &amp; Demons
Angels & Demons

No Exception. I have just shown this demo for '&' special character but you can do the same for all special characters mentioned in  "Special Characters in XML" section above.


Note: Only the characters "<" and "&" are strictly illegal in XML. The greater than character is legal, but it is a good habit to replace it.


Related Links

Sunday, 22 February 2015

Java Class Design using Builder

Background

Two important principle of Object Oriented programming are - 
  1. For each class design aim for low coupling and high cohesion.
  2. Classes should be open for extension but closed for modification.

We will see how we can use these to design any classes.


Class Design


Lets design a simple Employee class which has it's name.

public class Employee {
    
    private String name;
    
    public Employee(String name)
    {
        this.name = name;
    }
    
}


Looks good. Every time anyone has to create an instance of Employee he has to supply name in the constructor. So you see any flaw in this?

Well there is. Lets say new requirement comes up and you now have to add employee age. What would you do?

One way would be change the constructor to include age now.

public class Employee {
    
    private String name;
    private int age;
    
    public Employee(String name, int age)
    {
        this.name = name;
        this.age = age;
    }  
}


Though it solves our new requirement it will break all our existing code. All Users using our existing code will  have to make changes now. So we definitely cannot remove the constructor with name in it. So what do we do next ?

Lets create an overridden constructor.

public class Employee {
    
    private String name;
    private int age;
    
    public Employee(String name)
    {
        this.name = name;
    }
    
    public Employee(String name, int age)
    {
        this(name);
        this.age = age;
    }
    
}


Ok this looks good. This will not break existing code and will meet our existing requirement. Now take a minute to this what about future requirements. Lets say you may have to add employees sex, salary etc in the Employee mode. What will you do then? Keep adding overloaded constructors?

Sure you can. But that is a very poor design choice. Simplest thing to do is following -

public class Employee {
    
    private String name;
    private int age;
    
    public Employee(){}

    public String getName() {
        return name;
    }

    public void setName(String name) {
        this.name = name;
    }

    public int getAge() {
        return age;
    }

    public void setAge(int age) {
        this.age = age;
    }
    
}


That's right. A simple no argument default constructor and getter, setter methods corresponding to instance variables. This is flexible design implementation. Going forward we can add as many instance variables with corresponding get and set methods.

Though this is good and simple class design. I would not say it is optimal. What if you want to ensure that user should not create a Employee instance without providing name.

Sure different developers will have different methods to ensure that and have good design. I like to use builder for that. See following -


import static org.apache.commons.lang3.Validate.*;
public class Employee
{
    private String name;
    private int age;
    
    private Employee() {}

    public String getName()
    {
        return name;
    }
    
    public int getAge()
    {
        return age;
    }

    public static class EmployeeBuilder
    {
        private final Employee employee;

        public EmployeeBuilder()
        {
            employee = new Employee();
        }

        public EmployeeBuilder setName(String name)
        {
            employee.name = name;
            return this;
        }
        
        public EmployeeBuilder setAge(int age)
        {
            employee.age = age;
            return this;
        }

        public Employee build()
        {
            validateFields();
            return employee;
        }

        private void validateFields()
        {
            notNull(employee.name, "Employee Name cannot be Empty");
            isTrue(employee.age >= 21, "Employee age cannot be less than 21");
        }
    }
}


Notice following points -
  1. We made constructor of Employee class private. So no one can directly instantiate Employee class. He or she has to use our Builder class.
  2. There is not setter methods in Employee class. Again builder should be used.
  3. Builder's build() methods validates our requirements like name cannot be null or age has to be more than 21.
  4. You can easily create Employee objects using - 
Employee employee = new EmployeeBuilder().setName("Aniket").setAge(23).build();

Friday, 20 February 2015

Using Android Emulator to test your Android Application

Background

I have written a couple of posts before on Android Application development, debugging and other general concepts. As you know Android is just an operating system running on Linux kernel customized for resource constrained environment like that of handheld systems. Before you roll out your application to other users you need to test it on various models (with different configurations). This is where you Emulator comes into picture. You can create a emulator that suits your testing requirement. In this post we will cover some of the events that we can simulate with emulators like setting batter to low etc. So basically we will use a telnet to connect to Android virtual device and issue commands to simulate various events.

Creating an Android virtual Device

Lets start by creating an Android virtual device. Open your Eclipse which come as a pert of ADT bundle.

Go to 

Windows -> Android Virtual Device Manager

I currently don't have any emulators. So the manager shows no emulators.


Go ahead and create one. Click on create button on the right. Fill in the configuration details as per your requirements.


After successful creation of AVD start it. Wait for it to initialize (It may take couple of minutes). My Emulator looks like the following at startup -


Now lets connect to it via telnet. See the number at the top of the Emulator ? (5554:athakur_Nexus) This number (5554) is the port number emulator is running on. You can do various action by connecting to it via telnet. Connecting is very simple. Simply type following in command prompt -

  • telnet localhost 5554
and you  get a 'OK' response. Notices the 3G network symbol at the top right corner. Lets change it to 2G or edge. Command for that is -
  • network speed edge


To change it back to 3G you can use command -
  • network speed full
 You can also change the battery status of your emulated device.  Notice the battery icon. It about little more than 50% charged and battery is still charging (power is connected).

Lets first reduce the battery level. To do so you can use following command -
  • power capacity 4
and notice how battery level drops.


Battery is still charging. Notice the lightning symbol inside battery icon. Lets stop the charging. To do so use the following command -
  • battery status not-charging (Usage: "status unknown|charging|discharging|not-charging|full")
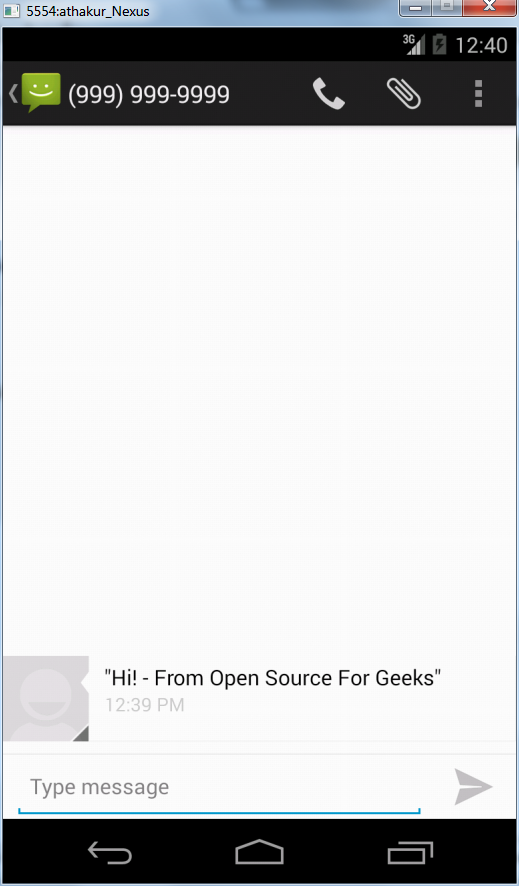
You can also simulate sms.  I am going to send a dummy message from telnet and you should see it as a proper message received in the emulator. Command for the same is -
  • sms send 9999999999 "Hi! - From Open Source For Geeks" (Syntax : sms send <phonenumber> <text message>)


You can even change your  coordinates on the map with following command -

  • geo fix 2.00 39.12
It is also possible to make a call from one emulator to  another. Simple go to dialer and dial port number of the other emulator. Emulator number running with that port will receive the call.


These are only some command. To get a full list of command you can type help after connecting to telnet -


Note :

  • You can reorient your device in the emulator by pressing Ctrl+F12 (Command+F12 on Mac). When this happens and your current Activity is killed and restarted.

Related Links

Monday, 16 February 2015

Proxy Design Pattern in Java

Background

We know proxy design pattern involves a representative object that controls access to it's subject that may be - 
  1. Remote
  2. Expensive to create (Virtual Proxy) or
  3. Need secure access (Protection Proxy)
In last post on

Understanding Java Remote Method Invocation (RMI)

We say example of Remote proxy. Stub is essentially the proxy that controls access of actual remote object.

Here is the summary of what happens in Proxy design pattern -

Proxy class implements the same interface as that of the Subject. Client crates a instance of proxy class (Typically using Factory pattern.) rather than the actual subject and calls methods on proxy (this is possible since both proxy and subject implement same interface). Now proxy internally instantiates Subject and calls methods on it depending on the purpose of the proxy.


We will see example of both Virtual as well as Protection proxy in this example. Later we will also see how proxies are dynamically created (Java has in built support for it).

 Virtual Proxy

Lets say we are creating a news website. Lets design Interface for it - 

public interface NewsSiteInterface {
    void showNews();
}

Now lets write the actual implementation - 
public class NewsSiteImpl implements NewsSiteInterface {
    
    String news;
    
    public NewsSiteImpl() {
        //simulate blocking data transfer
        try {
            Thread.sleep(5000);
            System.out.println("Data Received");
        } catch (InterruptedException e) {
            e.printStackTrace();
        }
        news = "Hello World";
    }
    
    public void showNews() {
        System.out.println(news);
    }

  
}


Notice the constructor simulates fetching data which is a block call. If you directly make instance of NewsSiteImpl and call showNews() on it site may possible hang as instance creation will take time. Lets now create a proxy that would avoid this blocking call.


public class NewsSiteProxy implements NewsSiteInterface {
    
    NewsSiteInterface newsSite;
    
    public NewsSiteProxy() {
        new Thread(new Runnable() {
            @Override
            public void run() {
                newsSite = new NewsSiteImpl();
                showNews();
            }
        }).start();
    }

    @Override
    public void showNews() {
        if(newsSite == null) {
            System.out.println("Loading....");]
        }
        else {
            newsSite.showNews();
        }
        
    }

}

So now we create instance of  NewsSiteInterface in another thread asynchronously. So user can go ahead and call showNews(). Obviously data may not be loaded by then, So we just show Loading...
Important point out program will not get hanged. Lets test out setup.

public class NewsDemo {
    public static void main(String args[])
    {
        NewsSiteInterface newSite  = new NewsSiteProxy();
        newSite.showNews();
        newSite.showNews();
    }
    
}

and the output is -

Loading....
Loading....
Data Received
Hello World

So that was our virtual proxy that helped us tackle creating on expensive time consuming instance.

Now lets see our protection proxy. Well the concept remains the same. Instead of doing task asynchronously we do some validation.

 In our next protection proxy demo we will use Java Dynamic proxies.

Protection Proxy and Java Dynamic proxy

Lets say we are designing a programming QnA site like Stack Overflow.  When user create a account on Stack Overflow he essentially created a profile. Lets write a class for that -


public interface StackOverflowProfile {
    String askQuestion(String question);
    String writeAnswer(String answer);
    void upVote();
    void downVote();
}


Now lets create a concrete implementation of this profile interface.

public class StackOverflowProfileImpl implements StackOverflowProfile {

    @Override
    public void askQuestion(String question) {
        //Ask Question
    }

    @Override
    public void writeAnswer(String answer) {
        //Provide Answer to a question
    }

    @Override
    public void upVote() {
        //Up vote an Answer or Question
        
    }

    @Override
    public void downVote() {
        //Down vote an Answer or Question
    }

}


So far so good. Program would work but we did a major mistake here. We do not have verification check in the code which means a user can keep asking questions, answer them and keep upvoting the same thereby increasing his or her reputation.  Only if we knew proxy pattern before :)

Lets divide out auth checks / Proxy into two parts -
  1. Owner of a Question
  2. Non Owner
Our use case is -
  • Owner can ask question, answer question but cannot do upvote or downvote.
  • Non owner cannot ask question but he can answer, upvote or downvote.
Note : Each profile can use either of the proxy depending on if he or she is the owner of the Question. If owner then Owner Proxy will be used and upvote or downvote operations will not be allowed. If non owner proxy is used then question cannot be asked (as someone else is the owner) but answer, upvote, dowvote operations are allowed.

We are now going to use Dynamic proxies to implement above checks -

import java.lang.reflect.InvocationHandler;
import java.lang.reflect.InvocationTargetException;
import java.lang.reflect.Method;

public class OwnerSOProfile implements InvocationHandler {
    
    StackOverflowProfile soProfile;
    
    public OwnerSOProfile(StackOverflowProfile soProfile)
    {
        this.soProfile = soProfile;
    }

    @Override
    public Object invoke(Object proxy, Method method, Object[] args)
            throws Throwable {
        try
        {
            if(method.getName().equalsIgnoreCase("askQuestion"))
            {
                method.invoke(proxy, args);
            }
            else if(method.getName().equalsIgnoreCase("writeAnswer"))
            {
                method.invoke(proxy, args);
            }
            else if(method.getName().equalsIgnoreCase("upVote"))
            {
                throw new IllegalAccessException("Cannot Up vote own question or answer");
            }
            else if(method.getName().equalsIgnoreCase("downVote"))
            {
                throw new IllegalAccessException("Cannot down vote own question or answer");
            }
        }
        catch(InvocationTargetException ex) {
            ex.printStackTrace();
        }
        return null;
    }
}


and

import java.lang.reflect.InvocationHandler;
import java.lang.reflect.InvocationTargetException;
import java.lang.reflect.Method;

public class NonOwnerSoProfile implements InvocationHandler {
    
    StackOverflowProfile soProfile;
    
    public NonOwnerSoProfile(StackOverflowProfile soProfile)
    {
        this.soProfile = soProfile;
    }

    @Override
    public Object invoke(Object proxy, Method method, Object[] args)
            throws Throwable {
        
        try
        {
            if(method.getName().equalsIgnoreCase("askQuestion"))
            {
                throw new IllegalAccessException("Cannot edit question as you are not the owner");
            }
            else if(method.getName().equalsIgnoreCase("writeAnswer"))
            {
                method.invoke(proxy, args);
            }
            else if(method.getName().equalsIgnoreCase("upVote"))
            {
                method.invoke(proxy, args);
            }
            else if(method.getName().equalsIgnoreCase("downVote"))
            {
                method.invoke(proxy, args);
            }
        }
        catch(InvocationTargetException ex) {
            ex.printStackTrace();
        }
        return null;
    }
}


and finally lets do a demo -

import java.lang.reflect.Proxy;

public class SODemo {
    
    public static void main(String args[])
    {
        //general profile
        StackOverflowProfile profile = new StackOverflowProfileImpl();
        //allowed
        (profile).askQuestion("What is proxy pattern?");
        //not allowed
        getOwnerSoProxy(profile).upVote();
        //not allowed
        getNonOwnerSoProxy(profile).askQuestion("Java anti patterns?");
        //alowed
        getNonOwnerSoProxy(profile).upVote();
    }
    
    public static StackOverflowProfile getOwnerSoProxy(StackOverflowProfile profile)
    {
        return (StackOverflowProfile) Proxy.newProxyInstance(profile.getClass().getClassLoader(), profile.getClass().getInterfaces(), new OwnerSOProfile(profile));
    }
    
    public static StackOverflowProfile getNonOwnerSoProxy(StackOverflowProfile profile)
    {
        return (StackOverflowProfile) Proxy.newProxyInstance(profile.getClass().getClassLoader(), profile.getClass().getInterfaces(), new NonOwnerSoProfile(profile));
    }

}

Note : For above demo code. Try one call at a time because we have not added any Exception handling so whenever IllegalAccess Exception is thrown JVM will terminate.

Related Links

t> UA-39527780-1 back to top