Friday, 20 December 2013

Android operating System Overview and Activity Life cycle


Before getting started with Android development there are some basic prerequisites that you should be aware of
  1. Object-oriented programming concepts. Android makes heavy use of this.
  2. Some experience with Java.
  3. Experience with Eclipse development Environment.
  4. Basic knowledge of Android.

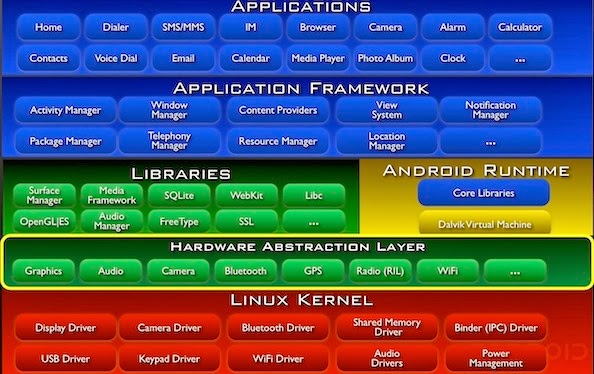
Android Architecture

  1.  Android runs on top of Linux kernel.
  2. Android uses a virtual machine called Dalvik Virtual Machine . This is specially optimized for mobile devices.
  3. Android has an integrated browser based on open source WebKit engine.
  4. Android has OpenGL ES which is embedded version of OpenGL(2D/3D graphics).
  5.  SQLite database for structured data storage.


Android versions

  1. Cupcake (1.5)
  2. Donut (1.6)
  3. Éclair (2.0/2.1)
  4. Froyo (2.2)
  5. Gingerbread (2.3)
  6. Honeycomb (3.0/3.1/3.2)
  7. Ice Cream sandwich (4.0)
  8. Jelly Bean (4.1/4.2/4.3)
  9. Kitkat (4.4)
  10. Lollipop (5.0/5.0.2)

Application Fundamentals

  1. Applications are written in Java programming language.
  2. You compile applications into Android package file(.apk files) which you can then distribute.
  3. Each application run in its own sandbox protected and isolated from other. They also run in their own Linux process.
  4.  Application consists of Components, a Manifest file and resources.

Android Components

  1.  Activities
    1.  Represents a single screen with a user interface.
    2. An application consists of multiple Activities.
    3. When new Activity starts, the old one is pushed onto stack which user can navigate by pressing back key.
    4. Can be built with xml files or directly by Java.
  2. Services
    1. Used to perform long running operations in the background.
    2. No interface.
    3. For example playing music. No matter what you are doing music keeps playing once started.
    4. Can be bound to other application.
  3. Content Providers
    1. Used to store and retrieve data and make it accessible to all the devices.
    2. By default there is no way to share data across different applications.
    3. Exposes public URI to others application.
    4. Uses database model.
    5. Example Contacts, Media etc.
  4. Broadcast receivers
    1. Responds to system wide broadcast announcements
    2. Example when screen turns off Android sends broadcast which your application can listen to. Other example is when battery gets low.
    3. You can also broadcast your own messages which other applications can listen to.
    4. No user interface though they can be used to create status bar notifications.

    Android Manifest File

    1.  Name must be AndroidManifest.xml and must be in Applications root directory.
    2. Gives Android System information about the Application.
    3. Describes components(mentioned above like Activities) used in Application.
    4. Declares permission required to run the application. If you must have notices when you try to install any app from the market store you have to give some permissions. These are given here.
    5. Declares minimum API level. If this is set only people with Android running version more than the API level will be able to view the application on the app store.

    Android Lifecycle


Android Lifecycle Methods

 
  •  onCreate() :This methods is called when activity is created.
    • First call will be to super.onCreate() so that android will do some of it's own initializations.
    • You can set the activity's content view by calling method setContentView().
    • You can get references to various UI components like EditText, Button etc by calling findViewById() method and then attach various listeners to it. Eg you can set onClickListener for button.
  •  onRestart() : This  method will be called when activity is stopped and is about to start again. If there is any logic that you need to execute on activity restart you should add it here.
  • onStart() : [Visible only behavior] This method is  called when the activity is about to start. In this method you should typically add logic to load persistent application state like reading from database.
  • onResume() : [Foreground only behavior ] This method is called when activity is visible  and is about to start interacting with the user. In this method you should do tasks related to activity coming to foreground. For eg. Starting a playback music or starting some animation etc.
  • onPause() :  Opposite of onRsume(). This method is called when activity is about to loose focus. In this method you should do things like stopping animation or stopping playback music... handle things you started in onResume() method. You should also save any data that you need to persist like storing user entered data in database.
  • onStop() :  This is when activity is no longer visible to the user. In this method you should typically cache your activity state in case activity is killed and needs is restarted later.
    • Note : If activity is killed by Android OS then onStop() is not called. So saving any persistent data should be done in onPause() method.
  •  onDestroy() : This method is called when activity is about to be destroyed.  Typical things to do here is release resource hold by your application.
    • Note : Again if activity is killed by Android OS then onDestroy() is not called. So saving any persistent data should be done in onPause() method.


Related Links

Swapping two Strings without using temporary variable.

We saw swapping two numbers without using temporary or third variable(here). Now lets see how can we swap two Strings without using any extra variable.

/**
 * Created with IntelliJ IDEA.
 * User: aniket
 * Date: 20/12/13
 * Time: 8:49 PM
 */
public class StringSwapper {

    public static void main(String args[]){

        String a="one";
        String b="two";

        a= a+b;
        b = a.substring(0,(a.length()-b.length()));
        a = a.substring(b.length(),(a.length()));

        System.out.println("a = "+a);
        System.out.println("b = "+b);

    }


}


Output : 
a = two
b = one


Smarter Way

There is another swart way to do this - use a Special character to concatenate Strings and them split them to swap.

String a="one";
String b="two";
a = a.concat("#" + b);
b = a.split("#")[0];
a = a.split("#")[1];

But the problem with this approach is that you must take care that that the special character you use should not be part of the String

How to reverse Strings and Integers

Strings Reversal

First Lets looks at how can we reverse a String in Java. We can do it two ways

  1. Iterative way
  2. Recursive way 
Both ways are given in the following code

/**
 * Created with IntelliJ IDEA.
 * User: aniket
 * Date: 20/12/13
 * Time: 2:53 PM
 */
public class StringReverser {

    public static String iterativeReverse(String originalString){

        char[] originalStringCharacterArray = originalString.toCharArray();
        StringBuilder reversedString = new StringBuilder();
        for(int i=originalString.length()-1;i>=0;i--){
            reversedString.append(originalStringCharacterArray[i]);
        }
        return reversedString.toString();
    }

    public static String recursiveReverse(String originalString){

           if(originalString.length() == 1){
               return originalString;
           }
            else {
               return recursiveReverse(originalString.substring(1)) + originalString.charAt(0);
           }
    }

    public static void main(String args[]){

        String originalString = "abcdef";

        System.out.println("Revered String by iterative way is : " + StringReverser.iterativeReverse(originalString));
        System.out.println("Revered String by iterative way is : " + StringReverser.recursiveReverse(originalString));

        // For Palindrome simply reverse the String and use .equals()

    }

}
 
Output : 
Revered String by iterative way is : fedcba

For Palindrome you can simply use the above code to get the reversed String and check both using String's .equals() method.

Integer Reversal

Integers reversal is again very easy. You simply should know proper use of % and / operators.


/**
 * Created with IntelliJ IDEA.
 * User: aniket
 * Date: 20/12/13
 * Time: 4:45 PM
 */
public class NumberReverser {

    public static int reverseNumber(int number){

        int reverse = 0;
        while(number != 0){
            reverse = (reverse*10) + (number%10);
            number = number/10;
        }
        return reverse;
    }

    public static void main(String args[]){
        System.out.printf("Reverse of number 1234 is : " + NumberReverser.reverseNumber(1234));

    }

}
Output : 

Reverse of number 1234 is : 4321

Thursday, 19 December 2013

Swapping two numbers without using temporary variable

Very basic interview question : Swap two variables without using third or temporary variables.  This serves the purpose of getting started with the interview. There are 3 ways to do this and we will discus all of them now

  1. Addition
  2. XOR operation(bitwise operator)
  3. Multiplication

By Addition


/**

 * Created with IntelliJ IDEA.
 * User: aniket
 * Date: 19/12/13
 * Time: 8:20 PM
 */
public class VariableSwapper {
    public static void main(String args[]){
        int a = 4;
        int b = 5;
        System.out.println("***** Swapping using Addition *****");
        System.out.println("Before Swapping a : " + a);
        System.out.println("Before Swapping b : " + b);
        a = a + b;
        b = a - b;
        a = a - b;
        System.out.println("After Swapping a : " + a);
        System.out.println("After Swapping b : " + b);
    }

}


By XOR operation

 /**
 * Created with IntelliJ IDEA.
 * User: aniket
 * Date: 19/12/13
 * Time: 8:20 PM
 */
public class VariableSwapper {

    public static void main(String args[]){

        int a = 4;
        int b = 5;
        System.out.println("***** Swapping using XOR *****");
        System.out.println("Before Swapping a : " + a);
        System.out.println("Before Swapping b : " + b);
        a = a ^ b;
        b = a ^ b;
        a = a ^ b;
        System.out.println("After Swapping a : " + a);
        System.out.println("After Swapping b : " + b);

    }

}

By Multiplication

/**
 * Created with IntelliJ IDEA.
 * User: aniket
 * Date: 19/12/13
 * Time: 8:20 PM
 */
public class VariableSwapper {

    public static void main(String args[]){

        int a = 4;
        int b = 5;

        System.out.println("***** Swapping using Multiplication *****");

        System.out.println("Before Swapping a : " + a);
        System.out.println("Before Swapping b : " + b);

        a = a * b;
        b = a / b;
        a = a / b;

        System.out.println("After Swapping a : " + a);
        System.out.println("After Swapping b : " + b);

    }

}


Output remains the same except printing the method part.

***** Swapping using Multiplication *****
Before Swapping a : 4
Before Swapping b : 5
After Swapping a : 5
After Swapping b : 4 


XOR logic can be better understood with following diagram


Monday, 16 December 2013

Binary Tree Traversal

Background

You must have heard of binary trees. Nothing special about it. Each node has two nodes(right and left). One of the most common interview questions is traversing the tree. There are three common types of traversals -


  1. Pre Order (Root - Left - Right)
  2. In Order (Left - Root - Right)
  3. Post Order (Left - Right - Root)
 We are going to first write code for the data structure that forms the Node which is used further to build the tree. Node class code goes something like below


package in.blogspot.osg.Demo;

public class Node {

    private String data;
    private Node left;
    private Node right;

    public String getData() {
        return data;
    }
    public void setData(String data) {
        this.data = data;
    }
    public Node(String data){
        this.data = data;
    }

    public Node getLeft() {
        return left;
    }
    public void setLeft(Node left) {
        this.left = left;
    }
    public Node getRight() {
        return right;
    }
    public void setRight(Node right) {
        this.right = right;
    }

}


Very simple. In this node structure we have String data and two nodes right and left. We have corresponding getters and setters. Note that data,right and left are instance variables and are assigned default values(null is our case).

Not Lets us build one tree and print various traversals.


package in.blogspot.osg.Demo;

public class MainRun {

    public static void main(String args[]){

        Node root = new Node("Aniket");

        root.setLeft(new Node("Amit"));
        root.setRight(new Node("Anubhav"));

        root.getLeft().setLeft(new Node("Sam"));
        root.getLeft().setRight(new Node("Ram"));

        root.getRight().setLeft(new Node("John"));
        root.getRight().setRight(new Node("Mark"));

        System.out.println("Printing Pre Order Traversal");
        PreOrder.printPreOrder(root);
        System.out.println("**********");
        
        System.out.println("Printing Post Order Traversal");
        PostOrder.printPostOrder(root);
        System.out.println("**********");
        
        System.out.println("Printing In Order Traversal");
        InOrder.printInOrder(root);
        System.out.println("**********");

    }

}


Above tree could be visualize as follows -

Now lets see our actual traversal logic. They are divided into 3 separate classes and each have it's own static method with corresponding logic.

Pre Order


package in.blogspot.osg.Demo;

public class PreOrder {

    /**
     * PreOrder : root-left-right
     * @param root
     */
    public static void printPreOrder(Node root){
        System.out.println("Value : " + root.getData());
        if(root.getLeft() != null){
            printPreOrder(root.getLeft());
        }
        if(root.getRight() != null){
            printPreOrder(root.getRight());
        }
    }
}

Post Order


package in.blogspot.osg.Demo;

public class PostOrder {
    
    /**
     * PostOrder : left-right-root
     * @param node
     */
    public static void printPostOrder(Node root){
       
        if(root.getLeft() != null){
            printPostOrder(root.getLeft());
        }
        if(root.getRight() != null){
            printPostOrder(root.getRight());
        }
        System.out.println("Value : " + root.getData());
    }
}

In Order


package in.blogspot.osg.Demo;

public class InOrder {
    
    /**
     * InOrder : left-root-right
     * @param root
     */
    public static void printInOrder(Node root){
        if(root.getLeft() != null){
            printInOrder(root.getLeft());
        }
        System.out.println("Value : " + root.getData());
        if(root.getRight() != null){
            printInOrder(root.getRight());
        }   
    }
}
Output for the same is

Output : 


Printing Pre Order Traversal
Value : Aniket
Value : Amit
Value : Sam
Value : Ram
Value : Anubhav
Value : John
Value : Mark
**********
Printing Post Order Traversal
Value : Sam
Value : Ram
Value : Amit
Value : John
Value : Mark
Value : Anubhav
Value : Aniket
**********
Printing In Order Traversal
Value : Sam
Value : Amit
Value : Ram
Value : Aniket
Value : John
Value : Anubhav
Value : Mark
**********


Level Order


Leaving the above three types of traversal there is one more type of traversal called level traversal in which we visit all nodes on the same level from left to right before moving on to the next level.


Code for Level traversal goes something like below - 
We need to use queue data structure for this


public class LevelTraversal {

    static Queue<Node> levelQueue = new LinkedList<Node>();

    public static void printLeveltraversal(Node root){

        System.out.println("Value : " + root.getData());

        if(root.getLeft() != null){
            levelQueue.offer(root.getLeft());
        }
        if(root.getRight() != null){
            levelQueue.offer(root.getRight());
        }

        if(levelQueue.size() != 0){
            printLeveltraversal(levelQueue.poll());
        }
    }

}


You can call this function from the same main we defined above output would be as follows


Output : 

Level order Traversal
Value : Aniket
Value : Amit
Value : Anubhav
Value : Sam
Value : Ram
Value : John
Value : Mark


You can uniquely derive the original binary tree give it's
  1. Pre order and in order traversal
  2. Post order and in order traversal
But you cannot determine a unique binary tree with just it's Pre ordee and  Post order traversals. However if you have the constraint that each internal node has both two children then you can very well find the original tree with above data.
t> UA-39527780-1 back to top