Friday, 15 November 2013

Program to reverse a stack "in place" using recursion?

Code :


import java.util.Stack;
/**
 * Created with IntelliJ IDEA.
 * User: aniket
 * Date: 11/15/13
 * Time: 3:30 PM
 */

public class InPlaceStackReversal {
    public static void reverse(Stack<String> stack){
        String element = stack.pop();
        if(stack.size() != 1) {
            reverse(stack);
        }
        pushToBottomOfStack(element,stack);
    }


    private static void pushToBottomOfStack(String data, Stack<String> stack){
        String element = stack.pop();
        if(stack.size() != 0){
            pushToBottomOfStack(data, stack);
        }
        else {
            stack.push(data);
        }
        stack.push(element);
    }

    public static void main(String args[]) {
        Stack<String> myStack = new Stack<String>();
        myStack.push("A");
        myStack.push("B");
        myStack.push("C");
        myStack.push("D");
        System.out.println("Original Stack : " + myStack);
        InPlaceStackReversal.reverse(myStack);
        System.out.println("Revered Stack : " + myStack);

    }
}

Output :


Original Stack : [A, B, C, D]
Revered Stack : [D, C, B, A]

Tuesday, 12 November 2013

Troubleshooting steps when Android device is detected but not recognized by Eclipse ADT.

If your device is not detected at all by Eclipse ADT then go though the article on Troubleshooting steps when Eclipse ADT does not recognizing your Android device.

Sometimes it does happen when your device is detected but is not recognized by your Eclipse ADT.  Each Android device has a Development Device ID which is used to uniquely identify your android device. You can view this ID by going to

System settings -> Developer options -> Development Device ID

(It is right below option to enable USB debugging)
Screenshot for the same is provided below(It is of my device running Android 4.0.4/ICS).

Now coming back to our main problem.Whenever it occurs you will see your prompt asking for device as follows -

You will see something like ???? which means your device is detected but is not recognized. You can check this issue by going to adt-bundle-windows-x86\sdk\platform-tools and typing the following command

adb.exe devices (Windows)
./adb devices   (Linux)

 In both cases you will see an entry in list of devices but again some ????? with no permissions . All you need to do to get things to work again is restart your server. Detailed steps to do so and it's effect before and after is provided in a snapshot below.

Note that the device is now listed properly. Another interesting thing to note here is when you kill the server a reconnect thread is started in your Eclipse ADT. It will continuously try to reconnect to the server and will stop once server is up. Screenshot for the same is given below.

After this you are all set. Your USB debugging will work perfectly.


Sunday, 20 October 2013

How to take screenshots in Android 4.0 in above.

If you have a shiny new phone with Ice Cream Sandwich(4.0) or above, screenshots are built right into your phone! Just press the Volume Down and Power buttons at the same time, hold them for a second, and your phone will take a screenshot. It'll show up in your Gallery app for you to share with whomever you wish!


It is slightly different for Samsung devices. You need to press and hold

Power Button + Home Button


Monday, 14 October 2013

Why overridden methods cannot have more strict access modifier?


 You must have come across a lot of examples in which access modifier of overridden method is less strict. For example is access modifier of a method is private than the overriding method in the subclass can have access modifier defualt(no modifier), protected or private.


One commonly used example is the protected Object clone() method from java.lang.Object class. It is generally overridden as public Object clone().

Most obvious question to follow is why such a behavior?


The answer lies in the question itself. Try to answer a counter question what happens if more strict access modifier is allowed for the overridden method?

Lets take a simple example to identify the problem. Lets say we have two classes Animal and Dog as follows -  

Class Animal :

package animalsData;

public class Animal {
    public void run() {
        System.out.println("Running");
    }
}


Class Dog : 

package animalsData;

public class Dog extends Animal {   
    private void run()
    {
        System.out.println("Dog is running");
    }
}


If  you are using an IDE(Eclipse,Netbeans etc) you will directly see the error. If you are using command line or a simple text editor(gedit, notepad etc) try compiling above code. You will get the following error -


Lets analyze the potential problem in above scenario. Try executing following piece of code

    public static void main(String args[]) {
        Animal animal = new Dog();
        animal.run();
    }


At compile time all java compiler does is see the reference type of the object(Animal in our case) and check whether the method called is available(declared or defined) class of reference type(In our case run() method is present in the Animal class which is the reference type). So there would be no errors in compilation but what happens when we run our code. Runtime class of the object is Dog and the corresponding run() method of Dog class will be invoked(Refer how function overriding is a runtime phenomenon ). But as per the access modifiers private methods must be called from the class only(not by it's instances). As this scenario violates basic principles laid down by java language it is not allowed.

On the other hand access modifier of the overriding method can be relaxed because it makes sense. In our example above if run() method in Animal class was private and that in Dog class was public we could easily execute our main code.[Keeping into consideration access modifier restrictions]

Sunday, 13 October 2013

Troubleshooting steps when Eclipse ADT does not recognize your Android device.

Device also does not show up in adb. Try adb devices . It will not show up unless you have enabled USB debugging and installed the right driver.

If you have not even enabled Developer option you may want to do it now

How to enable developers option in your android device?

Before going to the troubleshooting steps make sure following basic checks are passed.

  1. Make sure you have installed Google USB driver. If not you do it from Android SDK manager.

  2. Next make sure you have enabled USB Debugging on your android device. You will find this option in System Settings -> Developer Options -> USB Debugging.
  3. Make sure your device it compatible with the minimum API level you have set on your android project.

Debugging Steps

You need to install proper driver of your device. Only then your Eclipse can detect your device to launch you application on it.

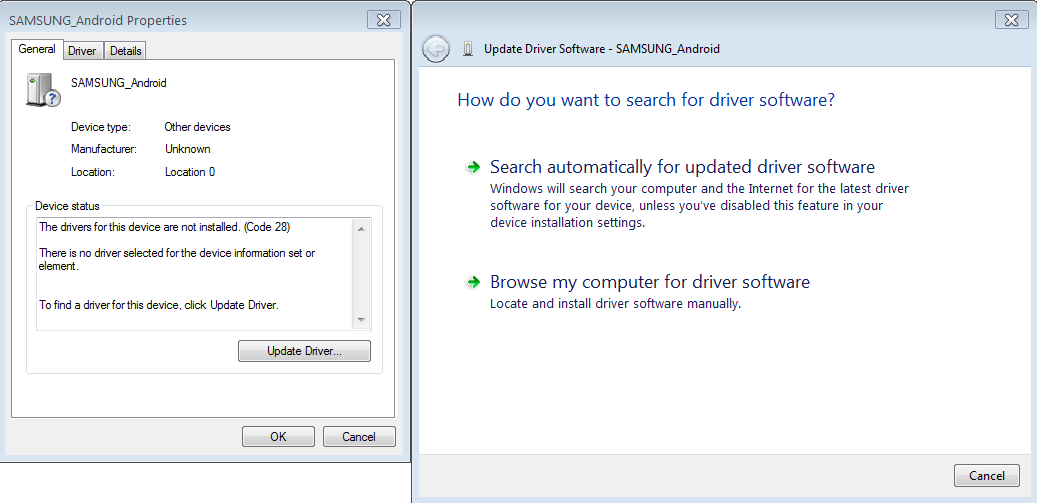
 1. Go to Computer(right click) -> Manage ->  Device Manager.
 2. If your device is categorized in "other devices" or "portable" devices" something is not right. Double click on the device listed in Device manager. Inside it check your driver details.
 3. If there are no driver details shown or the button is not clickable then the driver is not installed. If it is you need to update it.
 4. Windows should automatically do this for you. If not you can click on the icon when it is searching for the device driver and select "install most suitable driver automatically". [You will have to enable automatic update for this]
 5. Either case mentioned in point 3 the end result should be that after installing your driver(mind any suitable driver if your device driver is not available). Your device should be listed under the category "Android USB Devices"
 6. Now you can be sure that ADT would detect your device.

PS : I have mentioned any suitable driver because in my case I had Micromax A69(ICS) and it installed HTC driver. After this Android ADT started detecting my device.

 I am using Windows 7. Attaching a screen shot just for the reference - 


PS : You may also have to manually download and install driver if not found automatically. So when you click update select from local directory.
 

Samsung/ SAFE devices


For example when I tried this with samsung Galaxy S5 driver was not automatically installed. So I downloaded it manually from their site and installed it.


Use Browse my computer option.For samsung driver from above link you will get exe file that will install driver for you.

Moto G/E


Recent I bought Mote E and had the same problem. Again you need to manually download the suitable driver and install.

Remove the img extension and install.

Relate Links


    t> UA-39527780-1 back to top