Thursday, 28 November 2013

How to root your Android device?

 Want to root your phone?


A couple of articles to read before you proceed -

  1. What is rooting?
  2. Rooting - Is it for Me?

Consider all the factors before you proceed for rooting your phone. Remember once you root your phone or it gets bricked in the process your manufacturer's warranty will be lost. On the other side once you root your phone you can be the super user and then the OS is yours :)

Also before proceeding check your device compatibility from the compatibility list.


Get Set Go....


  1. Download and install Kingo Android Root.
  2. Enable USB debugging on your android device. For detailed step you can refer to this article.
  3. Run Android Root on your PC, then connect your phone via its USB sync cable. Before you connect your device to PC via USB it will show disconnected state. Once your device is connected the state will change to connected. Software will also download and install the required driver.

  4. After downloading the driver you will have to disconnect your device for completing the driver install. After this your screen  will look something like below -

  5. Now reconnect your device via USB. After connection your screen will look something like


  6. Click Root, then sit back and wait while the utility does its thing. It may take upto few minutes including automatic reboot.

  7. And that's all there is to it. Enjoy :)
Note : If you decide you want to reverse the process, just run Android Root again, connect your phone, then click Remove Root.


Now when you are installing any application or carrying out any task that requires root privileges you will get a prompt like following to grant/deny root privilege


Related Links

Accessing super-user mode with su in Ubuntu


How many time have you laughed looking at above picture? Specially Ubuntu users will know what I am taking about. Everything from installing packages to running a script we need to do add sudo before the command.

Unlike other distributions root account is by default disabled on Ubuntu. So simply doing su or su root will not work. It give authentication failure error.


Using sudo each time is fun but there are definitely other ways to perform root actions.

In order to perform root action you can do one of the following


  1. Use sudo with your user password, and you can do everything that root user do.


  2. Use sudo su with your user password to obtain root access .


  3. Use sudo passwd with that command are changing the root password, then you can easily access root user using su like other distros.

Sunday, 24 November 2013

How to set a custom ringtone to an Android phone?

Specially for individuals new to Android adding a custom song as their ringtone can be a really confusing. It is not as simple as selecting the song and setting it as the ringtone. Also most of the android phones are dual SIM. So we have an option to save same or separate ringtones for each SIM. Following is step by step procedure(with screenshots) to add your favorite song as ringtone.

For this example I am using Tik Tik Vajate Dokyaat .mp3 song to be used as my ringtone.

  1. First connect your phone to your Laptop/PC and transfer your song to the Ringtones directory. You will find this directory in Internal SD Card of your phone.
  2. Next go to System settings and navigate to User Profile.
  3. Next select the profile you want to set the ringtone of. For example in this example we are going to configure ringtone for General profile.
  4. Now under Volumes -> Incoming Calls select Phone Ringtone.
  5. On next screen you will see the song you added in the Ringtones directory. You can select it and click Save icon at the bottom. You have option to select same or different ringtones for different SIMs.
You are all set to enjoy your favorite song as your new ring tone!

Note : You can also use some android App to do so. I have created a similar app that lets you choose your ringtone with just one click - Ringtone Setter

Related Links

Saturday, 23 November 2013

How to completely back up an Android device?

Yes there are a lot of software's available on Play store to backup your Android device. A normal user can simply purchase that app and backup your data. it may have it's own cloud server or may provide you with the backup file to save. Take the example of DropBox  you can sync your images with it. Your apps data is generally synced with Google servers if you have checked that option. You can find this option in

System Settings -> Personal -> Backup & Reset -> Back up my data


But What is the fun in that? As a developer we need something more than an app that is developed by someone else and moreover who is charging us for that.


Android includes a built-in way to back up and restore the contents of your phone or tablet. All you need is a computer and a device running Android 4.0 (Ice Cream Sandwich) or newer.

Prerequisites are that you must have Android SDK installed on your system. It is nothing like installing a complicated program. You need to download Android SDK bundle from here.  All you have to do then is extract it and navigate to adt-bundle-windows-x86\sdk\platform-tools folder.(Also you need to have Java installed!)

Open command prompt here. You can execute a lot of android related commands here. You can Start/Stop android server, you can see connected devices etc.


Make sure you have USB debugging enabled. You can enable it from

System settings -> Developer options

Reference Posts -
  1. Troubleshooting steps when Android device is detected but not recognized by Eclipse ADT.
  2. Troubleshooting steps when Eclipse ADT does not recognizing your Android device.

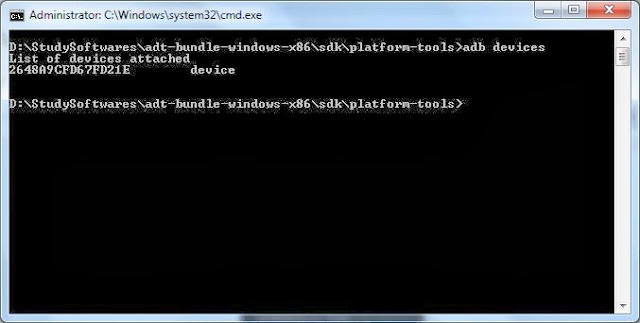
After these you are all set to backup your device. To make sure your device is connected you can go to the type the following command in the command prompt we had opened in platform-tools directory.

adb devices

You should see your device information listed.


Backing Up Your Device


Now you are all set to backup your device data. All you have to do is run the following command on the console

adb backup -apk -shared -all -f C:\Users\UserName\backup.ab


Now you will get a prompt to unlock your device and confirm backup operation. When you unlock your device it will look something like below


Now put your encryption password and select Backup data. Your back up will start soon. Have patience it will take time to backup as it does entire backup including your apps. Even at time it may seem nothing is happening but data is being continuously backed up. You can verify that by looking at the file size of the backup on your machine. It will keep in increasing.

Once it is done you can safely move that file to your cloud storage or your external storage drive.

Restoring a Backup

Restoring your data from the backup is again a very simple task. Simply run the following command in your console

adb restore C:\Users\UserName\backup.ab 


Again you will be provided a prompt to enter the decryption password. Here you must enter the same password you had entered while creating the backup. After entering the password click on Restore my data and your data will be restored.

Thursday, 21 November 2013

Installing Git on CentOS from sources


Installing Git on your Linux machine is very simple. Simply run sudo yum install git for Fedora/Centos or apt-get install git for Debian based systems or any package management tool you are using.

I am using CentOS Release 6.4 and the reason I am writing this post is that the version of git present in the repository is 1.7.1 whereas current version(as of 21/11/2013) is 1.8.4.3(Latest Stable Release). Thats a huge gap between versions.


Problem I faced was that I checked out HornetQ source from GitHub and then tried to import it in my Intellij IDEA. Project was imported but it failed to index it due to compatibility issues with git version.
Every time I loaded the project I got the following error -

2:53:27 PM Unsupported Git version
           The configured version of
Git is not supported: 1.7.1.0.
           The minimal supported
version is 1.7.1.1. Please update.

So I was left with no option but to download the sources and build it myself. Here is how I did it.

Firstly we need to download some tools needed for compilation and build. Simply execute the following command in your console -

sudo yum groupinstall "Development
Tools"

For git to build and run we also need dome extra dependencies. To install these dependencies run following on your console

sudo yum install zlib-devel
perl-ExtUtils-MakeMaker asciidoc xmlto openssl-devel

Now you will have to download the got source. You can do this in two ways

  1. Go to https://github.com/git/git and manually click download ZIP button than appears on the right mid of the page. OR
  2. You can use command line utility wget. Simply type following and execute in console

  Download the sources in a separate folder. Your console will look something like below


Now unzip the .zip file and navigate to master directory.

unzip git.zip
cd git-master


Now run the following commands on your console to build and install your latest git.

make configure
./configure --prefix=/usr/local
make all doc
sudo make install install-doc
install-html

Note : Generating docs may take some time.


Now you are all set with the latest git version. You can check your version executing following command on your console

git --version


For the sake of logically concluding this post which I wrote because of the problem arising in Itellij IDEA let me explain configuration changes needed in the IDE. Screen shot provided below -


Go to Files->Settings->Version Control->Git

and change the value of Path to Git Executable to /usr/local/bin/git

Where did we get /usr/local/bin/git from?

A natural question that would follow. Answer is simple. When we build our git from sources we provided an argument –prefix=/usr/local after ./configure. You can cross verify this. Simple execute the following in console

which git

This gives the location where git is installed. For me it gives -

[root@localhost aniket]# which git
/usr/local/bin/git

This path should be same for you unless you give some custom path while building sources. 


For installing git on Windows as well as knowing the basic commands you can refer to following post -


Related Links


Wednesday, 20 November 2013

Reverse a LinkedList in Java?

Java has a built in functionality to reverse Linked List. This function is available in Collections class and the method name is reverse(). It is a static function so you can simply call it using Collections.reverse(yourLinkedList);


Code :

import java.util.LinkedList;
/**
 * Created with IntelliJ IDEA.
 * User: aniket
 * Date: 11/20/13
 * Time: 5:20 PM
 */
public class LinkedListReversal {
    public static void main(String args[]){
        LinkedList<String> myLList = new LinkedList<String>();
        myLList.add("A");
        myLList.add("B");
        myLList.add("C");
        myLList.add("D");
        System.out.println("Original LL : " + myLList);
        Collections.reverse(myLList);
        System.out.println("Revered LL : " + myLList);
    }
}


Output :

Original LL : [A, B, C, D]
Revered LL : [D, C, B, A]

This shows you are aware of Java APIs but ultimately interviewer will get to the logic part as of how this is exactly done. or to put it in other words how is the method Collections.reverse() exactly implemented?

You can view the source code to know the exact method but as far as our LinkedList reversal problem is concerned we do the following -

Code : 


import java.util.LinkedList;
import java.util.ListIterator;
/**
 * Created with IntelliJ IDEA.
 * User: aniket
 * Date: 11/20/13
 * Time: 5:20 PM
 */
public class LinkedListReversal {
    public static void reverse(LinkedList<String> linkedList) {
        ListIterator<String> forwardIterator = linkedList.listIterator();
        ListIterator<String> backwardIterator = linkedList.listIterator(linkedList.size());
        for(int i = 1;i<=(linkedList.size()/2);i++){
            String tempString = forwardIterator.next();
            forwardIterator.set(backwardIterator.previous());
            backwardIterator.set(tempString);
        }
    }
    public static void main(String args[]){
        LinkedList<String> myLList = new LinkedList<String>();
        myLList.add("A");
        myLList.add("B");
        myLList.add("C");
        myLList.add("D");
        System.out.println("Original LL : " + myLList);
        LinkedListReversal.reverse(myLList);
        System.out.println("Revered LL : " + myLList);
    }
}

Output : 


Original LL : [A, B, C, D]

Revered LL : [D, C, B, A]


Note : LinkedList data structure in Java is in fact a doubly linked list and hence we could use previous() on the list iterator. If you look at the LinkedList class you will find Node structure as follows


    private static class Node<E> {
        E item;
        Node<E> next;
        Node<E> prev;
        Node(Node<E> prev, E element, Node<E> next) {
            this.item = element;
            this.next = next;
            this.prev = prev;
        }
    }


If you notice we have both next and prev nodes which implies it is a doubly Linked List.

For java code of reversing a linkedlist from very basics(from creating using Node data structure) you can refer to How to reverse a LinkedList in Java? )

Tuesday, 19 November 2013

Java Program to print all permutation of a String?

Interviewer may start with a very basic question as to what is number of permutations of a string with n characters. In case repetition is not allowed then it would be n!  i.e  [n*(n-1)*(n-2*....*!)]  . if repetition is allowed it would be n^n i.e [n*n*...n times].

Next would be to code it actually. Generally language is not a concern. What interviewer looks is how candidate thinks(his solving ability) and whether he is able to complete error free and working code. Following is a Java code that will print permutations of a given String along with the number of permutations possible.

Example :


Code : 


/**
 * Created with IntelliJ IDEA.
 * User: aniket
 * Date: 11/19/13
 * Time: 3:16 PM
 */
public class PermutationsPrinter {
    private int noOfPermutation;
    public void permute(char[] line,int start, int end){
        int j;
        if(start == end){
            noOfPermutation++;
            System.out.println(line);
        }
        else {
            for(j=start;j<=end;j++){
                char[] newLine = getSwappedString(line, start, j);
                permute(newLine,start+1,end);
            }
        }
    }


    private char[] getSwappedString(char[] characters,int i,int j ){
        String newLine = String.valueOf(swap(characters,i,j));//Create New String
        swap(characters,i,j);//restore original String
        return newLine.toCharArray();
    }


    private char[] swap(char[] characters,int i,int j){
        char temp = characters[i];
        characters[i] = characters[j];
        characters[j] = temp;
        return characters;
    }


    public int getNoOfPermutation() {
        return noOfPermutation;
    }


    public static void main(String args[]){
        String line = "ABC";
        PermutationsPrinter permuter = new PermutationsPrinter();
        permuter.permute(line.toCharArray(), 0, line.length() - 1);
        System.out.println("Number Of Permutations made : " + permuter.getNoOfPermutation());
    }
}

Output  : 


ABC
ACB
BAC
BCA
CBA
CAB
Number Of Permutations made : 6

(3! = 6 as expected)


More better example where you don't have to swap again to restore string is provided in the Interview questions git repo -

Friday, 15 November 2013

Program to reverse a stack "in place" using recursion?

Code :


import java.util.Stack;
/**
 * Created with IntelliJ IDEA.
 * User: aniket
 * Date: 11/15/13
 * Time: 3:30 PM
 */

public class InPlaceStackReversal {
    public static void reverse(Stack<String> stack){
        String element = stack.pop();
        if(stack.size() != 1) {
            reverse(stack);
        }
        pushToBottomOfStack(element,stack);
    }


    private static void pushToBottomOfStack(String data, Stack<String> stack){
        String element = stack.pop();
        if(stack.size() != 0){
            pushToBottomOfStack(data, stack);
        }
        else {
            stack.push(data);
        }
        stack.push(element);
    }

    public static void main(String args[]) {
        Stack<String> myStack = new Stack<String>();
        myStack.push("A");
        myStack.push("B");
        myStack.push("C");
        myStack.push("D");
        System.out.println("Original Stack : " + myStack);
        InPlaceStackReversal.reverse(myStack);
        System.out.println("Revered Stack : " + myStack);

    }
}

Output :


Original Stack : [A, B, C, D]
Revered Stack : [D, C, B, A]

Tuesday, 12 November 2013

Troubleshooting steps when Android device is detected but not recognized by Eclipse ADT.

If your device is not detected at all by Eclipse ADT then go though the article on Troubleshooting steps when Eclipse ADT does not recognizing your Android device.

Sometimes it does happen when your device is detected but is not recognized by your Eclipse ADT.  Each Android device has a Development Device ID which is used to uniquely identify your android device. You can view this ID by going to

System settings -> Developer options -> Development Device ID

(It is right below option to enable USB debugging)
Screenshot for the same is provided below(It is of my device running Android 4.0.4/ICS).

Now coming back to our main problem.Whenever it occurs you will see your prompt asking for device as follows -

You will see something like ???? which means your device is detected but is not recognized. You can check this issue by going to adt-bundle-windows-x86\sdk\platform-tools and typing the following command

adb.exe devices (Windows)
./adb devices   (Linux)

 In both cases you will see an entry in list of devices but again some ????? with no permissions . All you need to do to get things to work again is restart your server. Detailed steps to do so and it's effect before and after is provided in a snapshot below.

Note that the device is now listed properly. Another interesting thing to note here is when you kill the server a reconnect thread is started in your Eclipse ADT. It will continuously try to reconnect to the server and will stop once server is up. Screenshot for the same is given below.

After this you are all set. Your USB debugging will work perfectly.


t> UA-39527780-1 back to top