Showing posts with label WebDevelopment. Show all posts

Sunday, 18 March 2018

How To Set Up an HTTPS Service in IIS

Background

Windows provides Internet information service (IIS) to host your local applications on your windows machine. You need to enable IIS from "Turn Windows features on or off".


Once you have done that you can add an application to it and get started. I have created a youtube video to demo the same -


This video shows how to set up a simple website on IIS and also add https support. I am also going to show how to add https support part in this post.

How To Set Up an HTTPS Service in IIS

First, make sure you have self-signed certificate generated in your IIS manager. To do that go to "Server certificates" in your machine home node inside your IIS manager -


Next, double-click the "Server Certificates" section and make sure a self-signed certificate exists. 


If no certs exist for localhost go ahead and create one using "Create self-signed Certificate". 

Once you have the certificate go to Sites in the navigation panel on the left and click on Default website under sites.


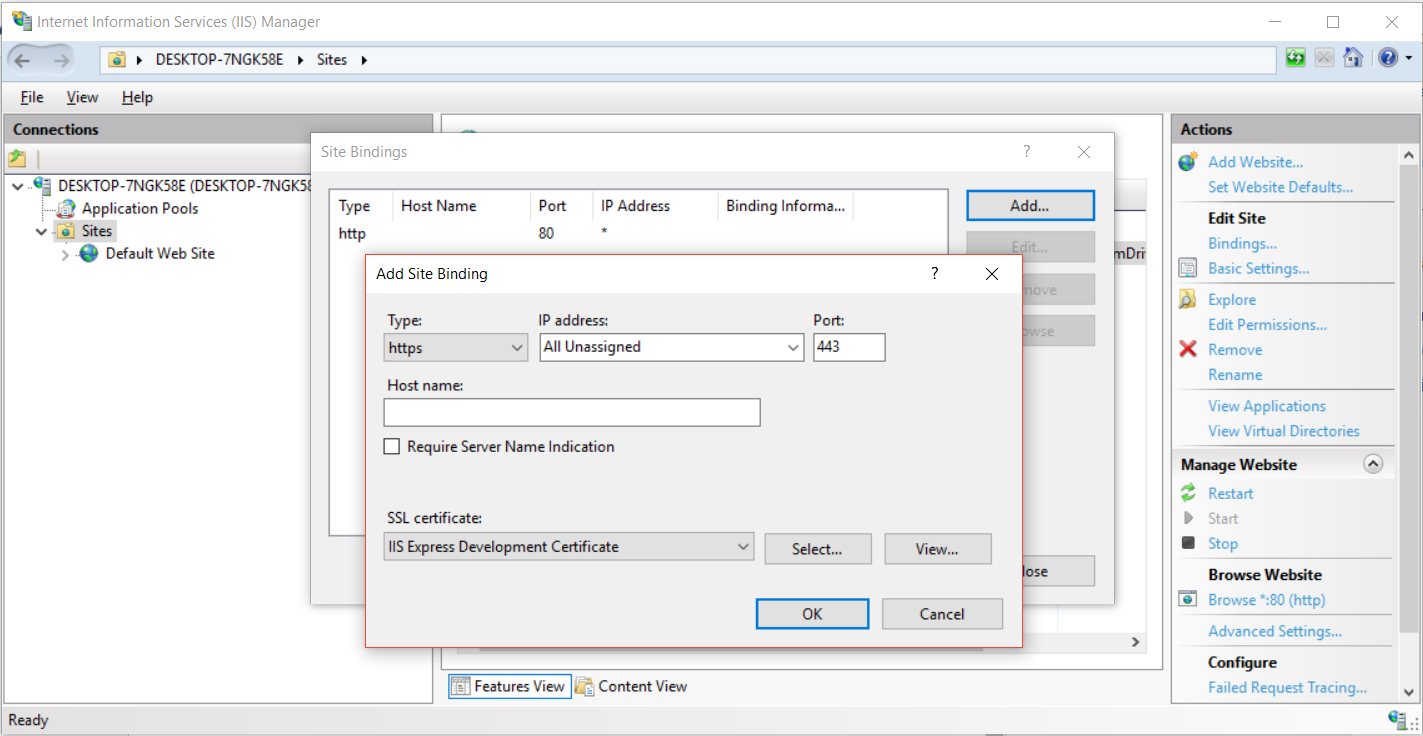
Next, click on "Bindings" in the section on the right and add https binding. Make sure you select correct SSL certificate in the process that we create in previous steps.


Once you are done just click ok and you should have https binding set for your website.


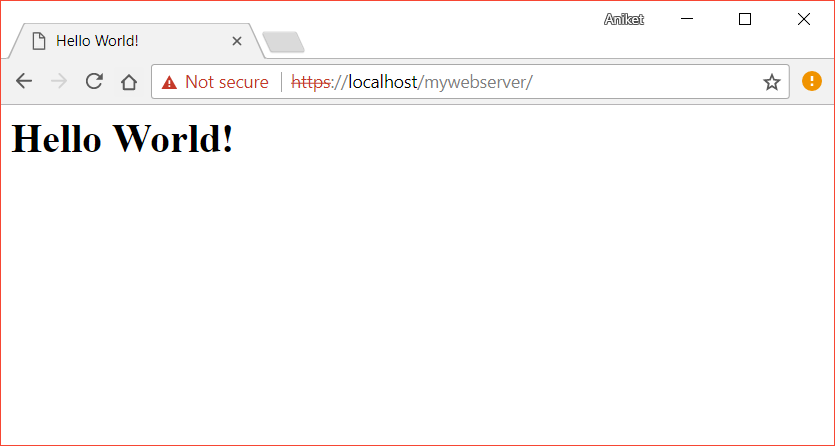
Now you can open your website with https protocol.


Related Links

Sunday, 11 March 2018

AngularJS Routing Using UI-Router

Background

In the last post, we saw AngularJS Hello World example. In this post, we will see how we can create an angular JS app with routing using UI-Router module. If you have not read the previous post I would highly recommend you read that first.


 Setup

There is a small change in the file structure than our previous example. Create files as shown in the following screenshot -


Following are file details -
  • helloWorld.html : Our main HTML file. Starting page similar to the last example.
  • helloworld.module.js : Declares angular module and it's dependencies
  • helloWorld.controller.js : Controller for the module
  • helloworld.config.js : Config for the module.  
  • login.html : login page to route to
  • setting.html : setting page to route to
 Also make sure you install http-server module to host your angular app and test it -
  • npm install -g http-server


Then you can simply run in your project directory as -
  • http-server -o 
NOTE : -o option is to open browser.

AngularJS Routing Using UI-Router


Now let's see one by one content of each file. Let's start with  helloWorld.html -

<html>
    <head>
        <title>Hello World!</title>
        <script type="text/javascript" src="https://ajax.googleapis.com/ajax/libs/angularjs/1.2.26/angular.min.js"></script>
            <script src="//cdnjs.cloudflare.com/ajax/libs/angular-ui-router/0.2.8/angular-ui-router.min.js"></script>
            <script type="text/javascript" src="helloworld.module.js"></script>
        <script type="text/javascript" src="helloWorld.controller.js"></script>
        <script type="text/javascript" src="helloworld.config.js"></script>
    </head>
    <body ng-app="helloWorldApp">
        <div ng-controller="helloWorldAppController" ng-init="init()">
                  <p>Enter Message here : <input type="text" ng-model="message"></p>
                   <p>Entered Message :  {{ message }}!</p>

                   <a href="/login">Login</a> <br/>
                   <a href="/setting">Setting</a>

                <div class="content-wrapper">
                    <ui-view></ui-view>
                </div>    
        </div>
    </body>
</html>


In this base HTML file we have just referenced other angular JS files that we need. An interesting thing to note here is the ui-view tag. This is where the injected code goes. But we will see that in a moment.


Let's see out module and controller files next -


helloworld.module.js

(function() {
    'use strict';
    console.log("In hello world module");
    angular.module('helloWorldApp', ['ui.router']);
})();


This code just declares your module as we did in last example. Only change is that it has an additional dependency on ui.router module. Note we have included a new script in helloWorld.html to get code for this module.


helloWorld.controller.js

(function(){
    'use strict';
    console.log("In hello world controller");
    angular.module("helloWorldApp").controller("helloWorldAppController", function($scope) {
        $scope.init = function() {
            console.log("Init method called");
            $scope.message = "Hello World!";
        }
    });

})();


This is a controller of the module we defined. This is again same as we did in last post. No new changes here.


Now let's see our new logic - helloworld.config.js


(function() {
    'use strict';
    console.log("In hello world config");
    angular.module('helloWorldApp').config([
        '$stateProvider',
        '$urlRouterProvider',
        function($stateProvider, $urlRouterProvider) {
            $stateProvider.state('login',{
                     url: "/login",
                     templateUrl: "login.html"
                })
            .state('settings',{
                    url: "/setting",
                    templateUrl: "setting.html"
            });
        }
    ]);
})();


This is actually the routing logic. For eg. if it encounters URL "/login" it will render page "login.html" that we have in same folder. Same for setting.html.


Finally, let's see out login.html and setting.html files -


login.html -


<h1>This is a login page!</h1>
<a href="/helloWorld.html">Back</a>


setting.html -


<h1>This is a login page!</h1>
<a href="/helloWorld.html">Back</a>


 Once you have all files in place just run http-server as follows -


And you should see following behavior - 


But wait what happened? I thought the code was supposed to be injected at tag ui-view.

This is because we do not actually use angular routing per say to change the state. Let's do some changes to see how we can do that. Change your login href as follows - 

<a href="" ng-click="replaceLoginPage()">Login</a>


and now add this method to the controller -


(function(){
    'use strict';
    console.log("In hello world controller");
    angular.module("helloWorldApp").controller("helloWorldAppController", function($scope, $state) {
        $scope.init = function() {
            console.log("Init method called");
            $scope.message = "Hello World!";
        }

        $scope.replaceLoginPage = function() {
            console.log("In replaceLoginPage");
            $state.go("login");
        }
    });

})();


And now it should replace ui-view tag.


Related Links


Tuesday, 27 February 2018

AngularJS Hello World Example

Background

AngularJS is a client-side javascript framework developed by Google which can interact with HTML. It helps to easily create and maintain SPA (Single page applications)

Some of its features are -
  1. Helps create responsive applications
  2. Provides MVC capabilities
  3. Dependency injection
  4. Powerful and flexible with less code to write
NOTE: AngularJS is a very old framework. The first version is called AngularJS. Later versions are just called angular. You can see the detailed release history - https://github.com/angular/angular.js/releases. This post will try to explain a simple Hello World program in Angular JS. This is mainly for projects that are already on it. If you are starting a new project I would highly recommend to go with later angular versions. You can visit https://angular.io/  for the same.


 AngularJS Hello World Example

Let's start by writing our HTML file. Create a folder where you can store your code files. Now in this folder create two files -
  1. helloWorld.html
  2. helloWorld.js
And add following content to it -

helloWorld.html:

 <html>
    <head>
        <title>Hello World!</title>
        <script type="text/javascript" src="https://ajax.googleapis.com/ajax/libs/angularjs/1.2.26/angular.min.js"></script>       
        <script type="text/javascript" src="helloWorld.js"></script>
    </head>
    <body ng-app="helloWorldApp">

        <div ng-controller="helloWorldAppController" ng-init="init()">
                  <p>Enter Message here : <input type="text" ng-model="message"></p>
                   <p>Entered Message :  {{ message }}!</p>
        </div>

    </body>
</html>


helloWorld.js  :

 (function(){
    'use strict';
    console.log("In JS");
    var helloWorldApp = angular.module("helloWorldApp", []);
    helloWorldApp.controller("helloWorldAppController", function($scope) {
        $scope.init = function() {
            console.log("Init method called");
            $scope.message = "Hello World!";
        }
    });

})();


Now you can simply open the helloWorld.html file and see the changes. 


Understanding the code

Now that we saw the behavior let's try to understand the code.

In our code we have initialized a angular module using ng-app directive. In the javascript we get this module using andular.module() function.  Inside a module you can have multiple controllers controlling various parts of your html. In our case we have defined a controller called helloWorldAppController that controls the div element we have defined. In the javascript we are getting this controller from our module.


Once you have the controller you can define varibles and functions that you can access in the HTML controller by this particular controller. You can also notice the variable called "message" that is defined in the controller is accessible in the HTML using {{message}} syntax. You would also see the binding exist using the ng-model syntax. This is called two way binding. So value changed in the input field is immediately visible in same HTML using {{message}} syntax as well as the controller using $scope.message. In the html where we have declared controller we have also specified init method using ng-init and you can see this menthod defined in controller using $scope.init. This is called when controller is initialized and this function in the controller script initialized messages variable to "Hello World!" that is reflected in HTML page.


Lastly we have injected our controller script (helloWorld.js ) and  angular js script in the html for our angular js code to work. Make sure angular script is the 1st one added.

All keywords starting with ng- are angular directived.
  • ng-app
  • ng-controller
  • ng-init
  • ng-model 

Sunday, 28 January 2018

Creating web application with Spark Java framework

Background

Spark is  a Java framework that let's you create web application. In this post we will see how we can write a basic web application using Java Spark framework.  Do not confuse this with Apache Spark which is a big data framework.  If you want to quickly bring up a local server to test something out Spark Java let's you do it in the simplest way possible. You do not need application server. It embeds Jetty server inside it.

Setup

Add following dependencies in your pom.xml for gradle build.

        <dependency>
            <groupId>com.sparkjava</groupId>
            <artifactId>spark-core</artifactId>
            <version>2.7.1</version>
        </dependency>
        <dependency>
            <groupId>org.slf4j</groupId>
            <artifactId>slf4j-simple</artifactId>
            <version>1.7.21</version>
        </dependency>


spark-core is the spark framework whereas slf4j-simple is for logging. Once above setup is done we can proceed to actual implement our rest application.

Getting Started with Java Spark

Following is a simple Spark code that starts a server and returns "Hello World!" in the response -

import spark.Request;
import spark.Response;
import spark.Route;
import spark.Spark;

/**
 * 
 * @author athakur
 *
 */
public class HelloWorldWithSpark {

    private static final Logger logger = LoggerFactory.getLogger(HelloWorldWithSpark.class);

    public static void main(String args[]) {
        Spark.get("/", new Route() {

            public Object handle(Request request, Response response) throws Exception {
                logger.debug("Received request!");
                return "Hello World!";
            }
        });
        ;
    }

}

Just run above Java code. It should start a jetty server and start listening for incoming requests. Default port that server listens on is 4567. So after running above code go to the browser and access following url  -
You should see "Hello World!" in the response.


Spark exposes static methods that let you define the URLs or routes you want to do some processing on and return some response. In above example we are listening on path "/" which is the root path and returning "Hello World!".


Same code in Java 8 perspective using functional programming/lambda would be -

public class HelloWorldWithSpark {

    private static final Logger logger = LoggerFactory.getLogger(HelloWorldWithSpark.class);

    public static void main(String args[]) {
        Spark.get("/", (req,res) -> {
            return "Hello World!";
        });
    }

}


NOTE : Here we are using GET verb but you can use any like POST, PUT etc.


You can easily create REST APIs from this. Sample example given below -

public class HelloWorldWithSpark {

    private static final Logger logger = LoggerFactory.getLogger(HelloWorldWithSpark.class);

    public static void main(String args[]) {
        
        Spark.get("/employee/:id", (req,res) -> {
            logger.debug("Got request to get employee with id : {}", req.params(":id"));
            return "Retrieved Employee No " + req.params(":id");
        });
        
        Spark.post("/employee/:id", (req,res) -> {
            logger.debug("Got request to add employee with id : {}", req.params(":id"));
            return "Added Employee No " + req.params(":id");
        });
    }

}


That was simple. Wasn't it? You want to deploy it in production like an actual web application in form of war you need to follow a bit different steps -


Related Links

Friday, 17 March 2017

Understanding HTTP Strict Transport Security (HSTS)

Background

Have you any time tried to visit a site by typing "http://" in your web browser and the site that loads corresponds to "https://". Well it happens a lot of time. A website may support only https - secure connections and browser is smart enough to know this. How? We will see that in a moment.

My use case was for using a proxy to intercept browser traffic. As you know any proxy will intercept traffic and then send it's own certificate to the browser and if browser does not recognize the cert it shows the error -
  • "Your connection is not secure"... SEC_ERROR_UNKNOWN_ISSUER
You may go in Advanced tab and then add exception to start trusting the new certs for your testing. But it is not always possible and well see why?

NOTE : If you are not trying something on your own and dont understand why above prompt came its time to turn back. Your network traffic may be getting intercepted by some hacker using MITM (Man in the middle) attach to steal sensitive data like passwords.

WARNING : All the below information is provided only for the use case of pen testing and other security testing. Please do not use it otherwise. All of the below features are provided for your security. Playing around with it without understanding can compromise your security. So proceed on your own risk.

HTTP Strict Transport Security (HSTS)

As per Wiki,

HTTP Strict Transport Security (HSTS) is a web security policy mechanism which helps to protect websites against protocol downgrade attacks and cookie hijacking. It allows web servers to declare that web browsers (or other complying user agents) should only interact with it using secure HTTPS connections,[1] and never via the insecure HTTP protocol. HSTS is an IETF standards track protocol and is specified in RFC 6797.

How this works is that your webserver eg. Apache or NGINX is configured so that in each response header it sends header corresponding to  HSTS
  • Strict-Transport-Security "max-age=63072000"
max-age is the expiry time. So the HSTS will be applicable till this much time.

NOTE : This is updated every time you visit the site. So if this time period is 2 years them each time you visit the site this will be set for next 2 years.

For eg see below in case of techcrunch -


Working of HTTP Strict Transport Security (HSTS)

Browser once it receives stores this data corresponding to each site. In case of Firefox you can see it as follows -
  1. Type about:support in firefox tab
  2. Click on "Show in Folder". This should open your firefox profile folder.
  3. In this search for a file called SiteSecurityServiceState.txt and open it.
  4. Firefox stored HSTS data for sites in this file.
Steps in screenshots -


NOTE : As mentioned earlier this entry is updated every time you hit the url in your browser. Exception is incognito mode in which case entry from this file is removed once incognito is close. However note that if you have visited the site even once in non incognito mode then the security restrictions will be obeyed even in incognito mode.

Working :
  • This tells browser that every subsequent connection should always be https (secure). So even if you try to access http version of the site browser will convert it to https and proceed. 
    • For eg. You can try hitting "http://techcrunch.com/" and it will automatically hit "https://techcrunch.com/"
  • Another effect it has it that if this header is set then you cannot add exception for the certificate which does not match the original one (the one browser does not trust). Eg in screenshot below -

NOTE : I am using Zap proxy. You can use any others like Fiddler or Burp. I have written posts on this before you can revisit them if needed.

How to bypass HSTS?

Well now that we know where firefox stores this data it is easy to bypass this. All you have to do is remove the entry from this file. You can probably change the permission of this file so that new entry is not made in it. When tried for techcrunch you can see you can get back option to add certificate exception -


NOTE : For above to work make sure firefox is closed else it can overwrite the file.

NOTE : Above workaround will not work for the well known sites like google since for them the entries are hardcoded into browser code. Please do share if you know of any workaround for this.

NOTE : In the above mentioned file you might also see entries corresponding to HPKP. A HTTP Public Key Pinning (HPKP) header instructs clients to pin a specific public key to a domain. So, if a HPKP-supporting browser encounters a HPKP header, it will remember the specified public key hashes and associate them with that domain. In the future (until the specified max-age timeout expires), the browser will only accept a certificate for that domain if any key in the certificate's trust chain matches one of the associated hashes.


Wednesday, 8 March 2017

Understanding Cross-site scripting (XSS)

Background

As per wiki
             Cross-site scripting (XSS) is a type of computer security vulnerability typically found in web applications. XSS enables attackers to inject client-side scripts into web pages viewed by other users. A cross-site scripting vulnerability may be used by attackers to bypass access controls such as the same-origin policy.
       We will see this in details as to how web applications can be vulnerable to an XSS attack and how can it be safeguarded. This is the most common known security vulnerability. You can use 3rd party produces like IBM App scan to check for security vulnerabilities in your web applications.


Types of XSS attacks

There are many variants of XSS attacks but the major ones are -
  • Reflected or Non persistent XSS attack
  • Stored or persistent XSS attack

Reflected or Non persistent XSS attack

Out of this reflected is most common. In this type if xss malicious script is executed on clients browser and sensitive data might be stolen.

For eg. lets take a search field on some social networking site. You generally type is words their to either search for a particular word in your feed or to search your friend/family members. When you do this in the resultant page you see something like - "Search result for - your search query". Now if your social networking site is not safeguarded from xss attacks, attacker might inject a malicious script in the search query that will get executed when you do a search which will result in the attacker stealing your data. Worst case your authorization cookie is stolen and your account is compromised.

As stated in Wiki - A reflected attack is typically delivered via email or a neutral web site. The bait is an innocent-looking URL, pointing to a trusted site but containing the XSS vector. If the trusted site is vulnerable to the vector, clicking the link can cause the victim's browser to execute the injected script.

So when you get that mail again saying hey please review these bull**** documents please do not click it. It's either a spam or worst - attempt to steal your sensitive data, since you are logged into multiple sites with active sessions. Always see who is it sent from? Do you know that person? Does the link look suspicious? No one will give you money just like that or you will not be selected for a lucky draw without applying for it :). If you are curious as to what it actually is then copy the link and open it in incognito mode which have no active sessions or logins. Now if it asks you to login it's time to turn around.

Now what do we mean by  innocent-looking URL? The URL is infact that for a trusted website. All attacker will do is inject an XSS vector in one of the request parameters. Say search parameter like in example above. He will also encode script tags and other characters so that the victim user will not be able to guess it's the affected URL. Anyway well soon see a real example of this with working code and the fix. Now lets see persistent xss.

Stored or persistent XSS attack

This is even worst that then the reflected one because this xss attack vector is stored on websites server (perhaps in it's persistent DB) and it will get executed every time user navigates to the section that uses this xss affected code. Lets see an example.

Consider a forum used to discuss programming related QnA. Again if the site is not safeguarded against XSS attacks then an attacker can ask a question which seems normal and legit but at the end contains a malicious script/attack vector. Now when he publishes the question it gets stored in the sites persistent storage and when any user tries to visit this question this malicious script will get executed on his/her browser and again your sensitive data can be stolen.

It's not always about the victims sensitive data though. An attacker can use XSS attack to permanently change the websites appearance or change display texts. Consider the damage it can do. For eg. attacker can change the announcement made by a reputed company which can result in it's stock prices crashing.

Enough with the theory let's see a practical example -

Testing for XSS

Code for this demo is available on my git repository  -
It's a web app. So you can download it and run it in a web server like apache tomcat. For this demo I will use my local setup.

NOTE : This web project has multiple workflows. The files you are interested in are -
This demo also assumes you are familiar with webapps, JSP, Java, Spring etc. I have written multiple posts on these topics in the past. You can search those in this blog if you are interested.You can find everything starting from configuring and using ivy dependency management to developing sample Spring application to deploying apps on tomcat. Above web app uses all these.

Once you have deployed the web app you can open it in your browser. It should look like following -


You can add normal text in the search box and do a "Search" or a "Search Xss Protect". Everything should work fine. For eg. when I input - "I am groot!", it just shows me the query I have input -


Now lets do "Search Again" and perform a normal "Search". But this time we will search differently. Enter following query in the search box -
  • I am groot!<script>alert(10)</script>
The result is -


As you can see we do see our normal result but we also see a prompt with 10 in it. Now if you revisit our input query we added a script tag at the end and the browser executed it. This was just for the demo, attackers script will execute silently in the background without prompts and steal/modify your data.

Now lets repeat the same search with text -
  • I am groot!<script>alert(10)</script>
Only this time you press "Search Xss Protect". What do you see?


What happened here? No prompts? That's because we escaped out input so that it is not harmful which is exactly what the fix is. You need to escape your user inputs so that they are not executed by your browser as scripts. Now that you have seen a demo of how XSS behaves and how you could safeguard it lets see how it actually works from code perspective.

Code working

You need to revisit the JSP file -
The main culprit line here is -
  • Your input : <%=query %
This essentially evaluates the query from Java. If this has script tags those will be evaluated too. What do we do? We escape it before this line is reached which is precisely what the code does when you press protected search -

        String xssProtect = request.getParameter("xssProtect");
        if(xssProtect != null && xssProtect.equalsIgnoreCase("yes")) {
            query = ESAPI.encoder().encodeForJavaScript(query);
        } 


NOTE : xssProtect is something I have internally used to differentiate between normal search and protected search for demo purposes. You need not worry about it. In production you should never have a normal search like scenario.

NOTE : ESAPI is a library that OWASP (Open Web Application Security Project) recommends. You can see a bunch of links in the related links section below. But you can technically use any library that escapes html like coverity security lib.

NOTE : Above was an example of reflected or non persistent XSS attack. What if we were storing this search queries in our internal DB and showing search history for a user? In that case it would be a persistent XSS attack.

Though above demo was a means to show you how XSS actually works and how it can be safeguarded you should never code it this way. JSP should never have such logic. All of this should be in backend logic possibly your servlets and controllers.

Related Links

Sunday, 15 November 2015

Create your own chrome plugin example demo

Background

In this post we will see how to create chrome plugins. We will see a simple demo plugin example in which when we click on the plugin icon we will will see the URL of current active TAB.


Getting Started

Create a directory where you will create files needed for your plugin. Lets call it "chrome_plugin" directory. 
  • First and foremost what you need is a file called manifest.json. This file essentially tell chrome browser details about your plugin like it's name, it's version, what permission it needs and the actual code files.

For our demo this file looks something like below -

{

  "manifest_version": 2,
  "name": "Open Source For Geeks Chrome Test Plugin",
  "description": "This extension will just show current active Tab URL",
  "version": "1.0",

  "browser_action": {
   "default_icon": "icon.png",
   "default_popup": "popup.html"
  },

  "permissions": [
   "activeTab"
   ]

} 


Contents of manifest.json file are basically json with plugin details. As you must have notices by now it references two essential resources -
  1. icon.png
  2. popup.html
  • Go ahead and put icon.png and create a file called popup.html is the same directory - "chrome_plugin".


 If you do not have the icon you can use the one above. It's 20*20 pixels icon.

  • Next edit popup.html with following contents - 

<!doctype html>

<html>
  <head>
    <title>OSFG Chrome Demo Plugin</title>
    <script src="popup.js"></script>
  </head>
  <body>

    <h1>Current Site URL : </h1>
    <br/>
    <div id="currentTabUrl"></div>
  </body>
</html>


Again a simple HTML file but note it asks to load a popup.js javascript file.

  •  Go ahead create a file called popup.js and add following contents to it -

function getCurrentActiveTabUrl(callback) {

  var tabQueryInfo = {
    active: true,
    currentWindow: true
  };

  chrome.tabs.query(tabQueryInfo, function(tabs) {
    var currentTab = tabs[0];
    var url = currentTab.url;]
    console.log(url);
    console.assert(typeof url == 'string', 'currentTab.url should be a string');
    callback(url);
  });

}
  

function renderOutput(outputText) {
  document.getElementById('currentTabUrl').innerHTML = "<a href='" + outputText + "'>" + outputText + "</a>";
}

document.addEventListener('DOMContentLoaded', function() {
  getCurrentActiveTabUrl(function(url) {
        renderOutput(url);
  });
});


Take some time to see the javascript code above. It essentially reads the current active TAB url and shows it in the popup in an anchor tag. And there you go your first chrome plugin is all set to be deployed.

NOTE : Most of the chrome APIs are asynchronous. So you cannot do something like -

var currTabUrl;
chrome.tabs.query(queryInfo, function(tabs) {
  currTabUrl= tabs[0].url;
});
alert(currTabUrl); // Will show "undefined" as chrome.tabs.query is async.


Deploying your chrome plugin

Deploying your plugin is again quite simple
  • Go to chrome://extensions/ URL is your chrome browser. Here you should see list of existing chrome extensions you are using.
  • Make sure "Developer Mode" check box is selected.

  • Now click on "Load Unpacked Extension" and select the folder you have plugin in - "chrome_plugin" directory is this case.

  • Now open any tab. You should see the plugin with icon you had put in the directory just besides Omnibox. Go to any URL and then click on the plugin icon.  


 You can download this sample chrome plugin code from here.

Appending custom methods to chrome right click Menu

Lets see how we can add custom functions to right click menu. Here is what we are going to do -  we will add a new option on right click which enables to search selected text in google maps.


The new manifest.json file looks like the following - 

{
  "manifest_version": 2,

  "name": "Chrome Test Plugin",
  "description": "This extension will just show current active Tab URL",
  "version": "1.0",
  
  "background": {
    "scripts": ["background.js"]
  },
  "browser_action": {
   "default_icon": "icon.png",
   "default_popup": "popup.html"
  },
  "permissions": [
   "activeTab",
   "contextMenus"
   ]
}

Notice couple of differences here
  1. There is a new permission added called contextMenus. This basically lets you operator om chrome context menus.
  2. There is a new key added called background that basically tells chrome about background processes. You can specify scripts or page here.
 Next in background.js add following code

function searchgooglemaps(info)
{
 var searchstring = info.selectionText;
 chrome.tabs.create({url: "http://maps.google.com/maps?q=" + searchstring})
}

chrome.contextMenus.create({title: "Search Google Maps", contexts:["selection"], onclick: searchgooglemaps});


 And you are done. Reload the extension.


When you click on "Search Google Maps" you should see a new Tab opening with google maps and a search location of your desired selected String.


Related Links

Saturday, 26 September 2015

Deleting a project from Chrome Rest client

Background

Making REST API calls from some client to test out stuff is normal for any programmer. Programmers use various REST clients. I have seen most of the programmer use either
  1.  Postman or
  2.  Advanced REST client.
I prefer the  later one. No particular reasons but I just started with Advanced REST client so continuing with the same.


So in Advanced REST client you can save your REST calls in a PROJECT. A project can have multiple REST calls associated with it. This is where I was stuck. I created multiple projects with some dups and wanted to clean it up. Advanced REST client allows you to delete the API calls from the project but not the project itself. So naturally you looks for workarounds and today I will show you one.

Solution is quite simple. You delete it yourself from the application database. All you need to know is where and how. We will see that now.


 Deleting a project from Chrome Rest client

I have created a dummy project named GREETINGS and have added a dummy API call called ADD_CUST. Deleting API call is easy. Just click the delete icon just besides the API selector on the top.


As you must have notices we do not have option to delete project itself. Lets see how we can do that by deleting project from App database. Follow below steps

  1. Right click 
  2. Inspect Element 
  3. Go to resources Tab
  4. Select restClient DB
  5. view projects table

You will see all the projects listed there.


Notice the ID of the project here. it's 10. We will use it later.  For now lets just see how can we run SQLs here. For this click on the database -restClient in this case. You should see a prompt. You can enter your SQL queries here.

Run simple query :
  • select * from projects;
You should see list of all available projects.


 Finally lets see how we can delete a project. Execute following query.

  • delete from projects where id=10;
Your project should get deleted from the DB. You can verify it by running select again.


Now simply refresh the page and you should see your project gone!


Saturday, 4 July 2015

Understanding CSS Specificity

Background

Life is good when you have a small web project with limited and simple CSS but as your project size grows and more CSS is to be applied complexity increases. 

In there are two or more conflicting CSS rules that point to the same element then your web browser will apply some rules to figure out which rule should be given higher precedence and be applied.

We term this rule weight as selectivity. More the selectivity more is the preference given to that rule.

Example


Enough of the theory lets see an example. Consider following html

<html>
    <head>
        <style type="text/css">
            .redbutton{color: red;}
            .bluebutton{color: blue;}
             #innerdiv input {color: green;}
        </style>
        <script src="http://ajax.googleapis.com/ajax/libs/jquery/1.7.1/jquery.min.js" type="text/javascript"></script>
        <script>
            function changecolor()
            {
                jQuery("#colorbutton").addClass("bluebutton");
            }
        </script>
    <title>Testing CSS Selectivity</title>
    </head>
    <body>
        <div id="ouderdiv">
            <div id ="innerdiv">
                <input id="colorbutton" type="button" class="redbutton" value="Click Me" onclick="changecolor()"/>
            <div>
        <div>
    </body>
    
</html>

What do you expect will be the color of the button on page load and on click ? Well think a bit and then try it out. Paste above html in a file and open it in any browser. Observer the color, click on the button and then observer the color again. 

Before Cick

After Click


Whats happening?

Have questions? Will be answered soon. Lets take a step back and review our html code. We have a button. For this button we provided a class called redbutton (which should make the button red) and then on click we are dynamically changing the class to bluebutton (which should make the button blue). But none of these worked. It is still green. As you must have guessed correctly by now there is another css rule that is getting applied.

#innerdiv input {color: green;}

But why? Because CSS specificity of this rule is more than other class rules that we have defined. Next natural question - How is css specificity determined by the browser?

How is CSS specificity calculated?

There are some basic rules to determine specificity of a CSS rule.

Determination of specificity of a CSS rule depends on what type of selector is used
  • HTML selector (Eg input) has specificity 1
  • Class selector (Eg .redcolor) has specificity 10
  • ID selector (Eg. #innerdiv) has specificity 100
And if you have multiple such selectors in an CSS rule then their individual specificity just get added to form rule specificity that is used by the browser to determine precedence.

Here are few example
  • a - specificity 1 (1 HTML selector)
  • div a - specificity 2 (2 HTML selectors,  1+1)
  • div .someclass - specificty 11 (1 HTML selector and 1 class selector, 1 + 10)
  • div #someid - specificity 101  (1 HTML selector and 1 id selector, 1 + 100)  
  • div #someid .someclass - specificity 111  (1 HTML selector and 1 id selector and 1 class selector, 1 + 100 + 10)  

and so on.... Hope you got the point.

Note : If two conflicting rules have same selectivity then the one applied or parsed later is picked up.

So lets apply it to our rules.

  • .redbutton{color: red;} - specificity 10 (1 class selector)
  • .bluebutton{color: blue;} - specificity 10 (1 class selector)
  • #innerdiv input {color: green;} - specificity 101 (1 id selector and 1 html selector, 100+1)
So how can we leverage this information now? Lets increase the specificity of first two color rules now.

  • #innerdiv .redbutton{color: red;} - specificity 110 (1 id selector and 1 class selector,100+10)
  • #innerdiv .bluebutton{color: blue;} - specificity 110 (1 id selector and 1 class selector,100+10)
  • #innerdiv input {color: green;} - specificity 100 (1 id selector and 1 html selector,100+1)

With above rules now test our page again.

 Before Click


 After Click


That's all with CSS selectivity. Ideal scenario is when no two rules conflict but in my personal experience conflicting rules are bound to happen for a big web project. This is when this rules come handle. Let me know if you still have any questions :).

Saturday, 25 October 2014

Automating a web page button click using HtmlUnit

Background

HtmlUnit is a "GUI-Less browser for Java programs". It models HTML documents and provides an API that allows you to invoke pages, fill out forms, click links, etc... just like you do in your "normal" browser.

It has fairly good JavaScript support (which is constantly improving) and is able to work even with quite complex AJAX libraries, simulating either Firefox or Internet Explorer depending on the configuration you want to use. 


So in this post I am going to host a simple HTML page on a server and use HtmlUnit to get that page and perform click action on the button on that fetched page.


Setting up the server

I am going to use NodeJS to setup the server that renders our simple page with a button. It's a simple fastest way to host a server. You need to have NodeJS installed on your machine for it. I had written a post earlier on it - installation and printing response on server request. You can go through that to setup and go through the basic workflow -


In a directory create two file index.html and server.js and put in the following contents in it.


index.html - 

<html>
<head>
<title>Hello World!</title>
<script>
function displayHelloWorld()
{
    alert("Hello World");
}
</script>
</head>
<body>
<center>
<h3>Hello World Demo by Open Source for Geeks</h3>
<button type="button" id="buttonId" onclick="alert('Hello world!')">Click Me!</button>
</center>
</body>
</html>


server.js -

var http = require('http'),
fs = require('fs');

fs.readFile('./index.html', function (err, html) {
    if (err) {
        throw err; 
    }       
    http.createServer(function(request, response) {  
        response.writeHeader(200, {"Content-Type": "text/html"});  
        response.write(html);  
        response.end();  
    }).listen(8000);
    console.log('Server running at http://127.0.0.1:8000/');
});


and that's it you can start the server by executing node server.js


you can then view the page from your browser - http://localhost:8000/


Go ahead click on the button. You should be able to see "Hello World" alert.


Our server is now ready. We are basically trying to automate this click by using HtmlUnit.

Getting Started with HtmlUnit

As usual I am going to use Ivy as my dependency manager and Eclipse as my IDE. You are free to choose yours. I am using 2.15 version (latest) of HtmlUnit [ Link To Maven Repo ].

My Ivy file structure looks something like - 

<ivy-module version="2.0" xmlns:xsi="http://www.w3.org/2001/XMLSchema-instance"
       xsi:noNamespaceSchemaLocation="http://ant.apache.org/ivy/schemas/ivy.xsd">
    <info
        organisation="OpenSourceForGeeks"
        module="HtmlUnitDemo"
        status="integration">
    </info>
    
    <dependencies>
        <dependency org="net.sourceforge.htmlunit" name="htmlunit" rev="2.15"/>        
    </dependencies>
</ivy-module>

Lets get to the code now - 

Lets create a class called WebpageButtonClicker.java and add our code in it.

import java.io.IOException;
import java.net.MalformedURLException;

import com.gargoylesoftware.htmlunit.AlertHandler;
import com.gargoylesoftware.htmlunit.FailingHttpStatusCodeException;
import com.gargoylesoftware.htmlunit.Page;
import com.gargoylesoftware.htmlunit.WebClient;
import com.gargoylesoftware.htmlunit.html.HtmlButton;
import com.gargoylesoftware.htmlunit.html.HtmlPage;


public class WebpageButtonClicker {
    
    public static void main(String args[]) throws FailingHttpStatusCodeException, MalformedURLException, IOException {
        WebClient webClient = new WebClient();
        webClient.setAlertHandler(new AlertHandler() {
            
            @Override
            public void handleAlert(Page page, String message) {
                System.out.println("Alert was : " + message);
                
            }
        });
        HtmlPage currentPage = webClient.getPage("http://localhost:8000/");
        HtmlButton button = (HtmlButton) currentPage.getElementById("buttonId");
        button.click();
    }
    

}


that's it. Now run the Java code. You should see the following output.

Alert was : Hello world!

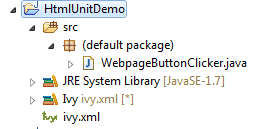
For the reference project structure looks like

Note : See how we have registered a Alert handler in above code. It is a callback that is received on any alert that is triggered. Similarly you can have handlers registered for multiple events like prompt and refresh.

Related Links


t> UA-39527780-1 back to top